
Installation Instructions


3
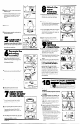
Remove old
disposer.
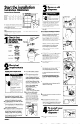
Start the installation
Installation dimensions
Garbage Disposer Dimensions
Electrical Shock Hazard
- II
Disconnect from electrical
SuPPlY.
Failure to do so could result
in death or electncal shock.
Compare your new disposer mountrng
assembly with the exrstrng mountrng.
If the mounting assemblres are the same,
complete Steps 3-A, B, D, E.
A. Using a pipe wrench, disconnect the drain
line where It attaches to the disposer waste
line pipe.
6. If old disposer mounting is the same as
your new one,
insert end of jam-breaker
wrench or screwdriver into right side of a
disposer mounting ring lug at top of
disposer. Hold disposer with other hand
Turn jam-breaker wrench or screwdriver
counterclockwrse until lug lines up with one
of the sink-mounting assembly screws.
B* - Distance from bottom of sink to center
line of disposer outlet, Add l/2 inch when
stainless steel sink is used.
C* - Lenqth of waste line oroe from center
line of dysposer outlet to end of waste line
pipe.
IMPORTANT: Plumb waste line to prevent
standing water In the disposer motor
housing.
Drawing shows just one model type.
Check that
all parts were
“;y
I
screw
I
included.
gasket
Caution: Potential Property Damage.
Hold disposer with one hand while
turning to prevent it from falling when
the mountrng ring is disconnected.
Failure to do so could result in damage
to cabinet or floor.
Drawing
shows just one model type.
Mounting
assembly
sink flange
F!!v
I
2 rubber
screw(s) metal flange
Remove disposer Go to Step 3-D.
C.
If old disposer mounting is different from
your new one,
remove the nuts on the
mounting ring usrng pliers or an adjustable
wrench. Remove old disposer. You may
need to remove a clamp or Mist the
disposer to remove it.
D.Turn disposer upside down and remove the
electrical plate.
mounting ring
and 3 screws
snap ring
2
Electrical
requirements
E* Use a screwdriver to remove the grounding
wire Remove wire nuts from power
wires. Separate disposer power wires
from the cable wires Loosen screw(s)
on strain relref and remove cable from the
disposer.
E.
A U.L.-listed conduit connector
must
be provided at the junction
box.
F.
It is the personal responsibrlity
and obligation of the customer to
contact a qualified electrician to
assure that the electrical installation
is adequate and is in conformance
with the National Electrical Code
ANSI/NFPA 704atest edition* and
all local codes and ordinances.
Copies of the standards listed
may be obtained from:
* National
Fire Protection
Association
Batterymarch Park
Quincy, Massachusetts 02269
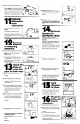
G.For continuous feed models:
Install a 15- or 20-amp wall
Electrical ground is required on this
appliance.
If old disposer mounting is the same
as your new disposer mounting, go to
Step 5.
Electrical Shock Hazard
Electrrcal ground is required
on this appliance.
1 Do Not ground to a gas pipe
Do Not have a fuse In the neu-
tral or grounding circuit.
Check with a qualified
electrlcian if you are not sure
the appliance is properly
grounded.
Failure to follow these
instructions could result in
death or electric shock.
E Loosen screws and remove the mounting
ring and back-up rings. A hammer may be
needed to loosen nngs.
6 Push old sink sleeve up through the srnk hole
and remove.
A.
120 Volt, 60 Hz, AC only, 15 or 20 Ampere
fused electrical supply is required. (Time-
delay fuse or circuit breaker is recommended.)
It is recommended that a separate circuit
serving only this appliance be provided.
B.
THE DISPOSER MUST BE CONNECTED WITH
COPPER WIRE ONLY.
C. Wire sizes and connections must conform
to the requirements of the National Electrical
Code, ANSI/NFPA 704atest edition* and all
local codes and ordinances.
switch above the countertop and
junction box inside cabinet as
shown. (switch and electrical
wiring can be obtained locally.)
Position switch in a convenient
location. Connect switch to
junction box.
D.This appliance should be connected to the
fused-disconnect (or circuit breaker) box
through flexible, armored or nonmetallic
sheathed, copper cable (with grounding
wire>. The flexible armored cable extending
from the appliance should be connected
directly to the junction box.
H.Clean sealant from sink hole rim usrny a
screwdriver or putty knife to scrape away all
traces of putty or caulking from the sink hole
rim. Hole rim
must
be as clean as possible
for a yood, watertight seal.
4
To install our
sink’s firs Y
disposer :
A.
Use wrench to loosen nut at top of
“P”-trap.
PANEL A