
Installation Instructions


8
Attach the
upper
mounting
m m
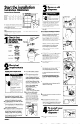
6. Remove nut at top of sink strainer. Remove
extension pipe.
C.
Loosen the large-diameter nut at the base
of the strainer by placing the trp of a
screwdriver on the ridge of the nut and
gently tapping the screwdnver with a
hammer.
assembhr,
IA
gasket
A. Working from under sink, slip the ccond
rubber gasket, then the metal back-up ring
(flat side up>, up and over sink flange
8. Holding the rubber gasket and metal back-
up ring in place, attach the mounting ring to
the sleeve with the three mounting ring
screws Do Not tighten screws at this time.
D. Remove nut.
C.
Push rubber gasket, metal back-up ring and
mounting ring further up sink sleeve. Slide
snap ring onto sink sleeve until it pops Into
place in the sleeve yroove.
E.
Push the strarner assembly up through the
sink hole and remove
5
Clean sinkS
drain line.
If installing in a new home, go to Step 6.
Remove drain trap Using an auger, clean out
the horizontal drain pipe that runs from the
trap to the main waste pipe.
D.Tighten mounting screws until entire
mounting assembly is seated evenly and
tightly against sink.
1 D.t-i I
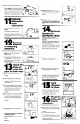
9
Make
electrical
connections
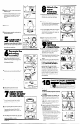
Watch these t&b
spots when routin
the auger.
l
A.
Remove electrical plate from the bottom
of the new disposer Pull out the black and
white electrical wires Locate the yreen
grounding screw under plate.
B. Insert strain relief Into hole Insert power
Separate the
mounting
assembly.
supply cable through strain relief. Pull cable
1 _
wires through opening where disposer
wires are located. Tighten strarn relief
screws.
C.
Connect power supply cable wires to the
disposer wires using electrical wire nuts or
by soldering wires together. Be sure to
connect
white to white, and black to
black.
Wrap wire connections with
electrical tape. Put wires back inside
disposer housing. Note: This appliance is
equipped with copper lead wires. If
connection is made to aluminum house
wiring, use only special connectors which
are approved for joining copper to
aluminum wires in accordance with the
national electrical code and local codes
and ordinances.
A Holding the mounting assembly with one
hand, use the other hand to insert jam-
breaker wrench into one of the lugs of the
lower mounting ring. Turn assemblycounter-
clockwise and remove.
B.
Loosen screws on mounting assembly until
they are level with mounting ring surface.
C.
Use screwdriver to pry off snap ring
Electrical ground is required on this appliance.
Failure to follow these instructions could result
sleeve 1
I
w
in death or electric shock.
D.
Take assembly apart and set aside
Electrical ground is required on this
appliance.
DO NOT reconnect electrical current to
main service panel until proper ground
is installed.
A.If
the cable leading to the disposer has
three wires,
attach the green grounding
wire to the green Qrounding screw. Go to
Step 10-D
B.
If the cable does NOT have a grounding
wire,
attach a length of copper wire (no
smaller than the other cable wire) to the
yreen yrounding screw
C.
Attach the other end of the grounding wire
to a yrounded metal cold water pipet
DO NOT ground to a gas supply line or
hot water supply line.
Use grounding clamp to secure wire to
pipe. If non-metal or plastic pipe IS used In
water connectrons or water supply you must
have a qualifted electrician install a proper
yround.
*Grounded cold water pipe must have metal
contlnulty to electrlcal ground and not be
Interrupted by plastic, rubber or other electrIcal-
lnsulatlny connectors such as hoses, flttlngs,
washers, or gaskets (Including water meter or
pump)
7
Apply rubber
s
asket or putty
o sink flange.
A.
The rubber sink flange gasket should always
be used where possible. Place rubber
gasket over sink flange. Go to Step 7-C.
IA. -
U
B.
If sink opening does not permit the use of a
rubber seal, plumber’s putty may be used.
Form putty into a long roll by rolling it
between your hands. Press roll under sink
flange rim.
C.
Place flange into sink drain hole. Push down
gently, but firmly to make sure flange sits
evenly over yasket or In putty
PANEL B