
Installation guide

Instruction Sheet W11036888 Rev A 10/16
Instruction Sheet
for Handle Kit
— 1 —
1. Remove handles from doors by lifting directly upward.
NOTE: Some products may have handles mounted with set
screws. You will need to loosen the set screws with a hex wrench.
2. Remove the mounting screws from the doors.
NOTE: Some products may have mounting brackets. You will
need to remove them as well.
3. Secure the four (4) shoulder screws from the handle kit into
the existing holes in the refrigerator and freezer doors using
a Phillips screwdriver.
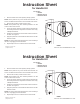
4. Position the handle above the shoulder screws mounted on
the door. See Figure 1.
5. Applyrmpressureonthehandletoslideitdownontothe
shoulder screws.
NOTE: Do not push the handle toward the door, this can damage
the door. Only apply pressure downward.
6. Repeat steps 4 and 5 to install the freezer door handle.
2 Handles
4 Shoulder Screws
1 Instruction Sheet
Kit Contains:
figure 1
© Whirlpool Corporation 2016
(All Rights Reserved)
Instruction Sheet W11036888 Rev A 10/16
— 1 —
© Whirlpool Corporation 2016
(All Rights Reserved)
Instruction Sheet
for Handle Kit
1. Remove handles from doors by lifting directly upward.
NOTE: Some products may have handles mounted with set
screws. You will need to loosen the set screws with a hex wrench.
2. Remove the mounting screws from the doors.
NOTE: Some products may have mounting brackets. You will
need to remove them as well.
3. Secure the four (4) shoulder screws from the handle kit into
the existing holes in the refrigerator and freezer doors using
a Phillips screwdriver.
4. Position the handle above the shoulder screws mounted on
the door. See Figure 1.
5. Applyrmpressureonthehandletoslideitdownontothe
shoulder screws.
NOTE: Do not push the handle toward the door, this can damage
the door. Only apply pressure downward.
6. Repeat steps 4 and 5 to install the freezer door handle.
2 Handles
4 Shoulder Screws
1 Instruction Sheet
Kit Contains:
figure 1