
Installation guide


continuedfrompage8 suite de/a page 8
4So
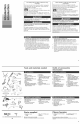
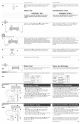
Install a mating, three-prong, grounding-type wall receptacle
O in the cabinet next to the dishwasher opening. Go to
step 6.
Instalier darts Ie placard _ c0t6 de I'ouverture du Iave-vaisselb
une 0 prise de courant _trois alv6obs reli@ _ ia terre. Passer
t'6tape6.
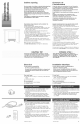
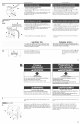
Water line Canalisatien d'eau
Routing the water line through the left slde of Fairs passer ma¢anaUsation d,eau du ¢6t6 gauohe de
m
m
Cut a 1/2" (1.3 cm) minimum hole @ in bft-hand cabinet
side, rear or floor. Optional locations are shown.
Percer une ouverture minimaie de 1,3 cm (1/2 po) O dans ie
placard du c6t6 gauche de I'ouverture, _ I'ar@re ou darts le
piancher. Les endroits facuitatifs sent indiqu6s.
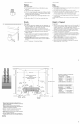
Measure overall length of copper tubing @ required, Attach
copper tubing to water fine with manual shutoff valve,
Carefully feed copper tubing through hob in cabinet (copper
tubing will bend and kink easily) until it is far enough into the
cabinet opening to connect it to dishwasher inlet on the front
left of dishwasher,
Mesurer Ia Iongueur totate du tube @ de cuivre requis.
Raccorder ie tube de cuivre a la canalisation d'eau avec un
robinet d'arr6L Fairspasser doucement ietube de cuivre dans le
trou du piacard (Istube de cuivre se courbe et s'6crase
faciiement) jusqu'_ ce qu'ii p@_tre assezioin darts i'ouverture
pour 6tre raccord6 _ la prise _ I'avant du c6t6 gauche du laveo
vaissetle.
m Turn shutoff valve @ to "ON" position. Flush water into a
bucket to get rid of particles that may clog the inlet valve.
Ouvdr Ie robinet d'arr6t O AIa position "ON". Laisser un jet d'eau
puissant s'@oubr darts un seau pour qu'ii entraTnetoutes bs
particules qui pourraient obstruer lavalve d'entr@ d'eau.
m
Turn shutoff valve to "OFF"position.
Fermer b robinet d'arr6t a la position "OFF".
9
10.
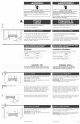
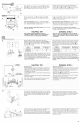
Drain hess
Cut a 1=1/2"(3.8 cm) diameter hole in cabinet wall or floor on
the side of the opening closest to the sink.
Tuyau de d6eharge
Perceruntrou de3,8cm (1 1/2 po)dediametredansla paroidu placard
oudansle planchersur lec6t6deI'ouvertureleplusprochede I'@ier.
Connect drain hose to waste tee or waste disposer following
one method,
if you have: and:
an air gap
a waste disposer
no air gap*
an air gap
no waste disposer
no air gap*
*an air gap is reoommended
go to step:
11a,
11s.
11b,
11d,
Connecterletuyauded@harge_ unraccordTd'@acoationou un
broyeurded@betscommesuit.
Si VOUS avez :
un broyeur
de d@hets
pasde _royeur
de d@hets
st:
un mldse=siphon
pas debdse=siphon*
un m_dse=siphon
poede bales=siphon*
*on bfise=siphonest resommandd
paesez
11a,
11s,
11b,
11d,
1, Remove the disposer keeekeut pleg. Cut end of drain hose
@ if needed (do not cut ribbed section).
2. Attach drain hose to air gap _ with large spring-type
clamp @. If the drain hose was cut, use a 1-1/2" to 2"
(3.8 to 5 cm) screw=type clamp*.
3. Use a rubber hose connector* (_ with spring or screw=type
clamps* @ to connect air gap to disposer inlet @.
This connection @ MUST be before drain trap @ and at least
20" (50.8 cm) above the floor where dishwasher will be
installed. Go to step 12.
1.0ter I'eperculeattachabledubreyeurded@hets.CouperI'extr6mit6du
tuyaudevidange@ aubesoin(nepascooperlasectionondul6e).
2. Connecterb toyaude@chargeaubrise=siphonOavec onegrossebride
detype_ ressortO Sib tuyaude@charge6taitcoup6,utiliserune
bridedetype_visserde3,8=5cm (11/2=2po).*
3. Utiliseruntuyauencaoutchouc*@ _I'aidedebridesdeserrage_visou
ressort*@ pourconnecterlebfise=siphon_ I'entr@du broyeur@.
Ceraccordement@ DOlTsefaireau-dessusdupi_gedusiphon@ et_one
hauteurminimalede50,8cm(20po)au=dessosduplancheroQserainstall_le
laveovaissdb.Passer_I'_tape12.
jzd)
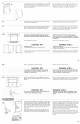
1. Cut end of drain hose @ if needed (do not cut ribbed
section).
2. Attach drain hose to air gap _ with large spring=type
clamp, if the drain hose was cut, use a 1=1/2"to 2"
(3.8 to 5 cm) screw-type clamp*.
3. Use a rubber hose connector* @ with spring or screw=type
clamps* @ to connect air gap to waste tee @.
This connection @ MUST be before drain trap @ and at bast
20" (50,8 cm) above the floor where dishwasher will be
installed, Go to step 12,
continued on page 11
1. CouperI'extr6mit6du tuyaude @charge@ au besoin(ne pas
couperla sectionon@l@).
2. Connecterletuyaude d@hargeau brise=siphon_ avecunegrosse
bridedetype_ ressorLSi letuyaude@charge6taitcoup&utiliser
unebridedetype_ visserde 3,8°5cm (1 1/2o2po).*
3. Dtiliser un tuyauencaoutchouc* @ _ I'aidede brides deserrage
vis ou _ ressort* 6) pour connecterle brise=siphonau raccordT
d'@acuation@.
Ce raccordement @ DOiTse fairs au=dessusdu pi6ge du siphon
@ et _ une hauteur minimaie de 50,8 cm (20 po) au=dessusdu
plancher o_ sera install_ le lave=vaissetle.Passer_ I'_tape 12.
suite _ /a page 11 £0