
Manual


Wood Frame Installation - Style 2
(optional before drywall installation)
Construct wood wall framing so that it is flush with interior
surface of wall studs. The framing must be centered over the
installation location. The height of the framing must allow for
the mounting bracket to be secured to the framing within the
dimensions shown.
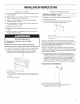
5. Attach the flue mounting bracket to the ceiling using
two 4.8 x 38 mm pan head mounting screws.
A
A. 5V_e" (12.9 cm)
B. 38V_6" to 44V_" (96. 7 cm to 111.9 cm) above cooktop
C. Centerfine
2. After the wall surface is finished, drill two %2" (4 mm) pilot
holes.
3. Install the mounting bracket to the frame using
two 4.8 x 38 mm pan head mounting screws.
.... _ (,_<:c_ .......
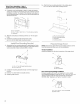
Assemble the flue mounting bracket by attaching the 2 side
brackets to the center bracket using the 2 flat head bracket
screws provided. Adjust outside width as shown,
,/ /"
A. 3.9 x 5. 7 mm flat head bracket screws
B. 9W_6" (24.9 cm)
2. Center the mounting bracket directly over the range hood
location.
3. Drill two s/_6"pilot holes for drywall anchors.
4. Install drywall anchors.
C
il _ _
" i D
A. Flue mounting bracket
B. Hood mounting bracket
C. Centerline
D. Cooktop surface
NOTE: Remove the plastic film from all exterior surfaces of the
hood and decorative flues, prior to final installation,
Vented Installation
Installthe damper into the duct connector of the range hood.
A
i
B
A. Damper
B. Duct connector
Non-vented (recirculating) Installation
Damper supplied with hood is not required in a non-vented
(recirculating) installation. Install the 5" (12.7 cm) to 6" (15.2 cm)
adapter supplied with the Charcoal Filter Kit, Part Number
8212566. See "Assistance or Service" section to order.
A
A. 5" (12.7 cm) to 6" (15.2 cm) adapter
B. Blower collar