Instructions for Installation and Use Fridge / Freezer Model HME40N
Retention of this Instruction Book This Instruction Book must be kept handy for reference as it contains important details on the safe and proper use of the appliance. If you sell or pass the appliance to someone else, or move house and leave it behind, make sure this Book is also provided so the new owner can become familiar with the appliance and safety warnings. If the Book is lost or damaged a copy may be obtained from: Indesit Company UK Ltd.
Operating Instructions REFRIGERATOR/FREEZER COMBINATION Contents GB English,1 Installation, 4-5 Positioning and connection Description of the appliance, 6-7 Control panel Overall view Accessories, 8 Refrigerator compartment Freezer compartment Display, 9-10 Display description Using the display Start-up and use, 11 HME40N Starting the appliance Using the refrigerator to its full potential Using the freezer to its full potential Maintenance and care, 12 Switching the appliance off Cleaning the applian
Installation GB ! Before operating your new appliance, please read these operating instructions carefully. They contain important information for safe use, installation and care of the appliance. ! Please keep these operating instructions for future reference. Pass them on to possible new owners of the appliance. Positioning and connection Positioning 1. Place the appliance in a well-ventilated humidity-free room. 2. Do not obstruct the rear fan grills.
Fitting a new plug GB IMPORTANT: WIRES IN THE MAINS LEAD ARE COLOURED IN ACCORDANCE WITH THE FOLLOWING CODE... Green and Yellow Blue Brown - Earth - Neutral - Live As the colours of the wires in the mains lead may not correspond with the coloured markings identifying the terminals in your plug, proceed as follows: - Connect Green and Yellow wire to terminal marked or coloured Green and Yellow. 'E' or - Connect Brown wire to terminal marked 'L' or coloured red or brown.
Description of the appliance GB Control panel ON/OFF button Display ADJUST/SELECT + button MODE button ECO ON/OFF FREDGE button ON/OFF FRIDGE + RESET ALARM - RESET ALARM button • ON/OFF button switches the whole appliance on and off (refrigerator compartment and freezer compartment). It must be held down for at least 2 seconds. See Start-up and use and Maintenance and care. • ON/OFF FRIDGE button switches the refrigerator compartment on and off. It must be held down for at least 2 seconds.
Description of the appliance Overall view GB Lamp (see Maintenance) A.I.R. SYSTEM (Advanced Integrated Refrigeration) MULTI-USE* bin Removable lidded shelf with EGG TRAYand BUTTER DISH BOTTLE RACK/ CAN RACK* flap door SHELVES FRESH BOX* Compartment FRUIT and VEGETABLE bin FREEZER and STORAGE compartment Removable multipurpose SHELVES BOTTLE FASTENER BOTTLE shelf EASY ICE ice tray STORAGE compartments Levelling FEET DRAIN SYSTEM (see Maintenance) Varies by number and/or position.
Accessories GB Refrigerator compartment 1 2 SHELVES: thanks to the special rails the shelves are removable and the height is adjustable (see diagram), allowing easy storage of large containers and food. Height can be adjusted without complete removal of the shelf. WINE AREA*: to store up to three bottles of wine (see diagram). The air circulates freely between the bottles guaranteeing rapid cooling. When not in use, close it to increase the space on the shelf.
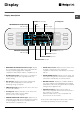
Display Display description GB ALARM indicator light REFRIGERATOR OPERATION indicator light ECO function Scrolling text TIME indicator light ECO ON/OFF FRIDGE + RESET ALARM - ICE PARTY functions FREEZER OPERATION indicator light HOLIDAY function SUPER FREEZE function SUPER COOL function • REFRIGERATOR OPERATION indicator light: displays the set temperature (static digit) or the temperature that is being set (flashing digit) for the refrigerator compartment.
GB Using the display setting the temperature When the appliance is switched on, the standard storage temperatures are automatically set: • +5°C for the refrigerator compartment • -18°C for the freezer compartment. The temperatures that may be set are the following: • between +2°C and +8°C for the refrigerator compartment • between -18°C and -26°C for the freezer compartment To set the temperature: 1.
Start-up and use Starting the appliance Using the refrigerator to its full potential ! Before starting the appliance, follow the installation • Adjust the temperature using the display. instructions (see Installation). ! Before connecting the appliance, clean the compartments and accessories well with lukewarm water and bicarbonate of soda. ! The appliance comes with a motor protection control system which makes the compressor start approximately 8 minutes after being switched on.
Maintenance and care GB Switching the appliance off During cleaning and maintenance it is necessary to disconnect the appliance from the electricity supply: 1. hold the ON/OFF button down for more than two seconds until OFF appears on both indicator displays (refrigerator and freezer). 2. pull the plug out of the socket ! If this procedure is not followed, the alarm may sound. This alarm does not indicate a malfunction.
Precautions and tips ! The appliance was designed and manufactured in compliance with international safety standards. The following warnings are provided for safety reasons and must be read carefully. This appliance complies with the following Community Directives: - 73/23/EEC of 19/02/73 (Low Voltage) and subsequent amendments; -89/336/EEC of 03.05.89 (Electromagnetic Compatibility) and subsequent amendments; - 2002/96/CE..
Troubleshooting GB If the appliance does not work, before calling for Assistance (see Assistance), check for a solution from the following list. Malfunctions: Possible causes / Solutions: The display is completely switched off. • The plug has not been inserted into the electrical socket, or not far enough to make contact, or there is no power in the house. The motor does not start. • The appliance comes with a motor protection control (see Start-up and use). The display is on but it is dim.
Assistance Before calling for Assistance: • Check if the malfunction can be solved on your own (see Troubleshooting). • If the appliance is still not working and the problem persists despite having carried out all the checks, call your nearest Service Centre. model serial number Communicating: • type of malfunction • appliance model (Mod.) • serial number (S/N) This information can be found on the data plate located on the bottom left side of the refrigerator compartment. Mod.
GB Notes 16
Notes GB 17
After Sales Service GB "No company is better positioned to offer an after sales service on a Hotpoint appliance than us - the manufacturer" As part of our commitment to you, all Hotpoint appliances have the added benefit of a fully inclusive parts and labour guarantee for the first 12 months. In addition to this you also have the advantage of free replacement parts for the first 5 years when fitted by a Hotpoint engineer.
GB Guarantee "Satisfaction guaranteed or your money back" We give you a unique 'satisfaction guaranteed' promise - valid for 90 days - after you have purchased your Hotpoint appliance. If there is a technical problem simply call Hotpoint Repair service or visit our web-site at www.theservicecentre.co.uk and where necessary, we will arrange for an engineer to call. If the technical problem is not resolved under this guarantee, we will replace your machine or, if you prefer, give you your money back.
Key Contacts After Sales Service Over 1200 trained specialists, directly employed by us, ensure that you can have complete confidence in both the appliances and services we offer. Repair Service and Information Desk UK: 08709 066 066 (Open 8 to 8 Mon - Fri, 8 to 6 Sat, 10 to 4 Sun & Bank Holidays) www.theservicecentre.co.