
Instruction for Use


7
iten
2. Press the dust-compartment opening button (8)
to open the dust compartment lid (6).
3. Remove the dust bag by lightly pressing the dust
bag support (21).
Dispose of the dust bag in compliance with
all local regulations on waste disposal.
4. Fit a new dust bag to the intake valve (20),
making sure it locks into the dust bag support.
5. Close the dust compartment lid (6) until it clicks
into place.
Make sure the dust bag is properly coupled
to the relevant support to prevent it from
coming loose during use.
Cleaning the Hepa 11 lter (E)
The Hepa 11 lter ensures maximum protection
against allergens and high air quality, because the air
given back by the appliance is entirely free from dust/
powderresidues(lteringpower>99,5%).
We recommend cleaning the lter at least
every 4 months to restore its ltering power.
In any case we recommend replacing the lter at
least every year to ensure maximum performance.
TocleantheHepa11lter:
1. Make sure the appliance is disconnected from
the electrical outlet.
2. Press the dust-compartment opening button (8)
to open the dust compartment lid (6).
3. RemovetheHepa11lter(17)byreleasingthe
opening tab.
4. Washthelterunderrunningwater,takingcare
that the jet of water is not too strong.
5. Holditsothatthewaterowsparalleltoitsfolds.
6. Let it dry at room temperature until all its parts
are thoroughly dry.
7. Re-placetheHepa11lter(17),payingattention
to the positions of the notches.
8. Close the dust compartment lid until it clicks into
place.
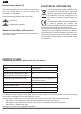
ATTACHMENTS
The attachments can either be supplied as standard
features (based on the model) or be purchased
separately from Hotpoint-Ariston's authorised centres.
CLEANING AND MAINTENANCE
Before cleaning or maintaining the vacuum
cleaner, make sure it has been unplugged
from the electrical outlet. Do not use aggressive
substances or abrasive materials to clean the
appliance, its internal parts and attachments.
Cleaning the appliance
Use a dry or slightly damp soft cloth to clean the
plastic parts (body, dust compartment etc), making
sure that all parts have been thoroughly wiped dry.
Cleaning the attachments
Before cleaning the attachments refer to the chapter
“Attachments”.
Cleaning the dust compartment (C)
For the routine cleaning of the dust compartment:
1. Press the dust-compartment opening button (8)
to open the dust compartment lid (6).
2. Remove the dust bag (19) by lightly pressing the
dust bag support (21) and remove the Hepa 11
lter(17)byreleasingtheopeningtab.
3. Clean the dust compartment by removing any
residual dirt with a small brush. If needed, use a
damp soft cloth, taking care to wipe all its parts
entirely dry.
4. Properly re-place the Hepa 11 lter, paying
attention to the positions of the notches.
5. Re-place the dust bag on the intake valve (20)
untilittsintothedustbagsupport.Thenclose
the dust compartment lid until it clicks into place.
Replacing the dust bag (D)
We recommend always using Hotpoint-
Ariston's original dust bags, because their
special material allows optimum air ltration,
maximum dust/powder retention, high
performances and a long motor life.
We recommend replacing the bag when the
full-bag red indicator lights up. In any case
change it at least once a year to be always sure of
the best efciency of your appliance. The pores of
a bag clogged with dust/powder particles reduce
the motor's suction power and can even damage
it.
1. Make sure the appliance is disconnected from
the electrical outlet.