Operating Instructions COOKER GB GB English, 1 Contents WARNING,2 Installation, 3-6 Positioning and levelling Electrical connection Gas connection Adapting to different types of gas Technical data Table of burner and nozzle specifications Description of the appliance, 7 I5GSH1 /UK Overall view Control panel Start-up and use, 8-10 Using the hob Using the oven Electronic timer Oven cooking advice table Precautions and tips, 11 General safety Disposal Respecting and conserving the environment Care and
WARNING GB WARNING: The appliance and its accessible parts become hot during use. The internal surfaces of the compartment (where present) may become hot. Care should be taken to avoid touching heating elements. Children less than 8 years of age shall be kept away unless continuously supervised. Never use steam cleaners or pressure cleaners on the appliance. Remove any liquid from the lid before opening it.
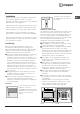
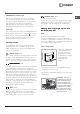
Installation The legs* fit into the slots on the underside of the base of the cooker. ! Before operating your new appliance please read this instruction booklet carefully. It contains important information concerning the safe installation and operation of the appliance. Levelling If it is necessary to level the appliance, screw the adjustable feet into the places provided on each corner of the base of the cooker (see figure).
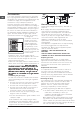
Gas connection 700 mm GB T he cooker should be connected to the gas-supply by a corgi registered installer. During installation of this product it is essential to fit an approved gas tap to isolate the supply from the appliance for the convenience of any subsequent removal or servicing. Connection of the appliance to the gas mains or liquid gas must be carried out according to the prescribed regulation in force, and only after it is ascertained that it is adaptable to the type of gas to be used.
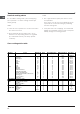
Disposing of the plug: Adapting to different types of gas Ensure that before disposing of the plug itself, you make the pins unusable so that it cannot be accidentally inserted into a socket. Instructions for connecting cable to an alternative plug: ! The wires in the mains lead are coloured in accordance with the following code: It is possible to adapt the appliance to a type of gas other than the default type (this is indicated on the rating label on the cover).
Safety Chain ! In order to prevent accidental tipping of the appliance, for example by a child climbing onto the oven door, the supplied safety chain MUST be installed! The cooker is fitted with a safety chain to be fixed by means of a screw (not supplied with the cooker) to the wall behind the appliance, at the same height as the chain is attached to the appliance. Choose the screw and the screw anchor according to the type of material of the wall behind the appliance.
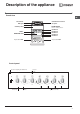
Description of the appliance Overall view GB Gas burner Hob grid Containment surface for spills GUIDE RAILS for the sliding racks position 5 position 4 position 3 position 2 position 1 Control panel GRILL DRIPPING PAN Adjustable foot Adjustable foot Control panel Electronic Lighting for Hob Burners Timer Knob Termostat Knob Selector Knob Control Knobs for Gas Burners on Hob 7
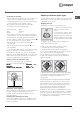
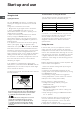
Start-up and use Practical advice on using the burners GB Using the hob For the burners to work in the most efficient way possible and to save on the amount of gas Lighting the burners For each BURNER knob there is a complete ring showing the strength of the flame for the relevant burner. To light one of the burners on the hob: 1. Bring a flame or gas lighter close to the burner. 2. Press the BURNER knob and turn it in an anticlockwise direction so that it is pointing to the maximum flame setting E. 3.
THERMOSTAT indicator light DOUBLE GRILL mode When this is illuminated, the oven is generating heat. It switches off when the inside of the oven reaches the selected temperature. At this point the light illuminates and switches off alternately, indicating that the thermostat is working and is maintaining the temperature at a constant level. The top heating element be activated.
GB Practical cooking advice PIZZA ! In the GRILL cooking mode, place the dripping pan in position 1 to collect cooking residues (fat and/or grease). • Use a light aluminium pizza pan. Place it on the rack provided. For a crispy crust, do not use the dripping pan as it prevents the crust from forming by extending the total cooking time. GRILL • Insert the rack in position 3 or 4. Place the food in the centre of the rack.
Precautions and tips ! The appliance was designed and manufactured in compliance with international safety standards. The following warnings are provided for safety reasons and must be read carefully. General safety • These instructions are only valid for the countries whose symbols appear in the manual and on the serial number plate. • The appliance was designed for domestic use inside the home and is not intended for commercial or industrial use.
Care and maintenance GB Switching the appliance off Inspecting the oven seals Disconnect your appliance from the electricity supply before carrying out any work on it. Check the door seals around the oven regularly. If the seals are damaged, please contact your nearest Authorised After-sales Service Centre. We recommend that the oven is not used until the seals have been replaced.
Removing and fitting the oven door: 1.Open the door 2.Make the hinge clamps of the oven door rotate backwards completely (see photo) WARNING! When reassembling the inner door glass insert the glass panel correctly so that the text written on the panel is not reversed and can be easily legible. GB 7.Replace the profile, a click will indicate that the part is positioned correctly. 8.Open the door completely. 9.Close the supports (see photo). 3.
GB Respecting and conserving the environment • Whenever possible, avoid pre-heating the oven and always try to fill it. Open the oven door as little as possible because heat is lost every time it is opened. To save a substantial amount of energy, simply switch off the oven 5 to 10 minutes before the end of your planned cooking time and use the heat the oven continues to generate.
GB 15
04/2014- 195122523.00 XEROX FABRIANO GB Indesit Company S.P.A. Viale Aristide Merloni,47 60044 Fabriano (AN) www.indesit.