I5VSH1A/FR FR Français Mode d’emploi CUISINIERE ET FOUR Sommaire Mode d’emploi,1 Attention,2 Description de l’appareil-Vue d’ensemble, 5 Description de l’appareil-Tableau de bord, 5 Installation,6 Mise en marche et utilisation,7 Utilisation du four,8 Utilisation du plan de cuisson,11 Précautions et conseils, 12 Nettoyage et entretien,13 Assistance,13 GB English Operating Instructions COOKER AND OVEN Contents Operating Instructions,1 W arning,3 Description of the appliance-Overall view,5 Description of
ATTENTION FR ATTENTION : cet appareil ainsi que ses parties accessibles deviennent très chauds pendant leur fonctionnement. Il faut faire attention de ne pas toucher les éléments chauffants. Ne laisser s'approcher les enfants de moins de 8 ans à moins qu’ils ne soient sous surveillance constante.
GB WARNING WARNING: The appliance and its accessible parts become hot during use. Care should be taken to avoid touching heating elements. Children less than 8 years of age shall be kept away unless continuously supervised.
ВНИМАНИЕ BG ВНИМАНИЕ: Уредът и неговите открити части се нагряват много при употреба. Бъдете особено внимателни и не докосвайте нагревателните елементи. Не използвайте абразивни продукти и остри метални шпатули за почистване на стъклената вратичка на фурната, защото може да надраскат повърхността, което да доведе до счупване на стъклото. Не допускайте деца под 8 години близо до уреда, освен ако не са под постоянно наблюдение.
2 3 5 1 FR 4 Description de l’appareil Tableau de bord 1.Manette du MINUTEUR 2.Voyant lumineux thermostat 3.Manette du THERMOSTAT 4.Manette PROGRAMMES 5.Voyant de fonctionnement de la plaque électrique 6.Manette de la plaque électrique GB 6 BG Описание на уреда Управляващ панел 1. TIMER копчето 2. Светлинен индикатор на термостата 3. Бучка термостат 4. ключа за избор 5. Светлинен индикатор на електрически котлон 6.
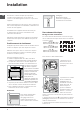
Installation (voir figure). Montage des pieds* fournis avec l’appareil par encastrement sous la base. ! Conservez ce mode d’emploi pour pouvoir le consulter à tout moment. En cas de vente, de cession ou de déménagement, veillez à ce qu’il suive l’appareil.
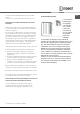
5. fixez le câble d’alimentation dans le serre-câble prévu. 6. fermez le couvercle du bornier et vissez la vis V. Branchement du câble d’alimentation au réseau électrique Montez sur le câble une fiche normalisée adaptée à la charge indiquée sur l’étiquette des caractéristiques collée sur l’appareil.
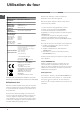
Utilisation du four FR CARACTERISTIQUES TECHNIQUES Dimensions du four HxLxP 34 x 39,1 x 45,5 cm Volume l 61 Dimensions utiles du tiroir chauffe-plats largeur 42 cm profondeur 44 cm hauteur 23 cm Tension et fréquence d'alimentation : voir plaquette signalétique Plan de cuisson vitrocéramique Avant gauche Arrière gauche Arrière droit Avant droit Absorption Max.
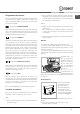
Programmes de cuisson ! Pour tous les programmes il est possible de sélectionner une température comprise entre 60°C et MAX., sauf pour le programme GRIL, pour lequel il est préconisé de sélectionner MAX. Programme FOUR STATIQUE Mise en marche des résistances de voûte et de sole. Pour cette cuisson traditionnelle mieux vaut cuire sur un seul niveau : la cuisson sur plusieurs niveaux entraînerait une mauvaise distribution de la chaleur. Programme Pâtisserie L’élément chauffant inférieur est branché.
FR Tournebroche Minuteur Pour actionner le Minuteur procéder comme suit : 1. tourner le bouton MINUTEUR et faire un tour presque complet dans le sens des aiguilles d’une montre pour remonter la sonnerie; 2. tourner le bouton MINUTEUR dans les sens inverse des aiguilles d’une montre pour sélectionner la durée désirée. tournebroche, sélectionnez PROGRAMMES.
Utilisation du plan de cuisson vitrocéramique ! La colle utilisée pour les joints laisse des traces de graisse sur le verre. Nous conseillons de les éliminer avant d’utiliser l’appareil à l’aide d’un produit d’entretien non abrasif. Une odeur de caoutchouc peut se dégager au cours des premières heures d’utilisation, elle disparaîtra très vite. Allumer et éteindre les foyers Pour allumer un foyer, tourner le bouton correspondant dans le sens des aiguilles d’une montre.
Précautions et conseils FR • Cet appareil ne doit pas être installé en extérieur, même dans un endroit abrité, il est en effet très dangereux de le laisser exposé à la pluie et aux orages. • Ne touchez pas à l’appareil si vous êtes pieds nus ou si vous avez les mains ou les pieds mouillés ou humides. •Cet appareil qui sert à cuire des aliments ne doit être utilisé que par des adultes conformément aux instructions du mode d’emploi.
Nettoyage et entretien • Utilisez exclusivement des casseroles et poêles à fond plat. • Si vous cuisinez un aliment qui nécessite beaucoup de temps, il est préférable d’utiliser un autocuiseur qui est deux fois plus rapide et économise un tiers de l’énergie. Mise hors tension Avant toute opération de nettoyage ou d’entretien coupez l’alimentation électrique de l’appareil. ! Ne nettoyez jamais l’appareil avec des nettoyeurs vapeur ou haute pression.
Démontage et remontage de la porte: FR 1. Ouvrir la porte 2. Faire pivoter à l'arrière les crochets des charnières de la porte du four (voir photo) verre insérer le panneau de verre correctement, de sorte que le texte écrit sur le panneau n’est pas inversée et peuvent être facilement lisibles. 7. Remonter le profil, un clic signale si la pièce est positionnée comme il faut. 8. Ouvrir la porte complètement. 9. Refermer les cavaliers (voir photo). 3.
Installation ! Before operating your new appliance please read this instruction booklet carefully. It contains important information concerning the safe installation and operation of the appliance. appliance fit into the slots on the underside of the base of the cooker. ! Please keep these operating instructions for future reference. Make sure that the instructions are kept with the appliance if it is sold, given away or moved.
GB 5. Fix the power supply cable in place by fastening the cable clamp screw. 6. Close the terminal board cover by tightening the screws V. Connecting the supply cable to the mains Install a standardised plug corresponding to the load indicated on the data plate located on the appliance. The appliance must be directly connected to the mains using an omnipolar circuit-breaker with a minimum contact opening of 3 mm installed between the appliance and the mains.
Start-up and use GB TECHNICAL DATA Oven dimensions (HxWxD) Volume Useful measurements relating to the oven compartment Power supply voltage and frequency Ceramic hob Front Left Back Left Back Right Front Right Max. ceramic hob consumption ENERGY LABEL and ECODESIGN 34 x 39,1 x 45,5 cm l 61 width 42 cm depth 44 cm height 18 cm see data plate 1200 W 1700 W 1200 W 1700 W 5800W Regulation (EU) No 65/2014 supplementing Directive 2010/30/EU. Regulation (EU) No 66/2014 implementing Directive 2009/125/EC.
GB Cooking modes GRILL ! A temperature value can be set for all cooking modes between 50°C and MAX, except for the GRILL programme, for which only the MAX power level is recommended. • Insert the rack in position 3 or 4. Place the food in the centre of the rack. • We recommend that the power level is set to maximum. The top heating element is regulated by a thermostat and may not always operate constantly. STATIC OVEN mode Both the top and bottom heating elements will come on.
GB Oven cooking advice table Selector knob setting Food to be cooked Weight (in kg) Cooking rack position from bottom Preheating time (minutes) Thermostat knob setting Cooking time (minutes) 1 Static Duck Roast veal or beef Pork roast Biscuits (short pastry) Tarts Lasagne Lamb Mackerel Plum-cake Cream puffs Sponge-cake Savoury pies 1 1 1 1 1 1 1 1 0.3 0.5 1.
Using the glass ceramic hob GB ! The glue applied on the gaskets leaves traces of grease on the glass. Before using the appliance, we recommend you remove these with a special nonabrasive cleaning product. During the first few hours of use there may be a smell of rubber which will disappear very quickly. Switching the cooking zones on and off To switch on a cooking zone, turn the corresponding knob in a clockwise direction.
Precautions and tips ! This appliance has been designed and manufactured in compliance with international safety standards. The following warnings are provided for safety reasons and must be read carefully. General safety • The glass ceramic hob is resistant to temperature fluctuations and shocks. It is, however, wise to remember that blades or cooking utensils may ruin the surface of the hob.
Care and maintenance • Keep gaskets clean and tidy to prevent any door GB energy losses • If you have a timed tariff electricity contract, the “delay cooking” option will make it easier to save money by moving operation to cheaper time periods. • Make the most of your hot plate's residual heat by switching off cast iron hot plates 10 minutes before the end of your cooking time and glass ceramic hot plates 5 minutes before the end of cooking time. • The base of your pot or pan should cover the hot plate.
GB Removing and fitting the oven door: 6.Replace the glass. 1.Open the door 2.Make the hinge clamps of the oven door rotate backwards completely (see photo) WARNING! Oven must not be operated with inner door glass removed! WARNING! When reassembling the inner door glass insert the glass panel correctly so that the text written on the panel is not reversed and can be easily legible. 7.Replace the profile, a click will indicate that the part is positioned correctly. 8.Open the door completely. 9.
GB OVEN BOTTOM 2. select the function of the oven and set the temperature to 100 ° C; 3. keep it in the oven for 15min; 4. turn off the oven; 5. Once cooled the oven, you can open the door to complete the cleaning with water and a damp cloth; 6.
Инсталиране ! Важно е да съхранявате тази книжка, за да може да я използвате за справка във всеки момент. При продажба на уреда, при прекратяване на използването му или при преместване се уверете, че книжката с инструкциите е заедно с него. ! Прочетете внимателно инструкциите: в тях има важни сведения за инсталирането, използването и безопасността при работа с уреда. ! Инсталирането на уреда трябва да се извърши от квалифициран специалист съгласно настоящите инструкции.
BG Свързване на захранващия кабел към електрическата мрежа Монтираите върху кабела нормализиран щепсел за електрическо натоварване, посочено на табелката с характеристики, която е поставена на уреда (виж таблица „Технически данни”). Свържете уреда директно към мрежата, като за целта използваите многополюсен прекъсвач с минимално отваряне между контактите от 3 mm, поставен между уреда и мрежата.
Пуск и експлоатация Използване на фурната ! При първото включване на фурната тя трябва да поработи празна за наи-малко половин час при термостат на максимум и затворена врата. След това я изключете, отворете вратата и проветрете помещението. Миризмата, която се усеща, се дължи на използваните за защита на фурната вещества. ! Преди употреба трябва да отстраните изцяло пластмасовото покритие, поставено на страничните стени на уреда.
BG ȼɇɂɆȺɇɂȿ! Ɏɭɪɧɚɬɚ ɟ ɫɧɚɛɞɟɧɚ ɫɴɫ ɫɢɫɬɟɦɚ ɡɚ ɡɚɫɬɨɩɨɪɹɜɚɧɟ ɧɚ ɪɟɲɟɬɤɢɬɟ, ɤɨɹɬɨ ɩɨɡɜɨɥɹɜɚ ɬɹɯɧɨɬɨ ɢɡɜɚɠɞɚɧɟ, ɛɟɡ ɬɟɞɚ ɢɡɥɢɡɚɬ ɢɡɜɴɧ ɮɭɪɧɚɬɚ. (1) Грил -Положение на терморегулатора по избор между 50°C и Max Включват се осветлението на фурната и двата нагревателя на грила. Задейства се и моторчето на въртящия се шиш. Грил с размери по-големи от обичайните, с напълно нова концепция: 50 % по-голяма ефективност на печене. Двойният грил премахва ъгловите зони, където липсва топлина.
BG Тегло (Kg) Ниво на печене отдолу нагоре Предварител но загряване (минути) Позиция на терморегул атора Време за печене (минути) 2,5 2,5 2 3 5 5 200 200 45-50 30-35 2,0 1,7 1,5 1,8 2 2,1 1,8 1,1 1,5 3 2 3 3 3 3 3 2 2 5 10 10 10 10 10 10 5 5 200 180 200 180 180 180 180 180 180 30-35 60-70 80-90 90-100 70-80 70-80 70-80 30-40 30-35 1 1 0,5 2 2 3 5 15 10 180 220 180 25-30 15-20 10-15 1,1 1 3 3 10 10 180 180 25-30 30-35 0,5 1 3 3 10 10 160 170 25-30 25-
Използване на стъклокерамичния готварски плот BG ! Лепилото, използвано при поставяне на уплътненията, оставя маслени следи върху стъклото. Препоръчва се, преди да използвате уреда, да отстраните тези следи със специфичен продукт за поддържане, които не е абразивен. През първите няколко часа на работа може да се усети миризма на гума, която все пак бързо ще изчезне. Включване и изключване на зоните за готвене За да включите зона за печене, завъртете съответния превключвател по посока на часовата стрелка.
Предпазни мерки и препоръки ! Този уред е произведен в съответствие с международните норми за безопасност при работа. Тези предупреждения са дадени от съображения за безопасност и трябва да бъдат прочетени внимателно. Общи правила за безопасност • Готварският плот от стъклокерамика е устоичив на температурни колебания и на удари. Все пак, трябва да се има предвид, че остриета или заточени кухненски прибори могат да счупят готварския плот.
Поддръжка и почистване Изключете уреда BG Преди да извършите операции по уреда, тои трябва да бъде изключен от мрежата за електрическо захранване. Почистване на фурната ! Не използваите парна струя за почистване. • Вътрешните емаилирани или изработени от неръждаема стомана части и гумените уплътнения могат да се почистват с гъба, напоена с хладка вода и неутрален сапун. Ако петната са трудно отстраними, използваите специфични продукти за почистване.
Демонтаж и монтаж на вратата на фурната: ПРЕДУПРЕЖДЕНИЕ! Фурната не трябва да се използва при свалено вътрешно стъкло! 1.Отворете вратата 2.Напълно завъртете назад шарнирните скоби на вратата на фурната (виж снимката) 3.Затворете вратата докато скобата спре (вратата ще остане отворена на около 40°) (виж снимката) ПРЕДУПРЕЖДЕНИЕ! При повторно монтиране на вътрешното стъкло на вратата, поставете правилно стъкления панел, така че текстът върху панела да не е обърнат обратно и да може лесно да се чете. 7.
BG Пестене и опазване на околната среда Почистване на фурната с помощта на пара Този метод на почистване се препоръчва след готвене на много мазно (печено) месо. Този процес на почистване улеснява отстраняването на замърсявания по стените на фурната чрез генериране на пара, която се образува във фурната и улеснява почистването. ! Важно! Преди да започнете да почиствате с пара: -Отстранете всички остатъци от храна и мазнина от дъното на фурната. - Свалете всички аксесоари (решетки и тави).
BG 35
XEROX FABRIANO 04/2014- 195122530.00 BG Indesit Company S.P.A. Viale Aristide Merloni,47 60044 Fabriano (AN) www.indesit.