JQ 280 www.whirlpool.
INDEX INSTALLATION 3 Installation SAFETY 4 Important safety instructions 5 Precautions ACCESSORIES AND MAINTENANCE 6 Accessories 7 Maintenance & Cleaning CONTROL PANEL 8 control panel GENERAL USE 9 Start protection / child lock 9 Pause or stop cooking 10 Set lock 10 Weight sensor COOKING FUNCTION 11 manual cook & reheat with microwaves 12 jet start 13 Automatic microwaves 14 manual defrost 15 6th sense defrost 16 manual grill 17 Automatic grill 18 manual crisp 19 6th sense crisp 20 manual forced air 21 Auto
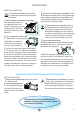
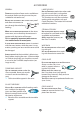
INSTALLATION PRIOR TO CONNECTING E C NSURE THAT THE APPLIANCE IS NOT DAMAGED. Check that the oven door closes firmly against the door support and that the internal door seal is not damaged. Empty the oven and clean the interior with a soft, damp cloth. on the rating plate corresponds to the voltage in your home. HECK THAT THE VOLTAGE D O NOT REMOVE THE MICROWAVE INLET PROTEC- located on the side of the oven cavity wall. They prevent grease & food particles from entering the microwave inlet channels.
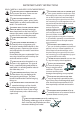
IMPORTANT SAFETY INSTRUCTIONS READ CAREFULLY AND KEEP FOR FUTURE REFERENCE O NOT HEAT, OR USE FLAMMABLE MATERIALS HIS APPLIANCE CAN BE USED BY CHILDREN aged in or near the oven. Fumes can crefrom 8 years and above and persons with ate a fire hazard or explosion. reduced physical, sensory or mental capabil- D D T ities or lack of experience and knowledge if they have been given supervision or instruction concerning use of the appliance in a safe way and understand the hazards involved.
PRECAUTIONS LIQUIDS .G. BEVERAGES OR WATER. Overheating the liquid beyond boiling point can occur without evidence of bubbling. This could result in a sudden boil over of the hot liquid. o prevent this possibility the following steps should be taken: 1. Avoid using straight-sided containers with narrow necks. 2. Stir the liquid before placing the container in the oven and let the teaspoon remain in the container. 3.
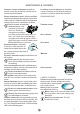
ACCESSORIES LARGE VESSELS USE THE TURNTABLE STOP button when cooking with vessels that is so large that they can not turn freely in the oven. This function can only be used when cooking with microwaves only and Combi functions. The button will not work with other functions. GENERAL THERE ARE a number of accessories available on the market. Before you buy, ensure they are suitable for microwave use. ENSURE THAT THE UTENSILS YOU USE are oven proof and allow microwaves to pass through them before cooking.
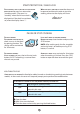
MAINTENANCE & CLEANING IF THE GRILL IS NOT USED REGULARLY, it should be run for 10 minutes a month to burn off any splashes, in order to reduce the risk of fire. CLEANING IS THE ONLY MAINTENANCE normally required. It must be carried out with the microwave oven disconnected. FAILURE TO MAINTAIN THE OVEN in a clean condition could lead to deterioration of the surface that could adversely affect the life of the appliance and possibly result in a hazardous situation.
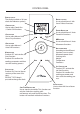
CONTROL PANEL DIGITAL DISPLAY The display includes a 24-hour clock and indicator symbols. DEFROST BUTTON Use to select Manual / 6th Sense Defrost functions. COMBI BUTTON Use to select Combi fan / Combi Grill functions. FORCED AIR BUTTON Use to select Manual / Auto Forced Air functions. CRISP BUTTON Use to select Manual / 6th Sense Crisp functions. MW BUTTON Use to select Manual / Auto Microwave functions. GRILL BUTTON Use to select Manual / Auto Grill functions.
START PROTECTION / CHILD LOCK THIS AUTOMATIC SAFETY FUNCTION IS ACTIVATED ONE MINUTE AFTER the oven has returned to “stand by mode“. (The oven is in “stand by” when the 24-hour clock is displayed or if the clock has not been set, when the display shows “:“.
SET CLOCK WHEN THE APPLIANCE IS FIRST PLUGGED IN or after a power failure, the product will enter clock setting. If the clock is not set, the display will remain “:“ instead of the clock. NOTE: YOU CAN PRESS&HOLD THE STOP BUTTON for a few seconds in standby mode to access the clock setting mode. q w e r TURN THE ADJUSTABLE KNOB to set the hours. PRESS KNOB BUTTON. (The two right-hand digits (minutes) flicker). TURN THE ADJUSTABLE KNOB to set the minutes. PRESS THE KNOB BUTTON AGAIN.
MANUAL COOK & REHEAT WITH MICROWAVES USE THIS FUNCTION for normal cooking and reheating, such as vegetables, fish, potatoes and meat. q w PRESS THE MW BUTTON. e r t y TURN THE ADJUSTABLE KNOB to set the power. TURN THE ADJUSTABLE KNOB to see the “manual mode” icon and press the knob button to confirm. PRESS THE KNOB BUTTON. TURN THE ADJUSTABLE KNOB to set the time. PRESS THE KNOB BUTTON. The function will start.
JET START THIS FUNCTION IS USED for quick reheating of food with a high water content such as clear soups, coffee or tea. q PRESS THE JET START OR KNOB BUTTON. THIS FUNCTION AUTOMATICALLY STARTS with maximum microwave power level and the cooking time set to 30 seconds. Each additional press increases the time with 30 seconds. You may also alter the time by turning the adjust knob to increase or decrease the time after the function has started.
AUTOMATIC MICROWAVES USE THIS FUNCTION TO cook various types of foods. THE OVEN WILL automatically select cooking method, time and power needed. q w e r t y PRESS THE MW BUTTON. PRESS THE KNOB BUTTON to confirm the Auto mode. TURN THE ADJUSTABLE KNOB to select the food class (see table). PRESS THE KNOB BUTTON. TURN THE ADJUSTABLE KNOB to set the food weight. PRESS THE KNOB BUTTON. The function will start.
MANUAL DEFROST USE THIS FUNCTION for manually defrosting food like Meat, Poultry, Fish, Vegetables and Bread. q w e r PRESS THE DEFROST BUTTON. TURN THE ADJUSTABLE KNOB to see the “manual mode” icon and press the knob button to confirm. TURN THE ADJUSTABLE KNOB to set the time. PRESS THE KNOB BUTTON. The function will start. HINTS FOR FROZEN FOODS: IF THE FOOD IS WARMER than deep-freeze temperature (-18°C), choose shorter time.
6TH SENSE DEFROST USE THIS FUNCTION for automatically defrosting Meat, Poultry, Fish, Vegetables and Bread. FOR BEST RESULT we recommend to defrost directly on the glass turntable. If needed, it is possible to use a container of light plastic suitable for microwave. q w e r PRESS THE DEFROST BUTTON. PRESS THE KNOB BUTTON to confirm the 6th Sense Mode. TURN THE ADJUSTABLE KNOB to select the food class (see table). PRESS THE KNOB BUTTON. The function will start.
MANUAL GRILL USE THIS FUNCTION TO quickly give a pleasant brown surface to the food like cheese toast & hot sandwich, sausages, grill spit, pommes duchesse, gratined fruit. q w PRESS THE GRILL BUTTON. e r TURN THE ADJUSTABLE KNOB to set the time. TURN THE ADJUSTABLE KNOB to see the “manual mode” icon and press the knob button to confirm. PRESS THE KNOB BUTTON. The function will start.
AUTOMATIC GRILL USE THIS FUNCTION TO cook Toast, Croque monsieur and Sausages. q w e r t y PRESS THE GRILL BUTTON. PRESS THE KNOB BUTTON to confirm the Auto Mode. TURN THE ADJUSTABLE KNOB to select the food class. PRESS THE KNOB BUTTON. TURN THE ADJUSTABLE KNOB to set the food weight. PRESS THE KNOB BUTTON. The function will start.
MANUAL CRISP USE THIS FUNCTION TO reheat and cook pizza and other dough based food, frying bacon and eggs, sausages, hamburgers. Brush thin oil on the crisp plate. The main property of this function is to brown the food on both top and bottom at same time. q w PRESS THE CRISP BUTTON. e r TURN THE ADJUSTABLE KNOB to set the time. TURN THE ADJUSTABLE KNOB to see the “manual mode” icon and press the knob button to confirm. PRESS THE KNOB BUTTON. The function will start.
6TH SENSE CRISP USE THIS FUNCTION TO cook various types of frozen foods. It also allow to defrost the frozen bread and have it warm and crispy. (see Food class 8 in the chart below) THE OVEN WILL automatically select cooking method, time and power needed. q w e r PRESS THE CRISP BUTTON. PRESS THE KNOB BUTTON to confirm the 6th Sense Mode. TURN THE ADJUSTABLE KNOB to select the food class (see table). PRESS THE KNOB BUTTON. The function will start.
MANUAL FORCED AIR USE THIS FUNCTION TO cook meringues, pastry, cakes, cookies , muffins, soufflés, poultry and roast meats. q w PRESS THE FORCED AIR BUTTON. e r t y TURN THE ADJUSTABLE KNOB to set the temperature. TURN THE ADJUSTABLE KNOB to see the “manual mode” icon and press the knob button to confirm. PRESS THE KNOB BUTTON. TURN THE ADJUSTABLE KNOB to set the time. PRESS THE KNOB BUTTON. The function will start. THERE IS PREHEATING STAGE before cooking start.
AUTOMATIC FORCED AIR USE THIS FUNCTION for baking of cake mix, cookies, muffins and rolls. ALWAYS PLACE THE FOOD on the low wire rack. q w e r t y PRESS THE FORCED AIR BUTTON. PRESS THE KNOB BUTTON to confirm the Auto Mode. TURN THE ADJUSTABLE KNOB to select the food class. PRESS THE KNOB BUTTON. TURN THE ADJUSTABLE KNOB to set the food weight. PRESS THE KNOB BUTTON. The function will start. THERE IS PREHEATING STAGE before cooking start for some food class.
COMBI GRILL USE THIS FUNCTION TO cook loads food that are thicker in dimension,that require browning on the top surface, such as Gratins, Lasagne, Poultry and Baked potatoes. q w e r t PRESS THE COMBI BUTTON REPEATEDLY to set the combi grill function. TURN THE ADJUSTABLE KNOB to set the power. PRESS THE KNOB BUTTON. TURN THE ADJUSTABLE KNOB to set the time. PRESS THE KNOB BUTTON. The function will start.
COMBI FAN USE THIS FUNCTION TO cook loads food that are thicker in dimension,that require browning on the surface, such as roast meats, poultry, jacket potatoes, frozen convenience foods, cakes, pastry, fish and puddings. q w e r t y u PRESS THE COMBI BUTTON REPEATEDLY to set the combi fan function. TURN THE ADJUSTABLE KNOB to set the temperature. PRESS THE KNOB BUTTON. TURN THE ADJUSTABLE KNOB to set the power. PRESS THE KNOB BUTTON. TURN THE ADJUSTABLE KNOB to set the time. PRESS THE KNOB BUTTON.
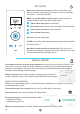
6TH SENSE STEAM USE THIS FUNCTION FOR such food types such as vegetables and fish. ALWAYS USE THE SUPPLIED STEAM ACCESSORY when using STEAMER ACCESSORY this function. lid grid bowl A: Pour water up to the Steam Water Level marked on the bowl. B: Insert the grid and put the food in. C: Cover with lid and insert in the oven. D: Set the function on the control panel q w e PRESS THE STEAM BUTTON. TURN THE ADJUSTABLE KNOB to select the food class (see table). PRESS THE KNOB BUTTON. The function will start.
HOW TO BOIL PASTA AND RICE WITH MICROWAVE IS IT POSSIBLE TO USE THE STEAMER ACCESSORY (WITHOUT THE GRID) to Boil pasta and rice WITH MANUAL MICROWAVE FUNCTION. The graduation levels marked on the accessory will help you to dose the right amount of water. FOOD PORTIONS AMOUNT LEVEL 100G q 200G w RICE PASTA 300G e 400G r 70G q 140G w 210G e Lid Bowl (Grid) USE SHORT PASTA.
TROUBLE SHOOTING GUIDE IF THE OVEN DOES NOT WORK, do not make a service call until you have made the following checks: The Turntable and turntable support is in place. The Plug is properly inserted in the wall socket. The Door is properly closed. Check your Fuses and ensure that there is power available. Check that the oven has ample ventilation. Wait for 10 minutes, then try to operate the oven once more. Open and then close the door before you try again.
GB 27
Power level Container 12.3.1 Test Amount Approx. time 1000 G 12 - 13 MIN 750 W PYREX 3.226 12.3.2 475 G 5 ½ - 7 MIN 750 W PYREX 3.827 12.3.3 900 G 14 - 16 MIN 750 W PYREX 3.838 12.3.4 1100 G 18 - 20 MIN GRILL + 650 W PYREX 3.827 12.3.5 700 G 24 - 26 MIN FA 200°C+ 90 W PYREX 3.827 12.3.6 1200 G 35 - 38 MIN FA 200°C + 350 W PIE PLATE 13.