JT 368 www.whirlpool.
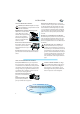
INSTALLATION AVANT DE BRANCHER L'APPAREIL PLACEZ LE FOUR À DISTANCE d'autres sources de chaleur. Laissez un espace de 20 cm minimum au-dessus du four afin de garantir une ventilation suffisante. Vérifiez que l'espace en dessous, au-dessus et autour du four est dégagé pour permettre une circulation de l'air appropriée. Le four ne doit pas être placé dans une armoire. ASSUREZ-VOUS QUE L'APPAREIL N'EST PAS ENDOMMAGÉ.
CONSIGNES DE SÉCURITÉ IMPORTANTES LISEZ CES CONSIGNES ATTENTIVEMENT ET CONSERVEZ-LES EN LIEU SÛR POUR TOUTE CONSULTATION ULTÉRIEURE VEILLEZ À NE PAS CHAUFFER OU UTILISER DE MATÉRIAUX inflammables à l'intérieur ou à proximité du four. Les vapeurs dégagées peuvent provoquer un incendie ou une explosion. N'UTILISEZ JAMAIS VOTRE FOUR MICRO-ONDES pour sécher des textiles, du papier, des épices, des herbes, du bois, des fleurs, des fruits ou d'autres produits combustibles. Ils pourraient s'enflammer.
PRÉCAUTIONS GÉNÉRALITÉS LIQUIDES PAR EX. BOISSONS OU EAU. Dans un four à microondes, les liquides peuvent bouillir sans produire de bulles. Dans ce cas, ils peuvent déborder brusquement. Afin d'éviter cet inconvénient, prenez les précautions suivantes : 1. Évitez d'utiliser des récipients à bord droit et col étroit. 2. Remuez le liquide avant de placer le récipient dans le four ; placez une petite cuiller dans le récipient. 3.
ACCESSOIRES GÉNÉRALITÉS DE NOMBREUX ACCESSOIRES sont disponibles sur le marché. Avant de les acheter, assurez-vous qu'ils conviennent bien aux micro-ondes. COUVERCLE LE COUVERCLE sert à couvrir les aliments à cuire ou à réchauffer avec la fonction micro-ondes seulement ; il permet d'éviter les éclaboussures, retient l'humidité et réduit le temps demandé. UTILISEZ LE COUVERCLE pour le réchauffage sur deux niveaux.
PROTECTION CONTRE UNE MISE EN MARCHE DU FOUR À VIDE / SÉCURITÉ ENFANTS CETTE FONCTION DE SÉCURITÉ AUTOMATIQUE EST ACTIVÉE UNE MINUTE après le retour du four en "mode veille"“. (Le four est en mode "veille" si l'heure est affichée ou si l'horloge n'a pas été programmée lorsque l'écran est vide). CELA SIGNIFIE QUE VOUS DEVEZ OUVRIR ET REFERMER LA PORTE, pour y introduire un plat, afin d'annuler la sécurité enfants. Sinon l'afficheur indiquera “DOOR“ (porte).
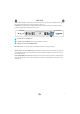
MINUTEUR UTILISEZ CETTE FONCTION si vous devez mesurer un temps avec précision, par exemple pour la cuisson des oeufs ou pour faire lever une pâte avant de la cuire, etc. LE MINUTEUR EST complètement indépendant de toutes les autres fonctions et peut être utilisé n'importe quand, que le four fonctionne ou non. q w q w e e APPUYEZ SUR LA TOUCHE HORLOGE. TOURNEZ LE BOUTON DE RÉGLAGE pour régler la durée à mesurer. APPUYEZ SUR LA TOUCHE START (DÉMARRAGE).
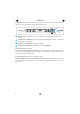
HORLOGE À LA PREMIÈRE UTILISATION ou après une panne de courant, l'écran est vide. Si l'horloge n'est pas réglée, l'écran reste vide jusqu'au réglage d'un temps de cuisson. qr wer r q APPUYEZ SUR LA TOUCHE HORLOGE (3 secondes) usqu’à ce que le chiffre de gauche (heures) clignote. w TOURNEZ LE BOUTON DE RÉGLAGE pour régler les heures et APPUYER pour confirmer. (Les chiffres à droite ( minutes ) clignotent. ) e r TOURNEZ LE BOUTON DE RÉGLAGE pour régler les minutes.
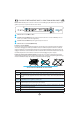
CUISSON ET RÉCHAUFFAGE AVEC LA FONCTION MICRO-ONDES UTILISEZ CETTE FONCTION pour la cuisson normale ou le réchauffage rapide d'aliments tels que les légumes, le poisson, les pommes de terre et la viande. q we q w e r r APPUYEZ SUR LA TOUCHE MICRO-ONDES. TOURNEZ LE BOUTON DE RÉGLAGE pour régler la puissance du micro-ondes et APPUYEZ pour confirmer. ( Les chiffres de l'heure clignotent. ) TOURNEZ LE BOUTON DE RÉGLAGE pour régler le temps de cuisson. APPUYEZ SUR LA TOUCHE START (DÉMARRAGE).
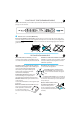
FONCTION JET START (DÉMARRAGE RAPIDE) UTILISEZ CETTE FONCTION pour réchauffer rapidement des aliments à forte teneur en eau, tels que les potages, le café ou le thé. q q APPUYEZ SUR LA TOUCHE START (DÉMARRAGE). CETTE FONCTION DÉMARRE AUTOMATIQUEMENT à pleine puissance avec le temps de cuisson réglé sur 30 secondes. Chaque nouvelle pression augmente le temps de 30 secondes. Vous pouvez également augmenter ou diminuer le temps de cuisson en tournant le bouton de réglage après le démarrage de la fonction.
DÉCONGÉLATION RAPIDE UTILISEZ CETTE FONCTION pour décongeler de la viande, des volailles, du poisson, des légumes ou du pain. LA FONCTION JET DEFROST doit connaître le poids net des aliments et être utilisée uniquement si le poids se situe entre 100 g et 3 kg, voir le tableau Jet Defrost. PLACEZ TOUJOURS LES ALIMENTS sur le plateau tournant en verre. q we q w e r r APPUYEZ SUR LA TOUCHE JET DEFROST. TOURNEZ LE BOUTON DE RÉGLAGE pour choisir la catégorie d'aliment ET APPUYEZ pour confirmer.
DÉCONGÉLATION RAPIDE ALIMENTS SURGELÉS : SI LE POIDS DES ALIMENTS EST INFÉRIEUR OU SUPÉRIEUR AU POIDS CONSEILLÉ : Suivez la procédure pour “ Cuisson & Réchauffage des aliments au mirco-ondes” et sélectionnez 160 W pour la décongélation. CLASSE D'ALIMENTS q w e r t ALIMENTS SURGELÉS : POUR LES ALIMENTS PLUS CHAUDS que la température de surgélation (-18 °C), choisissez un poids d'aliment inférieur. POUR LES ALIMENTS PLUS FROIDS que la température de surgélation (-18 °C), choisissez un poids supérieur.
GRIL UTILISEZ CETTE FONCTION pour dorer rapidement la surface des aliments. q w q w e e APPUYEZ SUR LA TOUCHE GRIL. TOURNEZ LE BOUTON DE RÉGLAGE pour sélectionner le temps de cuisson. APPUYEZ SUR LA TOUCHE START (DÉMARRAGE). NE LAISSEZ PAS LA PORTE DU FOUR OUVERTE pendant de longues périodes lorsque le gril est allumé, car ceci provoque une chute de température. POUR LES ALIMENTS TELS QUE fromage, toasts, biftecks ou saucisses, placez les aliments sur la grille métallique supérieure.
GRIL COMBI UTILISEZ CETTE FONCTION pour cuire des gratins, des lasagnes, des volailles et des pommes de terre. q q w e r we r APPUYEZ SUR LA TOUCHE GRILL COMBI. TOURNEZ LE BOUTON DE RÉGLAGE pour régler la puissance du micro-ondes et appuyez pour confirmer. ( Les chiffres de l'heure clignotent. ) TOURNEZ LE BOUTON DE RÉGLAGE pour régler le temps de cuisson. APPUYEZ SUR LA TOUCHE START (DÉMARRAGE).
TOUCHE CRISP UTILISEZ CETTE FONCTION pour réchauffer et cuire les pizzas et autres aliments similaires. Elle est également idéale pour la cuisson des oeufs au bacon, de saucisses, de hamburgers, etc. q q w e w e APPUYEZ SUR LA TOUCHE CRISP. TOURNEZ LE BOUTON DE RÉGLAGE pour sélectionner le temps de cuisson. APPUYEZ SUR LA TOUCHE START (DÉMARRAGE). IL N'EST PAS POSSIBLE de modifier le niveau de puissance ou d'activer/désactiver le gril pendant l'utilisation de la fonction Crisp.
CHALEUR PULSÉE UTILISEZ CETTE FONCTION POUR la cuisson de meringues, pâtisseries, gâteaux, soufflés, volaille et rôtis. q we q w e r r APPUYEZ UNE FOIS SUR LA TOUCHE AIR PULSÉ. ( Les chiffres de la température clignotent. ) TOURNEZ LE BOUTON DE RÉGLAGE pour régler la température et APPUYER pour confirmer. ( Les chiffres de l'heure clignotent. ) TOURNEZ LE BOUTON DE RÉGLAGE pour régler le temps de cuisson. APPUYEZ SUR LA TOUCHE START (DÉMARRAGE).
CHALEUR PULSÉE COMBINÉE UTILISEZ CETTE FONCTION POUR la cuisson de rôtis, volailles, pommes de terre en robe des champs, plats préparés congelés, gâteaux mousseline, pâtisseries, poisson et puddings. wer q q w t APPUYEZ UNE FOIS SUR LA TOUCHE AIR PULSÉ COMBINÉ. ( Les chiffres de la température clignotent. ) TOURNEZ LE BOUTON DE RÉGLAGE pour régler la température et APPUYEZ pour confirmer. ( Les chiffres de puissance clignotent.
CHAUFFAGE RAPIDE UTILISEZ CETTE FONCTION pour réchauffer le four vide. N'INTRODUISEZ PAS D'ALIMENTS dans le four avant ou pendant son préchauffage. En effet, la haute température dégagée risquerait de les brûler. AU COURS DU PRÉCHAUFFAGE, le four doit être toujours vide. q q w e q APPUYEZ SUR LA TOUCHE AIR PULSÉ o SUR DEUX FOIS SUR LA TOUCHE AIR PULSÉ COMBINÉ. ( Les chiffres de température clignotent. ) w e TOURNEZ LE BOUTON DE RÉGLAGE pour régler la température.
CRISP AUTOMATIQUE UTILISEZ CETTE FONCTION POUR porter rapidement les aliments congelés à la température de service. Cette fonction doit être utilisée uniquement pour les plats surgelés prêts à servir. q q w APPUYEZ SUR LA TOUCHE CRISP. e r TOURNEZ LE BOUTON DE RÉGLAGE pour régler le poids. we r TOURNEZ LE BOUTON DE RÉGLAGE pour sélectionner la catégorie d'aliment et APPUYER pour confirmer. ( Les chiffres du poids clignotent. ) APPUYEZ SUR LA TOUCHE START (DÉMARRAGE).
CRISP AUTOMATIQUE CLASSE D'ALIMENTS QUANTITÉ CONSEILS q FRITES Disposez les frites en une couche uniforme sur le plat 200 G - 600 G Crisp Saupoudrez de sel si vous désirez des pommes frites plus croustillantes. w e PIZZA, CROÛTE FINE 200 G - 500 G Pour pizzas à croûte fine. PIZZA, CROÛTE ÉPAISSE 300 G - 800 G Pour pizzas à croûte épaisse. r t HAMBURGERS 180G - 450G BÂTONNETS DE POISSON 200 G - 600 G Préchauffez le plat Crisp avec un petit peu de beurre ou d'huile.
RÉCHAUFFAGE AUTOMATIQUE UTILISEZ CETTE FONCTION pour réchauffer des plats précuisinés ou du lait. Disposez les aliments sur un plat résistant à la chaleur et adapté aux micro-ondes. q we q w APPUYEZ SUR LA TOUCHE AUTO REHEAT. e r TOURNEZ LE BOUTON DE RÉGLAGE pour régler le poids. r TOURNEZ LE BOUTON DE RÉGLAGE pour sélectionner la catégorie d'aliments et APPUYEZ pour confirmer. (Les chiffres du poids clignotent.) APPUYEZ SUR LA TOUCHE START (DÉMARRAGE).
RÉCHAUFFAGE AUTOMATIQUE CLASSE D'ALIMENTS QUANTITÉ CONSEILS q GRANDE ASSIETTE 250 G - 600 G Préparez les aliments comme indiqué ci-dessus. Chauffez sous un couvercle. w SOUPE 200 G - 800 G Réchauffez sans couvercle dans des bols séparés ou dans un grand récipient. e PLAT SURGELÉ 250 G - 600 G Suivez les instructions figurant sur l'emballage (ventilation, perforation, etc.) r LAIT 100 G - 500 G Faites chauffer sans couvrir et utilisez une cuillère dans un bol ou une tasse.
CHALEUR PULSÉE COMBINÉE AUTOMATIQUE UTILISEZ CETTE FONCTION pour les aliments répertoriés dans le tableau. q q w e r we r APPUYEZ SUR LA TOUCHE AIR PULSÉ COMBINÉ AUTOMATIQUE. TOURNEZ LE BOUTON DE RÉGLAGE pour sélectionner la catégorie d'aliments et APPUYEZ pour confirmer. ( les chiffres du poids clignotent.) TOURNEZ LE BOUTON DE RÉGLAGE pour régler le poids. APPUYEZ SUR LA TOUCHE START (DÉMARRAGE).
CHALEUR PULSÉE COMBINÉE AUTOMATIQUE CLASSE D'ALIMENTS q POULET (800 G - 1500 G) LASAGNES SURGELÉES CONSEILS Assaisonnez le poulet avec du sel et des épices. Enduisez-le, si nécessaire, d'huile. Placez-le dans un plat pour micro-ondes, résistant au four. Placez le plat sur la grille métallique inférieure. w (400 G - 1000 G) Placez-les dans un plat pour micro-ondes, résistant à la chaleur. Placez le plat sur la grille métallique inférieure.
ENTRETIEN ET NETTOYAGE L'ENTRETIEN DE CET APPAREIL se limite à son nettoyage. Pour nettoyer le four, vous devez d'abord le débrancher. SI LE FOUR N'EST PAS MAINTENU PROPRE, cela peut entraîner la détérioration de la surface, affecter la durée de vie de l'appareil et provoquer des situations de danger. N'UTILISEZ EN AUCUN CAS DE TAMPONS À RÉCURER EN MÉTAL, nettoyants abrasifs, tampons en laine de verre, chiffons rugueux etc.
DIAGNOSTIC DES PANNES SI LE FOUR NE FONCTIONNE PAS, avant de contacter votre Revendeur, veuillez vérifier si : Le plateau tournant et support du plateau tournant sont en place. La prise de courant est bien branchée. La porte est correctement fermée. Les fusibles sont en bon état et la puissance de l'installation est adaptée. Le four est bien ventilé. Attendez 10 minutes et essayez à nouveau. Ouvrez et refermez la porte avant d'essayer à nouveau.
FR 27
REMARQUE PARTICULIÈRE POUR PROTÉGER le four et l'écran contre le risque de surchauffe, la température de laporte du four est surveillée. Par conséquent, le four peut procéder à un refroidissement en cas de risque de surchauffe. Durant ce laps de temps, le ventilateur, le plateau tournant et la lampe fonctionnent. Cela est normal. Après cette procédure, le four s'arrête automatiquement. La procédure de refroidissement peut être interrompue, sans aucun dommage pour le four, en ouvrant la porte. Test 12.3.