KHMF 9010/I Instructions for use
Product description and symbols 4 Gas burner functions 4 Practical advice on how to use the burners 5 Injectors table 5 Induction zone functions 6 Positioning the pan supports and Wok support 7 Sizes and installation measurements (mm) 8 Precautions and general recommendations 9 Safeguarding the environment 10 Installation 11 Gas connection 12 Electrical connection 12 Securing the hob into cabinetry 13 Adaption to different kinds of gas 13 Replacing the injectors 14 Regulating t
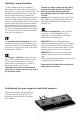
Product description and symbols 1. Removable pan supports 2. Professional double crown Wok burners 3. 145 mm diameter induction zone 4. Left gas burner control knob 5. Central gas burner control knob 6. Right gas burner control knob 7. Display and touch control panel for the induction zones Gas burner control knob symbols A. Burner position indicator B. Flame regulation symbols - Off - Maximum external and internal crown flame B - Minimum external crown flame. Maximum internal crown flame.
Practical advice on how to use the burners Read these instructions to get the best out of your burners: - Use pans with a diameter the same as the burner (see pan diameter table to the side). - Only use flat bottom pots and pans. - Use the right amount of water for cooking food and use the lid. Important: using the pan supports incorrectly will scratch the hob top: avoid placing them upside down or dragging them across the hob.
Induction zone functions This hob is fitted with 2 induction zones that allow you to boil water very quickly, as well as control the temperature with extreme precision, giving you a vast range of cooking options. The induction zone control panel has the following functions. 1. 2. 3. 4. 5. 6. 7. The child safety option can be turned on by pressing the button (2) until the illuminated point above the button with the key symbol (2) comes on.
Induction zone functions The time remaining can also be changed by pressing the clock symbol button (4) at any time and using the +/- buttons (3) to alter the time. The light above the display will flash for 10 seconds, then the display will show the amended time remaining. When the programmed time expires a continuous double signal will be heard. If a zone has been programmed using the timer option when the time expires the zone and the zone indicator will automatically switch off.
Sizes and installation measurements (mm) NOTE: If a hood is installed above the hob, read the instructions for fitting the hood where it indicates the correct distances to be complied with. Rear wall Front • The cooktop has to be set into a work top between 20 - 40 mm deep. • The distance between the lower face of the glass ceramic hob and the cupboard or separating panel must comply with the sizes shown in diagram “A”.
Precautions and general recommendations • The appliances should only be repaired or adjusted by a qualified electrician. • Make sure the electrical wires of other electrical appliances do not come into contact with hot parts. • The induction zones will not switch on if the pan is not either the right size, or do not attract a magnet. Use a magnet to check.
Safeguarding the environment • this hob can come into contact with food and complies with EEC (CE) Regulation n. 1935/2004. Note: • Improper use of the pan supports can scratch the hob surface. Avoid placing them, or dragging them if unprotected by rubber stoppers. • On glass surfaces, do not use: - Cast iron griddles, terracotta pots or pans. - Heat convectors (e.g. metal netting). - Two burners for cooking with one pan (e.g. fish kettle).
Installation Technical information for the installer • This product can be built into a 20 to 40 mm deep worktop. • The hob cannot be installed with an oven underneath. Always insert a separator panel under the hob at a distance of no less than 25 mm from the lowest point (electronic control module) on the appliance. Follow the measures shown in the “Sizes and installation measurements (mm)” section.
Gas connection The gas mains system must comply with local regulations. • The paragraph on “national legislation reference” shows the local legislation specific to the country of destination. • Should there be no information regarding your country of interest, ask for further details from the installer.
Securing the hob into cabinetry 1. After cleaning the surfaces around the edges, fit the seal provided around the hob. 2. Position the hob inside the opening according to the sizes indicated in the description sheet. 3. Use the brackets (A) provided to secure the hob, fixing it with the proper screws to adapt it to the thickness. A Seal around the edges • Position the seal on the support flange.
Replacing the injectors (See the product description sheet for model) Remove the bottom of the hob, lifting out the installation brackets to change the dual crown wok burner injector. Please contact the Customer Care Centre. REMOVING THE MAIN INJECTOR Remove the injector (F) using a 10mm spanner. Slacken the holding screw (H) to regulate the position (X) of the gas inlet coupling (G) with regard to the injector. REMOVING THE SECONDARY INJECTOR Remove the injector (I) using a 12 mm spanner.
General cleaning In order to keep your hob in good condition, you must keep it clean, removing any food residue each time you use it. Always disconnect the hob from the electrical power supply and wait until it cools before cleaning. Note: in the models fitted with electronic ignition and safety thermocouples, you have to clean the terminal part very carefully to ensure they work properly. Frequently check them and, if necessary, clean with a damp cloth.
Troubleshooting guide 2. If one of the following codes appears when you press the ignition button on the hob: ER31, ER47, ER36, ER39, ER20, ER37, ER22, E5, E6, E7, E9 contact the Customer Care Centre and tell them about the code that is appearing on the display. 3. If the hob does not work after intensive use, it means that the temperature inside the hob is too high. In this case E2 appears on the display. Wait for a few minutes until the hob cools down. 4.
After Sales Service Before contacting the Customer Care Centre, clarify that you cannot resolve the problem yourself based on the descriptions given in the “Troubleshooting guide”. 1. Turn the apparatus off and restart it to see if the fault is repeated. If after carrying out the above checks, the fault persists, contact your Customer Care Centre.
Whirlpool Europe S.r.l. Viale G. Borghi, 27 - 21025 Comerio (VA) Phone 0332.759111 - Fax 0332.759268 www.whirlpool.