
Use and Care Manual


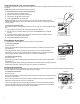

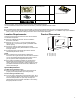
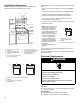
Table Of Contents
- MICROWAVE OVEN SAFETY
- Microwave Oven Safety
- Internet Connectivity Guide for Connected Appliances Only
- FCC Caution
- MICROWAVE OVEN MAINTENANCE AND CARE
- General Cleaning
- INSTALLATION INSTRUCTIONS
- REQUIREMENTS
- Tools and Parts
- Location Requirements
- Product Dimensions
- Installation Dimensions
- Electrical Requirements
- INSTALLATION
- Prepare Microwave Oven Hood Combination
- Installation Types
- Find the Cardboard Plate
- Find the Wall Stud(s)
- Find the Flush Point
- Mark Upper Cabinet
- Mark Rear Wall
- Drill holes in Upper Cabinet
- Drill holes in Rear Wall
- Attach Mounting Plate to Wall
- Rotate Blower Motor
- Install Damper Assembly
- Install the Microwave Oven
- Complete Installation
- VENTING DESIGN SPECIFICATIONS
- Venting Design Specifications
- SEGURIDAD DEL HORNO MICROONDAS
- Seguridad del Horno Microondas
- Guía de Conectividad a Internet solo para Electrodomésticos Conectados
- Precaución de FCC
- MANTENIMIENTO Y CUIDADO DEL HORNO MICROONDAS
- Limpieza General
- INSTRUCCIONES DE INSTALACIÓN
- REQUISITOS
- Herramientas y Piezas
- Requisitos de Ubicación
- Dimensiones del producto
- Dimensiones de Instalación
- Requisitos Eléctricos
- INSTALACIÓN
- Preparar la combinación de horno de microondas y campana
- Tipos de Instalación
- Encontrar plantilla de cartón
- Encontrar las vigas de pared
- Encontrar el Punto al Ras
- Marcar Gabinete Superior
- Marque la Pared Posterior
- Taladrar los orificios en el Gabinete Superior
- Taladre orificios en la Pared Posterior
- Fije la Placa de Montaje a la Pared
- Gire el Motor del Soplador
- Instale el Conjunto de la Compuerta
- Instalación del horno de microondas
- Complete la Instalación
- ESPECIFICACIONES PARA EL DISEÑO DE LA VENTILACIÓN
- Especificaciones para el Diseño de la Ventilación

7
To remove the filter alert and reset filters duration:
After replacing the charcoal filter, to remove the filter alert on the display, retrieve another 6 months
duration.
Press Setting key, use Arrow key to select Cleaning and Maintenance submenu, press
CONFIRM/MENU key to enter.
Use Arrow key to select Reset filter submenu, press CONFIRM/MENU key to reset.
The charcoal filter retrieves another 6 months duration now.
NOTE: For roof venting and wall venting, the charcoal filter is not necessary, but the filter alert will
still appear every 6 months. You can follow the above steps to remove the alert.
Illustration 3
B
A
C
D
A. Holes
B. Hooks
C. Charcoal
Filter
D. Bottom
Plate
INSTALLATION INSTRUCTIONS
REQUIREMENTS
Tools and Parts
Tools Needed
� Measuring tape
� Pencil
� Scissors
� Masking tape or thumbtacks
� Drill
� No. 2 Phillips screwdriver
� Stud finder
� No. 3 Phillips screwdriver for 1/4-20 x 3" (76 mm) bolts
� 3/16" (5 mm), 3/8" (10 mm), 5/8" (16 mm) drill bits
� 3/4" (19 mm) hole saw
� Keyhole saw
� Diagonal wire cutting pliers
� 7/16" (11 mm) socket wrench (or box wrench) for 1/4" x 2"
(6.4 mm x 51 mm) lag screws
� 1
1
/
2
" (38 mm) diameter hole drill bit for wood or metal cabinet
� Caulking gun and weatherproof caulking compound
� Duct tape.
Materials Needed
� Standard fittings for wall or roof venting. See the “Venting
Design Specifications” section.