Instructions for use
Before using the appliance 4 Protecting the environment 4 Precautions and general recommendations 5 Product description 6 Touch Temperature Controls (select models) 7 Water Dispenser 8 Use of ice maker and water dispenser 9 Water filter 10 Guide to internal components 11 Guide to storage and thawing of food 13 Maintenance and cleaning 15 Preparing the appliance for absence 16 Troubleshooting guide/After-sales service 17 After-sales service 19 Appliance dimensions 20 Installatio
Before using the appliance • Your new appliance is designed exclusively for domestic use. To get the most out of your new appliance, read the user handbook thoroughly. The handbook contains a description of the product and useful tips for storing food. Keep this handbook for future consultation. • After unpacking, make sure that the appliance is undamaged and that the doors close properly. Any damage must be reported to your dealer within 24 hours after delivery of the appliance.
Precautions and general recommendations INSTALLATION • The appliance must be handled and installed by two or more people. • Be careful not to damage flooring (e.g. parquet) whilst moving the appliance. • During installation, make sure the power cable is not damaged. • Ensure that your appliance is not installed near a heat source. • To guarantee adequate ventilation, leave a space on both sides and above the appliance, following the installation instructions. • Keep the appliance ventilation openings free.
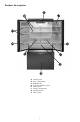
Product description A. B. C. D. E. F. G. H.
Touch Temperature Controls (select models) The controls are located at the top front of the refrigerator compartment. Control Initial Control Settings After plugging the refrigerator in, set the controls. • Pressing the or pads adjusts the controls to the desired setting. • The temperature control range for both compartments is 1 through 7 (coldest). • Set the Freezer control on 4. • Set the Refrigerator control on 4. • Let the refrigerator run at least 8 to 12 hours before adding food.
Water Dispenser If you did not flush the water system when the refrigerator was first installed, dispense water into a container until you draw 8 to 12 L (2 to 3 gal.) or for approximately 6 to 7 minutes after the water begins dispensing and discard. The water you draw and discard will rinse out the pipes. Allow several hours for the refrigerator to cool down and chill the water. Dispensing Water 1. Hold a container under the dispenser while pressing the button. 2. Release the button to stop dispensing.
Use of ice maker and water dispenser Automatic Ice Maker Connect the ice maker to the water supply as instructed. Proper water flow and a level refrigerator are essential for optimal ice maker performance. • Beverages and foods should not be placed in the ice storage bin for quick chilling. These items can block the ice maker arm, causing the ice maker to malfunction. • Turn off (arm up) the ice maker when the water supply is to be shut off for several hours.
Water filter Water Filter Removal and Installation If your appliance must be connected to the mains water supply to operate the water dispenser and/or ice maker, it must be a water supply which delivers drinking water only. Ice makers not connected to a mains water supply must be filled with drinking water only. NOTES: 1. The bypass cap does not filter water. Be sure to have a replacement cartridge available when a filter change is required. 2.
Guide to internal components Shelves • Never attempt to adjust a shelf that is loaded with food. • Ensure the shelf is secure and correctly fitted before placing items on a shelf. Your refrigerator has either spill guard glass shelves or nonsealed shelves. The spill guard glass shelf shelves have a spill retainer edge which allows for easier cleaning up of spillages. Some shelves are fitted with the Easy Glide slide out feature.
Guide to internal components Crisper drawers The Crisper drawers provide a higher humidity environment for fresh fruit and vegetable storage. Controls The Crisper controls regulate the amount of humidity in the crisper drawer. Slide the control toward the FRUIT setting for produce with outer skins. Slide the control toward the VEGETABLES setting for leafy produce. VEGETABLES FRUIT HUMIDITY CONTROLLED To remove: • Insert the drawer into the frame rails and firmly push it back into place.
Guide to internal components Upper wire basket To remove: • Pull the upper basket out to its full extension and lift out. To install: • Slide the upper basket into the freezer. Ensure that the rear hooks on the basket, hook behind the rail catch. Guide to storage and thawing of food The freezer compartment, marked with the symbol , is used for storing frozen food and freezing fresh, or cooked food.
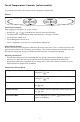
Guide to storage and thawing of food FOOD STORAGE CHART Storage time will vary according to the quality of the food, the type of packaging or wrap used (moisture and vapour proof), and the storage temperature (which should be - 18°C).
Maintenance and cleaning Before any cleaning or maintenance operation, unplug the appliance from the mains or disconnect the electrical power supply. Periodically clean the refrigerator and freezer compartments with a cloth and a solution of lukewarm water and mild detergent. Never use detergents or abrasives. Never clean refrigerator parts with flammable fluids. The fumes can create a fire hazard or explosion. Clean the outside of the appliance and the door seal with a damp cloth and dry with a soft cloth.
Preparing the appliance for absence For short periods • If the period of absence is less than 3 weeks, it will not be necessary to disconnect the appliance from the power supply. Remove all perishable foods and freeze the rest. • If the appliance is fitted with an automatic ice maker: 1. Switch the automatic ice maker off. 2. Switch the power supply to the ice maker off. 3. Empty the ice storage bin.
Troubleshooting guide/After-sales service Before contacting the Customer Care Centre... Operation problems are often due to minor causes that can be found and fixed without using any tools. Noises from the appliance are normal, since the fans and compressors for controlling its operation switch on and off automatically.
Troubleshooting guide/After-sales service If the edges of the refrigerator cabinet, which come in contact with the door seal, are warm to the touch: • This is normal in hot weather and when the compressor is running. If the light does not work: • Are the electric circuit safety devices installed in the house fully functional? • Is the power plug plugged into a live socket with the proper voltage? • Has the light bulb burnt out? In the case of burnt-out bulbs: 1. Always unplug the appliance from the mains.
After-sales service Before contacting The Customer Care Centre: 1. check the “Troubleshooting guide. You may be able to resolve the problem quickly and easily. 2. Switch the appliance off and then on again to see if the problem has been solved. If the problem re occurs, disconnect the appliance from the power supply and wait for about an hour before trying again. 3. If the problem persists after this course of action, contact the Customer Care Centre.
Appliance dimensions 20
Installation Your new appliance is a FULLY FROST FREE model designed exclusively for domestic use, i.e. both refrigerator and freezer compartments are provided with an automatic defrosting function. This manual contains indications and warnings for correct and safe installation of the appliance – please read it carefully before starting any installation. Keep this manual for future consultation. If you sell the appliance please give it to the new buyer.
Installation Freezer Drawer removal To avoid possible injury, product, or property damage, you will need two people to perform the following instructions. To Remove: 1. Pull the freezer drawer open to it’s full extension. 2. Pull the upper basket out to full extension and lift out to remove. 3. Lift the lower basket straight up and out to remove. 4. On each side rail is a basket cradle with two snap attachments.
Installation Leveling • Do not use power tools when performing the leveling procedure. • To enhance the appearance and maintain performance, the refrigerator should be level. (side to side) Note Complete any required door reversal, panel installation and/or a water supply connection, before leveling. Materials Needed • 3/8” hex head driver • A Spirit level 1. Remove the toe grille. • Grasp firmly and pull out carefully to unclip. 2. Remove the bottom bracket cover(s).
Installation For pullout drawer only: 1. Turn both stabilizing legs clockwise until firmly against floor. Turn roller adjustment screws 2 to 3 times anti clockwise so that the full weight of refrigerator rests on the stabilizing legs. 2. Replace toe grille and bracket cover(s). See markings on inside of toe grille to insure proper alignment. Opening and Closing Your Refrigerator Compartment Your new refrigerator is uniquely designed with two fresh food doors.
Water connection Disconnect the appliance from the mains power supply before starting operations. • The ice maker and water circuit must be connected to a water supply of drinkable and/or chemically purified water. • The water connection must be carried out in compliance with local water regulations. • The appliance is supplied with a water tube and with a transition connector for connecting to the water tube to the supply. (selected models) • Remove the protective cap from the end of the gray water tubing.
Electrical connection Regulations require that the appliance is earthed. The manufacturer declines all liability for injury to persons or animals and for damage to property resulting from failure to observe this or any other instructions. Installation and electrical connection must be carried out by a qualified engineer according to the manufacturer’s instructions and local safety regulations. Ensure that the voltage indicated on the appliance data plate corresponds to the mains voltage.
Printed in Italy 07/13 5019 600 00528 n GB