Instructions for use
Safety instructions 4 Safeguarding the environment 5 Appliance description 6 Supplied with the product 6 Control panel 6 Preliminary instructions for use 7 Preparing vacuum bags and containers 8 Machine operation indications 10 Cleaning the product 11 Troubleshooting guide 12 After-sales Service 13 KitchenAid front panel in stainless steel with anti-fingerprint surface finish 13 3
Safety instructions Important to be read and observed Before using the appliance carefully read these safety instructions. Keep them nearby close at hand for future reference. These instructions are also be available on website: docs.kichenaid.eu These instructions and the appliance itself provide important safety warnings, to be observed at all times.
During installation, make sure the appliance does not damage the power cable. Only activate the appliance when the installation has been completed. Electrical warnings For installation to comply with current safety regulations, an omnipolar switch with minimum contact gap of 3 mm is required and the appliance must be earthed. If the power cable is damaged, replace with an identical one.
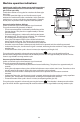
Appliance description 1) Pull-out appliance body which includes vacuum chamber and relative lid; 2) control panel; 3) vacuum chamber lid; 4) vacuum chamber; 5) sealing bar; 6) ON/OFF switch. 3 4 5 2 1 6 Supplied with the product Vacuum bag Control panel 1) 2) 3) 4) 5) Control panel display area Led indicator lights Button for KitchenAid vacuum bags. Button for KitchenAid vacuum containers. Button for halting current cycle.
Preliminary instructions for use Before starting up the machine, clean the vacuum chamber thoroughly with a soft, damp cloth. Repeat several times, rinsing the cloth in clean water each time. Do not use harsh detergents, steel scourers, scrapers or any abrasive, acidic or aggressive substances which could damage the surfaces of the vacuum chamber irreparably. The appliance can vacuum pack food in two different ways: 1.
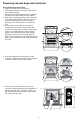
Preparing vacuum bags and containers Using KitchenAid vacuum bags 1. Open the drawer fully (until it clicks). 2. Switch the machine on using the switch on the front right hand side. 3. Select the size of KitchenAid bag best suited to the dimensions of the food (15x25 or 20x20). 4. Open the lid, making sure the vacuum chamber is dry. When placing food in the bag, take care not to get the bag dirty or wet next to the opening, as this could result in an ineffective seal. 5.
A perfect seal is essential in order to maintain the vacuum conditions in the bag. This can be identified by a clearly visible seal with no sign of any burns. Always check that the seal is on top of or parallel to the dotted line on the KitchenAid bag. Moreover, check the effectiveness of the seal: after sealing, it must not be possible to pull the edges of the bag apart. If this is not the case, transfer the food into another bag and repeat the vacuum packing procedure.
Machine operation indications Switching On (pulling the drawer out to working position) Always pull the drawer out to its full extension so that the glass lid can open fully. Switch the machine on using the On switch on the front right hand side. The control panel leds light up and a brief acoustic signal indicates the machine has been switched on. At this point the machine runs a set-up cycle lasting approximately 2 seconds; do not press any buttons until set-up has been completed.
Cleaning the product Clean the vacuum packing machine with a soft cloth or sponge and neutral detergent. In order to ensure hygiene and safeguard the quality of foodstuffs packed, the vacuum chamber and glass lid must be cleaned after each use. Use a soft cloth or non-abrasive sponge and neutral detergent. A Once a month, clean the sealing bar in order to remove any residue which could negatively impact the quality of bag sealing.
Troubleshooting guide Problem solving table FAULT All the led indicators on the control panel flash. POSSIBLE CAUSES Overheating. The led indicator of the STOP button flashes, accompanied by an intermittent acoustic signal Insufficient vacuum in the chamber. Upon switching on, all the led Pump oil replacement indicators on the control panel reminder. flash for 3 seconds and a long acoustic signal is emitted. The cycle starts (buttons flash) Overheating. but the pump does not work.
After-sales Service Before contacting KitchenAid After-sales Service: 1. See if you can eliminate the problem on your own by referring to the "Troubleshooting guide". 2. Turn the appliance off and on again to check if the problem has been eliminated. If repair work has to be carried out, contact an authorized After-sales Service (use of original spare parts and proper repair is guaranteed). Failure to comply with these instructions may compromise the safety and quality of the product.
Printed in Italy r 09/16 400011024287 GB