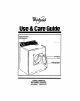
Use& CareGuide Cycle control knob and temperature Model and serial LARGECAPACITY AUTOMATICDRYERS LE5550XT LG5551XT
Contents Important Safety lnstructlons Additional safety instructions and your responsibilities Page ............... .3 Operatlng lnstructlons Starting your dryer.. ........................ The regular/permanent press cyde.. ............................... The knits, delicate cycle ................ The fluff air cycle ........................... Using TUMBLE PRESSa.. ............. Using damp dry ............................. signal ........................ Endofcycle . .6 .6 .7 8 .8 .
ImportantSafetyInstructions To reduce the rlsk of fire, electrlcal shock, or Injury to persons when uslng your dryer, follow bask precautions, lncludlng the followlng: l l 9 You are responsible for making sure that your dryer is installed, Read all lnstructlons before uslng the dryer. NEVER dry items cleaned, washed, soaked in or spotted with wax, paint, gasoline or flammable fluids in the dryer. The fumes can create a FIRE l HAZARD or EXPLOSION.
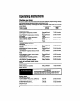
OperatingInstructions Starting your dryer Be sure to refer to the chart below and the Dryer Guide for Proper sorting, loading and control setting information before starting your dryer. NOTE: Do not overdry. Overdrying can cause shrinkage, static ding, and damage some fabrics. SUGGESTED CYCLE TYPE OF LOAD Cottons and Ilnsns EXTRA HEAVY-Bedspreads, mattress pads, quilts HEAVYWEIGHT-Towels, jeans, axduroys. wok dothes MEDIUMWEIGHTSheets, pillowcases, cdton underwear, diapers LIGHTWEIGHT-Batistes.
2. Push the Start Button to start 3. To atop and restart the dryer: l l wn the door or turn th& Cycle Control Knob to OFF to stop the dryer. Close the door, select a cycle (if necessary) and push the Start Button to restart the dryer.
Operating lnstructlons Continued The REGULAR/PERMANENT PRESScycle The REGULAFVPERMANENT PRESS Cycle helps provide the special care that cottons, permanent press and synthetic fabrics need. The cycle consists of a timed period of heated drying and a 10 minute cool down period. During the cool down, the bad tumbles without heat. This helps keep wrinkles from setting and makes the bad easier to handle. NOTE: To help reduce wrinkling, remove the bad from the dryer as soon as tumbling stops.
The FLUFFAIR cycle I Flre Hazard Do not dry plastic or rubber items wlth heat. Use FLUFF AIR cycle, or line dry. Failure to do so could result In flre or damaged i items. The dryer does not heat when the Cycle Control Knob is on FLUFF AIR. This cycle can be used to fluff or air dry bedding, plastic tablecloths, foam rubber pillows, stuffed toys, sneakers, etc. 1. Turn the Cycle Control Knob to the desired number of minutes you want in the FLUFF AIR Cycle. 2. Push the Start Button.
Operating lnstructlons Continued Using TUMBLEPRESS” The TUMBLE PRESS setting removes wrinkles from clothing that has been packed in a suitcase or closet, and from items not removed from the dryer al the end of a cycle. 1. Set the Cycle Control Knob on TUMBLE PRESS. 2. Push the Start Button. The bad will tumble in heated air for 10 minutes. Then the dryer will tumble the clothes for 10 more minutes without heat. For best results, put only a few ifems at a time in this cycle.
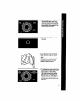
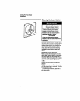
Caring For Your Dryer Do not run the dryer wlth the lint ecreen loose, damaged, blocked or mleslng. Dolng so can cause overheatlng and damage to both the dryer and fabrics. Cleaningthe lint screen The lint screen is located under a lid on top of the dryer. Clean It before each load. A screen blocked by lint can increase drying time. 1. Open the lid and pull the lint screen straight out. 2. Roll lint off the screen with your fingers. Do not rinse or wash the screen to remove lint.
Carlng For Your Dryer Contlnued cleaning tne aryer interior Electrlcal Shock and Personal Injury Hazard l Turn off the electrlcal power before cleaning the Interior. l Make sure the dryer Is cool. Failure to do so could result In electrlcal shock or Injury. Flre Hazard l Use non-flammable cleaner. Failure to do so could result In an explosion. Garments which contain unstable dyes, such as denim blue jeans or brightly colored cotton items, may discolor the dryer interior.
Lint removal Lint can gather inside the dryer and be a fuel for fire. It is recommended the lint be removed every 2 to 3 years, or more often, depending on dryer usage. Cleaning should be done by a qualified person. if you have any questions. please call our Consumer Assistance Center at 1-800-253-l 301. Electrical Shock and Personal Injury Hazard l Unplug the power supply cord or turn off the electrlcal power before removlng Ilnt. l Do not put hands lnslde the cablnet l Make sure the dryer Is cool.
Carlng For Your Contlnued lgnlter Gas dryer wlthout panel (full-fmnl 12 Dryer Funnel lower front accem pfinel removed) -8 dryer8 wlthout 8cce88 panel IOWW front tl your dryer is gas and does not have a tower front access panel: 1. Unplug the power supply cord or turn off the electrical power. 2. Remove lint screen. 3. Remove two screws from lint screen area. 4. Open top by pulling forward and up at each front comer (top is hinged at rear). 5.
If You NeedServiceOrAssistance We suggestyou follow these steps: 1. Before calling for asslstancs... Performance problems often result from little things you can find and fix yourself without tools of any kind.
5. If you are not satlsfled wtth how the problem was solved*... 4. If you need FSP replacement parts*... FSP is a registered trademark of Whirlpool Corporation for quality parts. Look for this symbol of quality whenever you need a replacement part for your Whirlpool appliance. FSP replacement parts will fit right and work right, because they are made to the same exacting specifications used to build every new Whirlpool appliance.
Notes
WHIRLPOOL@ AutomaticDryer Warranty DROO LENGTH OF WARRANTY 1 WHIRLPOOL WlLL PAY FOR FULL ONE-YEAR WARRANTY From Date of Purchase FSP@ replacement parts and repair labor to correct defects in materials or workmanship. Service must be provided by an authorized WhirlpooP”’ service company. WHIRLPOOL WILL NOT PAY FOR A. Service calls to: 1. Correct the installation of the dryer. 2. Instruct you how to use the dryer. 3. Replace house fuses or correct house wiring or plumbing. 4. Replace light bulbs. B.