i!iifziw dw AUTOMATIC WASHER Large Capacity Model LA6150XS Freezers, Refrtgerator-Freezers, Ice Makers, DIshwashers, Bullt-In Ovens and Surface Units. Ranges, MIcrowave Ovens, Trash Compactors.
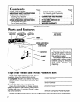
1 Contents PARTS AND FEATURES . . . . . . . . . . . IMPORTANT SAFETY INSTRUCTIONS OPERATING INSTRUCTIONS ....... Starting Your Washer . . . . . . . . . . . . What Happens in Each Cycle . . OTHER OPERATING INSTRUCTIONS For a Rinse and Spin . . . . . . , . For a Drain and Spin .. .. . . Page . 2 3 4 .. 4 . 6 .. ii ,. 8 01987 Whirlpool Page MAGIC CLEAN” Lint Filter . . . . . . . . . . . 8 For Visually and Physically Impaired Consumers ............ 8 CARING FOR YOUR WASHER . . . . . . . . . 9 Winterizing . .
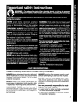
Additional Safety Instructions and Your Responsibilities ALWAYS store detergent, laundry aids and other materials in a cool, dry place where children can’t reach them - in a locked cabinet if possible. ALWAYS read and follow instructions on packages of detergent and laundry aids - especially warnings and precautions. HAZARDOUS FUMES can be formed if chlorine bleach is used in the same wash as ammonia or acids such as vinegar or rust remover.
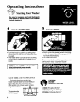
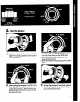
,- . 91 ’ Starting Your Washer Be sure to measure and add detergent, then place a sorted load in the washer before starting it. 1 l l n 2 w Select Select a WATER LEVEL Turn the knob to point to a setting that describes the size of the load you want to wash. The water level can be set for EX SMALL (a few items), MEDIUM or LARGE (a full load). I NOTE: Use the LARGE water level for best permanent press results. l l a CYCLE Each cycle has preset wash and rinse water temperatures.
3 n Start the Washer I A. Push in the Timer Knob and turn it to the right. It must be pushed l in and turned only clockwise. l l 6. After starting the washer, it will fill to the level you s&t with wash water of the preset temperature. After finishing the entire cycle, the Timer Knob will move into the OFF area. For REGULAR and PERM’T PRESS cycles, turn the Timer Knob to the START line. For the KNITS GENTLE cycle, turn the Timer Knob to the *. Start the washer by pulling out the Timer Knob. C.
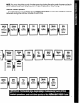
What Happens in Each Cycle Each cycle has been designed for different kinds of fabrics. When a Cycle Selector Button is pushed and the Timer Control Knob pulled out, the washer fills before agitation and timing starts. After agitation starts, the Timer Knob turns clockwise until it points to OFF and the cycle ends. REGULAR Cycle! REGULAR [HOT WATER) A cycle with a hot water wash and cold water rinse for sturdily constructed fabrics that are heavily soiled.
NOTE: You may hear the sound of water spraying during the spin parts of some cycles. some cycles, cold water is sprayed on the spinning load to help rinsing. Gentle In Wash System For better fabric care in REGULAR and PERMANENT PRESS cycles, reduced during the last few minutes of wash time.
Other operating instructions For a rinse and spin For a drain and spin You may need an extra rinse and spin for heavily soiled loads which need more detergent. (Extra detergent can require an extra rinse.) l Push Timer Knob in. l Turn clockwise to the Rinse portion of the cycle. See above drawing. l Pull Timer Knob out. l The washer will fill to selected level; agitate 2 minutes; drain and spin. Your washer can be spin out water. l Push Timer Knob in. l Turn clockwise to the tion of the cycle.
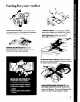
Caring for your washer WHEN NOT WASHING, keep both water faucets turned off. This takes the pressure off the water inlet valve and hoses. AFTER WASHING, use a soft dry cloth to wipe the outside and inside dry. Leave the lid up until the basket is dry. Wipe up spills right away. Spills can dull or damage the finish. - REMOVE SHARP OBJECTS such as pins, buckles, etc., from clothes before washing. Close metal zippers. SHARP OR HEAVY OBJECTS should never be put on or in the washer.
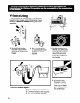
Winterizing Because some water stays in the washer, freezing can cause a lot of damage. If your washer is stored or moved during the cold weather... 1. Shut off both water faucets. Disconnect and drain water inlet hoses. To use the washer 2. Put a quart of R.V. or automobile type antifreeze in the basket. again... 1. Flush water pipes and hoses. 2. Connect hoses to the washer. 3. Turn on the water faucets. 10 3. Set the washer for a DRAIN and SPIN (see page 8).
If you need service or assistance, we suggest you follow these five steps: 3. If you need service?.. 1. Before calling for assistance... Performance problems often result from little things you can find and fix yourself without tools of any kind.
WHIRLPOOL” AUTOMATIC WASHER WARRANTY LENGTH OF WARRANTY FULL ONE-YEAR WARRANTY From Date of Purchase 1 WHIRLPOOL WILL PAY FOR FSP@ replacement parts and repair labor to correct defects in materials or workmanship. Service must be provided by a franchised TECH-CARE@ service company From Date of Purchase FSPreplacement parts for any part of gearcase assembly if defective in materials or workmanship. The gearcase assembly is shown below.