Operating instructions DISHWASHER EN Contents EN Precautions and advice, 2-3 English,1 General safety Disposal Saving energy and respecting the environment Installation, 4-5 Positioning and levelling Connecting the water and electricity supplies Advice regarding the first wash cycle Technical data Description of the appliance, 6 Overall view Control panel Loading the racks, 7-8 LFF 8M5 Lower rack Cutlery basket Upper rack Adjusting upper rack Start-up and use, 9 Starting the dishwasher Measurin
Precautions and advice EN This appliance was designed and manufactured in compliance with international safety standards The following information has been provided for safety reasons and should therefore be read carefully. Keep this instruction manual in a safe place for future reference. If the appliance is sold, given away or moved, please ensure the manual is kept with the machine. Please read these instructions carefully: they contain important information on installation, use and safety.
Phosphate-free and chlorine-free detergents containing enzymes • We strongly recommend that you use detergents that do not contain phosphates or chlorine, as these products are harmful to the environment. • Enzymes provide a particularly effective action at temperatures around 50°C. As a result detergents containing enzymes can be used in conjunction with low-temperature wash cycles in order to achieve the same results as a normal 65°C wash cycle.
Installation EN If the appliance must be moved at any time, keep it in an upright position; if absolutely necessary, it may be tilted onto its back. Before connecting the water outlet hose to the sink drain, remove the plastic plug (B). Positioning and levelling To ensure floods do not occur, the dishwasher: - is provided with a special system which blocks the water supply in the event of anomalies or leaks from inside the appliance.
Anti-condensation strip* Before installing the dishwasher, stick the adhesive transparent strip under the wooden shelf in order to protect it from any condensation which may form. Technical data Dimensions width 60 cm height 85 cm depth 60 cm Capacity 14 standard place-settings Water supply pressure 0,05 ÷ 1MPa (0.
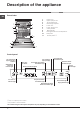
Description of the appliance EN Overall view 1. 2. 3. 4. 5. 6. 7. 8. 9. 10. 11.
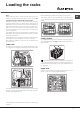
Loading the racks Tips Before loading the racks, remove all food residues from the crockery and empty liquids from glasses and containers. No preventive rinsing is needed under running water. Arrange the crockery so that it is held in place firmly and does not tip over; and arrange the containers with the openings facing downwards and the concave/convex parts placed obliquely, thus allowing the water to reach every surface and flow freely.
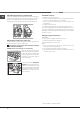
EN Adjustable position tip-up compartments Unsuitable crockery The tip-up compartments can be positioned at different heights, to optimise the arrangement of crockery throughout the rack. Wine glasses can be placed safely in the tip-up compartments, by inserting the stem of each glass into the corresponding slots. • Wooden crockery and cutlery. • Delicate decorated glasses, artistic handicraft and antique crockery. Their decorations are not resistant.
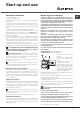
Start-up and use Starting the dishwasher Measuring out the detergent 1. Turn the water tap on. 2. Press the ON/OFF button. 3. Open the door and pour in a suitable amount of detergent (see below). 4. Load the racks (see Loading the racks) and shut the door. 5. Select the wash cycle in accordance with the type of crockery and its soil level (see Table of wash cycles) by pressing the P button. 6. Select the wash options* (see adjacent information). 7.
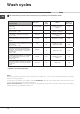
Wash cycles The number and type of wash cycles and options may vary depending on the dishwasher model. EN Instructions on wash-cycle selection and detergent dosage Wash cycle Wash cycles with drying Options Approximate duration of wash cycles Heavily soiled dishes and pans (not to be used for delicate items). 35 gr/ml – 1 Tab Auto Super Wash Yes Delayed start – Tabs – Half load 2:25’ For dirty pans and dishes.
Special wash cycles and Options Wash options* The OPTIONS may only be set, modified or reset after the wash cycle has been selected and before the Start/Pause button has been pressed. Only the options which are compatible with the type of wash cycle set may be selected. If an option is not compatible with the selected wash cycle (see Table of wash cycles), the corresponding LED flashes rapidly 3 times and 2 short beeps will sound.
Rinse aid EN Only use products which have been specifically designed for dishwashers. Do not use washing-up liquid. Follow the instructions given on the packaging. If using a multi-functional product it is not necessary to add any rinse aid. If you do not add rinse aid, the LOW RINSE AID indicator light will stay lit. Measuring out the rinse aid Rinse aid makes it easier for the crockery to dry, as water runs off surfaces more readily and therefore does not leave streaks or marks.
Care and maintenance Shutting off the water and electricity supplies • Turn off the water tap after every wash cycle to avoid leaks. • Always unplug the appliance when cleaning it and when performing maintenance work. Cleaning the dishwasher • The external surfaces of the machine and the control panel can be cleaned using a non-abrasive cloth which has been dampened with water. Do not use solvents or abrasive products.
Troubleshooting EN Whenever the appliance fails to work, check for a solution from the following list before calling for Assistance. Problem: Possible causes / Solutions: The dishwasher does not start or cannot be controlled • Switch off the appliance by pressing the ON/OFF button, switch it back on after approximately one minute and reset the program. • The appliance has not been plugged in properly. • The dishwasher door has not been shut properly. The door won’t close • The lock was released.
Assistance Assistance EN Before contacting Assistance: • Check whether the problem can be resolved using the Troubleshooting guide (see Troubleshooting). • Restart the programme to check whether the problem has ceased to exist. • If the problem persists, contact the Authorised Technical Assistance Service. Never use the services of unauthorised technicians. Please have the following information to hand: • The type of malfunction. • The appliance model (Mod.). • The serial number (S/N).
195111817.