BRAVOS® ELECTRONIC DRYER USE AND CARE GUIDE SÉCHEUSE ÉLECTRONIQUE BRAVOS® GUIDE D’UTILISATION ET D’ENTRETIEN Table of Contents Table des Matières DRYER SAFETY...............................................................................2 CHECK YOUR VENT SYSTEM FOR GOOD AIR FLOW...................................................................4 CONTROL PANEL AND FEATURES............................................5 CYCLE GUIDE.............................................................................
DRYER SAFETY 2
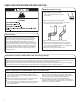
CHECK YOUR VENT SYSTEM FOR GOOD AIR FLOW Maintain good air flow by: n Cleaning your lint screen before each load. n Replace plastic or foil vent material with 4" (102 mm) diameter heavy, rigid vent material. n Use the shortest length of vent possible. n Use no more than four 90° elbows in a vent system; each bend and curve reduces air flow. Good Better Good air flow Along with heat, dryers require good air flow to efficiently dry laundry.
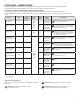
CONTROL PANEL AND FEATURES Not all features and cycles are available on all models. Steam models 1 3 2 4 6 5 5 Non-steam models 1 2 3 4 6 5 1 POWER/CANCEL BUTTON 2 CYCLE CONTROL KNOB Press to turn the dryer on and off. Press again to stop/cancel a cycle at any time. Use your dryer’s cycle control knob to select available cycles on your dryer. Turn the knob to select a cycle for your laundry load. See “Cycle Guide” for detailed descriptions of cycles.
5 CYCLE OPTIONS Use these buttons to select available options for your dryer. Not all cycles and options are available on all models. Wrinkle Prevent/Wrinkle Prevent with Steam (on some models) If you will be unable to remove a load immediately, press Wrinkle Prevent to add up to 150 minutes of periodic tumbling to help reduce wrinkling. On models with Wrinkle Prevent with Steam, a short steam cycle is added after 60 minutes to help smooth out wrinkles.
CYCLE GUIDE — SENSOR CYCLES Settings and options shown in bold are default settings for that cycle. Not all features and cycles are available on all models. Not all settings and options are available on each cycle. Default cycle times are estimated in minutes. Use Sensor Cycles for better fabric care and energy savings The dryer senses moisture in the load or air temperature and shuts off when the load reaches the selected dryness level. Use the NORMAL dryness level to provide optimal energy savings.
CYCLE GUIDE — TIMED CYCLES Settings and options shown in bold are default settings for that cycle. Not all features and cycles are available on all models. Not all settings and options are available on each cycle. Default cycle times are estimated in minutes. Adjusting drying time on Timed Cycles Selecting the Drying Temperature When you select a Timed Cycle, the default time appears in the display. Use the + and – buttons to increase or decrease the time in 1 minute increments.
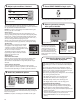
USING YOUR DRYER WARNING: To reduce the risk of fire, electric shock, or injury to persons, read the IMPORTANT SAFETY INSTRUCTIONS before operating this appliance. 1. Clean the lint screen 3. Press POWER/CANCEL Press the POWER/CANCEL button to turn on the dryer. Clean the lint screen before each load. Pull the lint screen straight up. Roll lint off the screen with your fingers. Do not rinse or wash screen to remove lint. Wet lint is hard to remove. Push the lint screen firmly back into place.
5. Adjust cycle modifiers, if desired 7. P ress START/PAUSE to begin cycle Press and hold the START/PAUSE button to begin the cycle. Steam model shown You may adjust different settings, depending on whether you have selected a Sensor Cycle, Timed Cycle, or Steam Cycle. See the “Cycle Guide” for detailed information. NOTE: Not all options and settings are available with all cycles. Not all cycles are on all models.
ADDITIONAL FEATURES USING THE DRYING RACK To obtain a drying rack for your dryer, follow the instructions included in your dryer drum. Remove and discard any packing material before use. Use the Drying Rack for items that you do not want to tumble dry, such as sweaters and tennis shoes. When you use the drying rack, the drum continues to turn, but the rack remains stationary. The drying rack is intended for use with the Timed Dry cycles only. The drying rack cannot be used with Sensor cycles.
DRYER CARE CLEANING THE DRYER LOCATION Keep dryer area clear and free from items that would block the air flow for proper dryer operation. This includes clearing piles of laundry in front of the dryer. CLEANING THE LINT SCREEN Every load cleaning The lint screen is located in the door opening of the dryer. The control panel has an indicator light to remind you to clean the lint screen after each load. A screen blocked by lint will increase drying time. To clean: 1. Pull the lint screen straight up.
NON-USE, STORAGE, AND MOVING CARE Install and store your dryer where it will not freeze. Because some water may stay in the hose, freezing can damage your dryer. If storing or moving your dryer during freezing weather, winterize it. Non-Use or Storage Care Operate your dryer only when you are at home. If you will be on vacation or not using your dryer for an extended period of time, you should: 1. Unplug dryer or disconnect power. 2. Clean lint screen. See “Cleaning the Lint Screen”. 3.
TROUBLESHOOTING First try the solutions suggested here or visit our website at www.whirlpool.com/product_help – In Canada www.whirlpool.ca for assistance and to possibly avoid a service call. If you experience Possible Causes Solution Dryer Operation Dryer will not run Door not closed completely. Make sure the dryer door is closed completely. START/PAUSE button not pressed firmly or held long enough. Press and hold the START/PAUSE button 2–5 seconds.
TROUBLESHOOTING First try the solutions suggested here or visit our website at www.whirlpool.com/product_help – In Canada www.whirlpool.ca for assistance and to possibly avoid a service call. If you experience Possible Causes Solution Dryer Results (cont.) Clothes are not drying satisfactorily or drying times are too long The load is too large and heavy to dry quickly. Separate the load to tumble freely. Fabric softener sheets are blocking the grille.
TROUBLESHOOTING First try the solutions suggested here or visit our website at www.whirlpool.com/product_help – In Canada www.whirlpool.ca for assistance and to possibly avoid a service call. If you experience Possible Causes Solution Dryer Results (cont.) Load too hot Load removed before cooldown portion of cycle complete. Allow the dryer to complete the cooldown portion of the cycle before removing the load. Using Timed Dry cycle with a high temperature setting.
MAYTAG® LAUNDRY WARRANTY LIMITED WARRANTY For one year from the date of purchase, when this major appliance is installed, operated, and maintained according to instructions attached to or furnished with the product, Maytag brand of Whirlpool Corporation or Whirlpool Canada LP (hereafter “Maytag”) will pay for factory specified replacement parts and repair labor to correct defects in materials or workmanship that existed when this major appliance was purchased.
SÉCURITÉ DE LA SÉCHEUSE 18
VÉRIFICATION D’UNE CIRCULATION D’AIR ADÉQUATE POUR LE SYSTÈME D’ÉVACUATION Maintenir une bonne circulation d’air en effectuant les opérations suivantes : n Nettoyer le filtre à charpie avant chaque charge. n Remplacer le matériau de conduits d’évacuation en plastique ou en aluminium par des conduits d’évacuation lourds et rigides de 4" (102 mm) de diamètre. n Toujours employer les conduits d’évacuation les plus courts possible.
TABLEAU DE COMMANDE ET CARACTÉRISTIQUES Certains programmes et caractéristiques ne sont pas disponibles sur certains modèles. Modèles vapeur 1 2 3 4 6 5 5 Modèles à fonctionnement sans vapeur 1 2 3 4 6 5 1 BOUTON POWER/CANCEL (mise sous tension/annulation) Appuyer sur ce bouton pour mettre la sécheuse en marche et pour l’éteindre. Appuyer de nouveau sur ce bouton pour arrêter/annuler un programme à tout moment.
5 OPTIONS DE PROGRAMMES Utiliser ces boutons pour sélectionner les options disponibles sur la sécheuse. Certains programmes et options ne sont pas disponibles sur certains modèles. Wrinkle Prevent/Wrinkle Prevent avec vapeur (sur certains modèles) Si l’on n’est pas en mesure de retirer la charge immédiatement, appuyer sur Wrinkle Prevent pour ajouter jusqu’à 150 minutes de culbutage périodique afin d’aider à réduire le froissement.
GUIDE DE PROGRAMMES — PROGRAMMES DE DÉTECTION Les réglages et options indiqués en gras sont les réglages par défaut pour ce programme. Certains programmes et caractéristiques ne sont pas disponibles sur certains modèles. Tous les réglages et options ne sont pas disponibles sur tous les programmes. La durée des programmes est estimée en minutes.
GUIDE DE PROGRAMMES — PROGRAMMES MINUTÉS Les réglages et options indiqués en gras sont les réglages par défaut pour ce programme. Certains programmes et caractéristiques ne sont pas disponibles sur certains modèles. Tous les réglages et options ne sont pas disponibles sur tous les programmes. La durée des programmes est estimée en minutes.
UTILISATION DE LA SÉCHEUSE AVERTISSEMENT : Pour réduire le risque d’incendie, de choc électrique ou de blessures corporelles, lire les INSTRUCTIONS IMPORTANTES DE SÉCURITÉ avant de faire fonctionner cet appareil. 1. Nettoyer le filtre à charpie 3. A ppuyer sur POWER/CANCEL (mise sous tension/annulation) Appuyer sur le bouton POWER/CANCEL (mise sous tension/ annulation) pour mettre la sécheuse en marche. Nettoyer le filtre à charpie avant chaque charge.
5. A juster les modificateurs de programme si désiré Illustration : Modèle à vapeur On peut ajuster différents réglages, selon que l’on a sélectionné un programme de détection, un programme minuté ou avec vapeur. Voir le “Guide de programmes” pour des informations détaillées. REMARQUE : Tous les réglages et options ne sont pas disponibles avec tous les programmes. Certains programmes ne sont pas disponibles sur certains modèles.
8. R etirer rapidement les vêtements une fois le programme terminé Illustration : Modèle à vapeur Retirer rapidement les vêtements une fois le programme terminé pour réduire le froissement. Modèle sans Si l’on n’est pas en mesure de fonctionnement à Modèle vapeur vapeur retirer rapidement la charge, sélectionner l’option Wrinkle Prevent™/Wrinkle Prevent avec vapeur avant d’appuyer sur Start/Pause (mise en marche/pause).
CARACTÉRISTIQUES SUPPLÉMENTAIRES UTILISATION DE LA GRILLE DE SÉCHAGE Pour obtenir une grille de séchage pour votre sécheuse, suivre les instructions fournies dans le tambour de la sécheuse. Enlever et jeter les matériaux d’emballage avant utilisation. Utiliser la grille de séchage pour les articles que l’on ne souhaite pas faire sécher par culbutage tels que les chandails et les chaussures de tennis. Lorsqu’on utilise la grille de séchage, le tambour continue de tourner mais la grille reste stationnaire.
ENTRETIEN DE LA SÉCHEUSE NETTOYAGE DE L’EMPLACEMENT DE LA SÉCHEUSE Éviter de laisser autour de la sécheuse des éléments qui pourraient obstruer la circulation de l’air et empêcher le bon fonctionnement de la sécheuse. Ceci implique de dégager également les éventuelles piles de linge placées devant la sécheuse. NETTOYAGE DU FILTRE À CHARPIE Nettoyage avant chaque charge Le filtre à charpie se trouve dans l’ouverture de la porte de la sécheuse.
PRÉCAUTIONS À PRENDRE EN CAS DE NON-UTILISATION, D’ENTREPOSAGE ET DE DÉMÉNAGEMENT Installer et remiser la sécheuse à l’abri du gel. Il est possible que de l’eau stagne dans les tuyaux; ceci pourrait endommager la sécheuse en période de gel. Si la sécheuse doit faire l’objet d’un déménagement ou de remisage au cours d’une période de gel, hivériser la sécheuse. Entretien en cas de non-utilisation ou d’entreposage On ne doit faire fonctionner la sécheuse que lorsqu’on est présent.
DÉPANNAGE Essayer d’abord les solutions suggérées ici ou consulter le site Web www.whirlpool.com/product_help – Au Canada www.whirlpool.ca pour obtenir de l’aide et pour éviter une intervention de réparation. Si les phénomènes suivants se produisent Causes possibles Solution Fonctionnement de la sécheuse La sécheuse ne fonctionne pas La sécheuse ne produit pas de chaleur La porte n’est pas bien fermée. S’assurer que la porte de la sécheuse est complètement fermée.
DÉPANNAGE Essayer d’abord les solutions suggérées ici ou consulter le site Web www.whirlpool.com/product_help – Au Canada www.whirlpool.ca pour obtenir de l’aide et pour éviter une intervention de réparation. Si les phénomènes suivants se produisent Causes possibles Solution Résultats de la sécheuse (suite) Les vêtements ne sèchent pas de manière satisfaisante ou le temps de séchage est trop long (suite) La charge est trop grosse et trop lourde pour sécher rapidement.
DÉPANNAGE Essayer d’abord les solutions suggérées ici ou consulter le site Web www.whirlpool.com/product_help – Au Canada www.whirlpool.ca pour obtenir de l’aide et pour éviter une intervention de réparation. Si les phénomènes suivants se produisent Causes possibles Solution Résultats de la sécheuse (suite) Odeurs Charge trop chaude Vous avez récemment employé de la peinture, de la teinture ou du vernis dans la pièce où votre sécheuse est installée. Aérer la pièce.
GARANTIE DES APPAREILS DE BUANDERIE MAYTAG® GARANTIE LIMITÉE Pendant un an à compter de la date d’achat, lorsque ce gros appareil ménager est utilisé et entretenu conformément aux instructions jointes à ou fournies avec le produit, la marque Maytag de Whirlpool Corporation ou Whirlpool Canada LP (ci-après désignées “Maytag”) paiera pour les pièces spécifiées par l’usine et la main-d’oeuvre pour corriger les vices de matériaux ou de fabrication qui existaient déjà lorsque ce gros appareil ménager a été achet
Assistance or Service Before calling for assistance or service, please check “Troubleshooting” or visit www.whirlpool.com/help. It may save you the cost of a service call. If you still need help, follow the instructions below. When calling, please know the purchase date and the complete model and serial number of your appliance. This information will help us to better respond to your request. If you need replacement parts or to order accessories We recommend that you use only FSP® Factory Specified Parts.