.... _i_ii!_i!_iiii_!ii_iii_iiii!!i_!_ !iiill iii!!iiiilili _;_'¸'_'_¸_ ...... UseCare A Note to You ................. Microwave Oven Safety .......................... Installation Instructions .................... ,i, Getting to Know Your Microwave Oven ............ Using Your Microwave Oven .......... 2; Caring for Your Microwave Oven .......... Cooking Guide ............. '_:' Questions and Answers ....................... Troubleshooting ........... Requesting Assistance or Service ...........
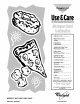
A NOTE TOYOU '_iii_l'i_ii_'ii_iii:; _,_i_;l_;_ _i_;_ii _'I,',i_,iii_ii_,_i,' _i_ '_li,_iii!_iii_,_ii:x_'OOU i!/_:i:ii_i_:iiii ii_!_i_:iiilc,_ii!f_ The Whirlpool Brand is committed to designing quality products that consistently perform for you to make your life easier. To ensure that you enjoy years of trouble-free operation, we developed this Use and Care Guide. It is full of valuable information about how to operate and maintain your appliance properly and safely. Please read it carefully.
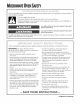
? liii i iiiifl'iiiii !i:;iil ; i i'A:iiiiy iiiilliii:: ! i ii"'ii ;iiiiiiii !i' , We have provided many important safety messages in this manual and on your appliance. Always read and obey all safety messages. This is the safety alert symbol. This symbol alerts you to hazards that can kill or hurt you and others. All safety messages will be preceded by the safety alert symbol and the word "DANGER" or "WARNING." These words mean: You will be killed or seriously foltow instructions.
iiiiit,, iiiiPORl'%i',!i ,,KI To reduce the risk of fire in the oven cavity: - Do not overcook food. Carefully attend the microwave oven if paper, plastic, or other combustible materials are placed inside the oven to facilitate cooking. - Remove wire twist-ties from paper or plastic bags before placing bag in oven. - If materials inside the oven should ignite, keep oven door closed, turn oven off, and disconnect the power cord, or shut off power at the fuse or circuit breaker panel.
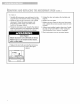
Observe all governing codes and ordinances. A 120 Volt, 60 Hz, AC only, 15 or 20 amp fused electrical supply is required. (A time-delay fuse is recommended.) It is recommended that a separate circuit serving only this appliance be provided. Electrical Shock Hazard Plug into a grounded 3 prong outlet. Do not remove ground prong. Do not use an adapter. Do not use an extension cord. Failure to follow these instructions can result in death, fire, or electrical shock.
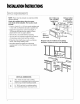
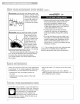
INSTAUATION INSlltUCnONS NOTE: There must be at least one wall stud within cabinet opening. 66%" (168.3 cm) min. mounting height from Check the opening where the microwave oven hood will be installed. The location must provide: Exhaust outlet connects to 31/4"x10" (8,25 x floor 30" (76,2 cm) 25.4 cm) ..... --_ min. width required duct 2 inch x 4 inch (5.1 x 10.2 cm) wood studding and % inch (.
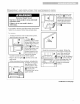
Excessive Weight Hazard Use two or more people to move and install microwave oven. Failure to do so can result in back or other injury. While wearing gloves, grasp the microwave oven supports _ and firmly pull the microwave oven forward and downward to release the microwave oven cabinet from the mounting plate locking pins _. If you need to remove your Microwave Hood Combination for any reason, follow these simple steps: Unplug microwave oven or disconnect power. Remove filters and vent grille.
Carefully lift microwave oven and hang it on the support tabs at the bottom of the mounting plate. Rotate the front of the microwave oven cabinet downward. Thread the power supply cord through the power supply cord hole in the bottom of the upper cabinet. Rotate the microwave oven towards the cabinet. Push the microwave oven against the mounting plate until locking pins snap into the cabinet. Untape the door and replace the turntable and support. Replace the vent grille.
GETTING TOKNOW YOUR MICROWAVE OVEN This section discusses the concepts behind microwave cooking. It also shows you the basics you need to know to operate your microwave oven. Please read this information before you use your microwave oven. Microwave ovens are safe. Microwave energy is not hot. It causes food to make its own heat, and it's this heat that cooks the food. Microwaves are like TV waves or light waves. You cannot see them, but you can see what they do.
Microwavespassthroughmostglass,paper,and plasticswithoutheating them so food absorbs the energy. Microwaves bounce off metal containers so food does not absorb the energy. Microwaves may not reach the center of a roast. The heat spreads to the center from the outer, cooked areas just as in regular oven cooking. This is one of the reasons for letting some foods (for example, roasts or baked potatoes) stand for a while after cooking, or for stirring some foods during the cooking time.
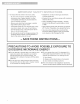
Test dinnerware or cookware before using. To test a dish for safe use, put it into the oven with a cup of water beside it. Cook at 100% cook power for 1 minute. If the dish gets hot and water stays cool, do not use it. Some dishes (melamine, some ceramic dinnerware, etc.) absorb microwave energy, becoming too hot to handle and slowing cooking times.
Do not overcook potatoes. Fire could result. At the end of the recommended cooking time, potatoes should be slightly firm because they will continue cooking during standing time. After microwaving, let potatoes stand for 5 minutes. They will finish cooking while standing. Do not start a microwave oven when it is empty. Product life may be shortened.
MICROWAVE OVEN FEATURES ® Your microwave oven is designed to make your cooking experience as enjoyable and productive as possible. To help get you up and running quickly, the following is a list of the oven's basic features: 1. Door Handle. Pull to open door. 2. Door Safety Lock System. The oven will not operate unless the door is securely closed. 3. Window with Metal Shield. Shield prevents microwaves from escaping. It is designed as a screen to allow you to view food as it cooks. 4. Cooking Rack.
Display. This display includes a clock and indicators to tell you the time of day, cooking time settings, and cooking functions you chose. REHEAT. Touch this pad to reheat microwavable foods without entering times and cook powers. See page 27 for more information. DEFROST. Touch this pad to defrost frozen foods without entering times and cook powers. See page 28 for more information. COOK. Touch this pad to cook microwavable foods without entering times and cook powers. See page 26 for more information.
LIGHTON/NIGHT/OFF. Touchthis padto turn the lightor nightlightonor off.Seepage18for moreinformation. VENTFANHIGH/LOW/OFF. Touchthis padto turnonthefanathighor lowspeed.Alsouse it toturnthefanoff. Seepage17for more information. If youhaveenteredallsettingsfora functionbut do nottouchSTART/ENTER in 5 seconds,the START? indicatorlightwillshow. If youopenthedoorwhilethe ovenis onand thenshutthedoor,theSTART? indicatorlight willshow.TouchSTART/ENTER to continue.
iiii i! i :ii iiii iii 0ii , ¸!i 'l! iii :ii ii ¸ i: ii;i ili When heating plates of food with a cook time that you set, you can heat two 101/4-inch (26 cm) plates side by side or one dish larger than the turntable. You can heat 2 more plates on the Cooking Rack for a possible total of 4 plates. For best results, halfway through cooking turn the plates halfway around until the food in the front is in the back. Do the same when heating a larger (9- to 13-inch [23 to 33 cm]) casserole.
The Cooking Rack gives you extra space when cooking in more than one container at the same time. If you need a replacement rack, you can order one from your authorized service company, or by calling the Consumer Assistance Center at 1-800-253-1301 (in U.S.A.) or 1-800-461-5681 (in Canada). When calling, follow the instructions and telephone prompts you hear. Make sure to have your model number when ordering. Insert the rack securely into the rack supports the oven.
When your microwave oven is first plugged in, or after a power failure, the display will flash ":". If a time of day is not set, ":" will show until you touch any pad. If you touch in an invalid time and touch CLOCK, 3 tones will sound. Enter the correct time. 1, Touch CLOCK. If you touch OFF/CANCEL while setting the clock, the display will show the last time of day set. To turn off the clock touch CLOCK, Number pad 0, and CLOCK again, the set time will disappear and ":" will show on the display.
You can use your microwave oven as a kitchen timer. Use the Minute Timer for timing up to 99 minutes, 99 seconds. The oven can operate while the Minute Timer is in use. To see the Minute Timer while the oven is cooking, touch TIMER SET. 1. Touch TIMER SET. TOUCH [ Enter the time to be counted down.
ADD MINUTE lets you cook food for 1 minute at 100% cook power or add an extra minute to your cooking time cycle. You can also use it to extend cooking time cycles in multiples of 1 minute, up to 99 minutes, If you touch ADD MINUTE during cooking, the oven will cook at the currently selected cook power. If you touch ADD MINUTE after cooking is over, the oven will cook at 100% cook power.
USING YOUR MICROWAVE OVEN This section carefully. gives you instructions for operating each function. Please read these instructions Put your food in the oven and close the door. Touch COOK TIME. TOUCH YOU SEE tco° I TIME Enter the cooking time. TOUCH YOU SEE TOUCH YOU SEE Example for 1 minute, 30 seconds: Start the oven. START ENTER At the end of the cooking time: YOU SEE (four tones will sound) You can change the cooking time any time during cooking by repeating Steps 2, 3, and 4.
For best results, some recipes call for different cook powers. The lower the cook power, the slower the cooking. Each Number pad also stands for a different percentage of cook power. Many microwave cookbook recipes tell you by number, percent, or name which cook power to use. COOK POWER NAME 10=100% of full power (automatic) High The following chart gives the percentage of cook power each Number pad stands for, and the cook power name usually used. It also tells you when to use each cook power.
Enter the cooking time. Example for 7 minutes, 30 seconds: Set the cook power. TOUCH YOU SEE [23 F_q F_q TOUCH YOU SEE I co°I POWER Example for 50% cook power: TOUCH YOU SEE OR I POWER COOK I (repeat until desired cook power appears) Start the oven. TOUCH START ENTER At the end of the cooking time: YOU SEE _1 YOU SEE (four tones will sound) You can change the cooking time or cook power any time during cooking by repeating Steps 2, 3 and/or 4 and 5.
For best results, some recipes call for one cook power for a certain length of time, and another cook power for another length of time. Your oven can be set to change from one to another automatically, for up to 3 stages. You can set your chosen cook functions in any order. However, if you use EZ-Choice DEFROST, it must be the first stage. Put your food in the oven and close the door. Touch COOK TIME. TOUCH TIME COOK Enter the cooking time for the first stage.
Start the oven. TOUCH YOU SEE START ENTER After the first stage is over, the next stage(s) will count down, (first stage, when cooking with 2 stages) At the end of the cooking time: YOU SEE (four tones will sound) You can change cooking times or cook powers for a stage any time after that stage starts by repeating Steps 2, 3, and/or 4 and 5.
You can cook microwavable foods just by choosing a category and quantity. EZ-Choice COOK has preset times and cook powers for 7 categories (see chart below). To use EZ-Ohoice below: Touch one or more Number pads to enter the quantity. -_ Example for 1 cup COOK, follow the steps You see Example for I cup _i,_Touch COOK } once You see Touch [ STARTENTER _1 I You see (countdown may vary) Touch COOK 1 to 7 times to choose the type of food.
You can reheat microwavable foods just by choosing a category and quantity. EZ-Choice REHEAT has preset times and cook powers for 5 categories (see chart below). Touch a Number pad to enter the quantity. -_ Example for I slice You see To use EZ-Choice REHEAT, follow the steps below: Example for I slice '_,_Touch REHEAT Touch once START ENTER i_I You see You see (countdown time may vary) Touch REHEAT 1 to 5 times to choose the type of food.
You can defrost food by choosing a category and setting a weight. EZ-Choice DEFROST has preset times and cook powers for 3 categories (see chart below). To use EZ-Choice DEFROST, follow the steps below: DEFROST I once You see If you do not enter a weight within 2 seconds, EZ-Choice DEFROST will prompt you to enter a weight. You then have 1 minute to enter a weight and to touch START/ENTER. If you do not do so, EZ-Choice DEFROST will be canceled.
FOOD SPECIAL INSTRUCTIONS Beef Meat of irregular shape and large, fatty cuts of meat should have the narrow or fatty areas shielded with foil at the beginning of a defrost cycle. Ground Beef, Bulk Do not defrost less than 1/4Ib (113 g). Ground Beef, Patties Do not defrost less than two 4 oz (113 g) patties. Round Steak, Tenderloin Steak, Pot Roast, Chuck Roast, Rib Roast, Rolled Rump Roast Stew Beef Place on a microwavable roasting rack. Place in a microwavable baking dish.
iD !ill{iilii{]i ijiiiit Ki'' i) i%iiii!! iisJq "i iii 'ii 1!i FOOD SPECIAL INSTRUCTIONS Chicken Whole (up to 91/2Ibs [4.3 kg]) Place chicken breast-side up on a microwavable roasting rack. Finish defrosting by immersing in cold water. Remove giblets when chicken is partially defrosted. Cut Up Place on a microwavable roasting rack. Finish defrosting by immersing in cold water. Cornish Hens Whole Place on a microwavable roasting rack. Finish defrosting by immersing in cold water.
You can pop commercially packaged microwave popcorn by touching just one pad. The number of times you touch this pad determines which size bag of popcorn your oven will pop. For best results: Pop only 1 package at a time. If you are using a microwave popcorn popper, follow manufacturer's instructions. To use POPCORN, follow the steps below: Place the bag in the center of the turntable. Touch POPCORN 1 to 3 times to choose the bag size.
Youcanheatoneor two8-ounce(227g)cupsof a beverage by touchingjust 1 pad.Thenumber oftimesyoutouchthis paddetermines thenumber ofcupsyourovenwillheat. and the oven will startcup,justwait5 heating automatically If youwantto heat1 seconds for 1 cup. J BEVERAGE I Change to 2 cups, if desired. TOUCH I BEVERAGE YOU SEE I OR After 5 seconds, the oven will start heating.
You can cook one to four baking potatoes (10 oz [284 g] to 13 oz [369 g] each) by touching just one pad. The number of times you touch this pad determines the number of potatoes your oven will cook. Time _t_ TIP Before baking, remember to pierce the potato with a fork several times. After cooking, let potatoe s stand for 5 minutes to finish cooking, If you touch BAKED POTATO 5 times, the display returns to the 1-potato setting. You do not need to touch START/ENTER to start the oven.
iiiiiiii +++ You do not need to touch START/ENTER to start the oven. The oven will start cooking by itself in 5 seconds. You can cook 1 to 4 cups of a frozen vegetable by touching just one pad. The number of times you touch this pad determines the number of cups your oven will cook. If you need more or less cooking time, do not touch VEGETABLE again. Touch COOK POWER before the oven starts cooking. (See "Changing preset cooking times" in the "Getting to Know" section.
You can cook a 1O- or 20-ounce (284 g or 568 g) frozen entree by touching just one pad. The number of times you touch this pad determines the size of entree your oven will cook. If you touch FROZEN ENTREE 3 times, the display returns to the 10-ounce (284 g) setting. You do not need to touch START/ENTER to start the oven. The oven will start cooking by itself in 5 seconds. If you need more or less cooking time, do not touch FROZEN ENTREE again. Touch COOK POWER before the oven starts cooking.
You can safely keep hot, cooked food warm in your microwave oven for up to 99 minutes, 99 seconds (about 1 hour, 40 minutes). You can use WARM HOLD by itself, or to automatically follow a cooking cycle. WARM HOLD operates for up to 99 minutes, 99 seconds. Opening the oven door cancels WARM HOLD. Close the door and touch WARM HOLD, then touch START/ENTER if additional WARM HOLD time is desired. Start the oven. Food cooked covered should be covered during WARM HOLD. Pastry items (pies, turnovers, etc.
CARING FOR YOUR MICROWAVE OVEN To make sure your microwave oven looks good and works it properly. For proper care, please follow these instructions For interior surfaces: Wash often with warm, sudsy water and a sponge or soft cloth. Use only mild, nonabrasive soaps or a mild detergent. Be sure to keep the areas clean where the door and oven frame touch when closed. Wipe well with clean water. Over time, stains can occur on the surfaces as the result of food particles spattering during cooking.
Do not allow grease and soil to build up in the grease filters. It will decrease the exhaust fan efficiency and could cause a fire. Remove and clean grease filters at least once a month. Your microwave hood combination comes with a charcoal filter to provide clean recirculated air. The charcoal filter cannot be cleaned and should be replaced every 6 to 12 months. You can order replacements (PN 4393690) in the U.S.A.
j;ii l@ (ii?i!i!ii](;11'IiiI;; i Unplug microwave oven or disconnect Replace bulb(s) with candelabra-base bulb(s) (PN 4393681)? power. Remove the bulb cover mounting screw and carefully remove the cover. 30-watt A Replace the bulb cover and mounting screw. Plug in microwave oven or reconnect power. i Mounting screw Yl'i_ _ii!f ¸_ili_'_ii!_ iiil!i!:iiilii_!_ Unplug microwave oven or disconnect power. Remove the two vent grille mounting screws located above the cover (the two outer screws).
COOKING GUIDr if you increase or decrease the amount of food you prepare, the time it takes to cook that food will aHsochange. For exampHe, if you doubHe a recipe, add a HittHemore than haHfthe originaH cooking time. Check for doneness and, if necessary, add more time in small increments. ® The lower the temperature of the food being put into the microwave oven, the Honger it takes to cook.
If youusealuminum containerswithoutpackage instructions, follow theseguidelines: Forbestresults,placefoodevenlyontheplate. Placethecontainerin a glassbowlandaddsome Youcando thisinseveralways: watersothatit coversthe bottomof thecontainer, If youarecookingseveralitemsof the same notmorethan1/4inch(6mm)high.Thisensures food, suchas bakedpotatoes,placethemin a evenheatingof thecontainerbottom. ringpatternforuniformcooking. Alwaysremovethe lidto avoiddamageto Whencookingfoodsof unevenshapesor theoven.
QUE ONS AND ANSWERS ...........................................................................................................................................................................................................................................................................................................................................................................................................................................................................................................
TROUBLESHOOTING Most cooking problems often are caused by little things you can find and fix without tools of any kind. Check the lists below and on the next page before calling for assistance or service. If you still need help, see the "Requesting Assistance or Service" section on page 45 or 46. PROBLEM CAUSE Nothing works.
PROBLEM CAUSE The turntable will not turn. _ You have turned off the turntable. (See the "Heating more than one plate of food" section on page 16.) The turntable is not correctly in place. It should be correct-side firmly on the center shaft. up and sitting The support is not operating correctly. Remove the turntable and restart the oven. If the support still does not move, call an authorized service technician for repair. Cooking without the turntable can give you poor results.
REQUI "nNG A L ANCE ORSERVICE To avoid unnecessary service calls, please check the "Troubleshooting" the cost of a service call. If you still need help, follow the instructions Call the Whirlpool _ Consumer Assistance Our consultants are available to assist you. entercalling: toll free at 1-800-253-1301. When Please know the purchase date, and the complete model and serial number of your appliance (see the "A Note to You" section). This information will help us better respond to your request.
1i;: ?(iIi]l tli!i!il!i!il) ii_iii _Ii_i!i, !::__ii;_l:A_iii!f ii_Ii_ l_ii),!_ '_i_ii_i_ ii_0_ii_li! ¸_iii:¸_Ii_iii!f ¸ Contact the dealer from whom you purchased your Consumer Assistance Centre toll free, 8:30 a.m. - 6 p.m. (EST), atppliance, 1-800-461-5681. or call the Inglis Limited _ ;i!Li_ii ':i_li_iiil_i_i!!41!fii;i _i)ii!f'l"_i_'i0ii!i_i _ Contact your nearest Inglis Limited Appliance Service branch or authorized servicing outlet to service your appliance. (See list below.
INDEX This index is alphabetical. It contains on which you can find each topic. all the topics TOPIC ALUMINUM FOIL ................................................. included in this manual, along with the page(s) PAGE TOPIC 28, 41 ELECTRICAL REQUIREMENTS ............................. 5, 12 AUDIBLE SIGNALS .................................................... 15 PAGE EXHAUST FAN ........................................................... 17 CARING FOR YOUR MICROWAVE OVEN ................
LENGTH OF WARRANTY WHIRLPOOL WILL PAY FOR FULL ONE-YEAR WARRANTY FROM DATE OF PURCHASE FSP* replacement parts and repair labor to correct defects in materials or workmanship. Service must be provided by an authorized Whirlpool service company. LIMITED FOUR-YEAR WARRANTY SECOND THROUGH FIFTH YEAR FROM DATE OF PURCHASE FSP replacement magnetron tube on microwave ovens if defective in materials or workmanship. WHIRLPOOL WILL NOT PAY FOR A. Service calls to: 1.