
Instruction for Use


PAUSE OR STOP COOKING
To pause cooking:
The cooking can be paused to check, turn or stir the
food by opening the door. The setting will be maintai-
ned for 10 minutes.
To continue cooking:
• Close the door and press the Start button
ONCE. The cooking is resumed from where it
was paused.
• Pressing the Start button TWICE will increase
the time by 30 seconds.
If you don’t want to continue cooking:
• Remove the food, close the door and press the
STOP button.
Note: After cooking ends, the fan, turntable and cavi-
ty lamp is on before pressing STOP button, it’s nor-
mal.
A beep will signal once a minute for 10 minutes when
the cooking is fi nished. Press the STOP button or
open the door to cancel the signal.
The oven will only hold the settings for 60 se-
conds if the door is opened and then closed
after the cooking is fi nished.
CHILD LOCK
This automatic safety function is activated 1 minutes
after the oven has returned to “standby mode“.
In this mode the door will be locked.
The door must be opened and closed e.g. putting
food into it, before the safety lock is released.
Else the display will show “door”.
ADD/ STIR/ TURN FOOD
Depending on the selected function, it could be nee-
ded to add / stir / turn food during cooking. In these
cases the oven will pause cooking and it will ask you
to perform the needed action.
When required, you should:
1. Open the door.
2. Add, Stir or Turn the food (depending on the re-
quired action).
3. Close the door and restart by pressing
the Confi rmation Button / Start button.
Notes:
- If the door is not opened within 2 minutes since
the request to Add some food, the oven will go in
Stand-by mode.
- If the door is not opened within 2 minutes since
the request to Stir ot Turn the food, the oven will
continue the cooking process (in this case the fi nal
results may not be the optimal ones)
SET CLOCK
WHEN THE APPLIANCE IS FIRST PLUGGED IN or after a
power failure, the product will enter clock setting.
If the clock is not set, the display will remain “:“ in-
stead of the clock.
NOTE: YOU CAN PRESS&HOLD THE STOP BUTTON for a
few seconds in standby mode to access the clock
setting mode.
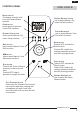
q
TURN THE ADJUSTABLE KNOB to set the hours.
w
PRESS KNOB BUTTON. (The two right-hand
digits (minutes) flicker).
e
TURN THE ADJUSTABLE KNOB to set the minutes.
r
PRESS THE KNOB BUTTON AGAIN.
THE CLOCK IS SET and in operation.
IF STOP is pressed in clock setting mode, the
clock will be disabled the display shows “:”.
NOTE: KEEP THE DOOR OPEN WHILE SETTING THE
CLOCK. This gives you 10 minutes to com-
plete the setting of the Clock. Otherwise,
each step must be accomplished within 60
seconds.
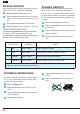
WEIGHT SENSOR
THIS MICROWAVE OVEN USES THE WEIGHT SENSOR TECH-
NOLOGY for some 6th sense functions (Defrost,
Crisp and Steam); when you select one of these
6thSense functions, you just need to select type
of food you want to process and press start: the
microwave automatically detects the weight of
food and set the cooking time accordingly.
DURING THE SENSING PHASE weight icon blinks and
progress bar shows the weight calculation pro-
cess (see sample below, from 6th Defrost func-
tion).
WEIGHT SENSING CALIBRATION
Weight sensor technology requires a Calibration
process before fi rst use. Suggest user to make
the calibration once a year.
PRESS AND HOLD for few seconds the Stop TurnTa-
ble button.
THE CALIBRATION PROCESS starts and the display
shows:
88
en