
Instruction for Use


EN6
NOTE:
When making quick-cook foods that require perfect heat distribution (e.g. pancakes) on the 28 cm double cooking zone (where present), use pans no greater than
24 cm in diameter. For delicate cooking (for example, melting chocolate or butter) use the smaller diameter single zones.
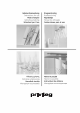
After unpacking the product, check for any damage during transport. In case of problems, contact the dealer or the After-Sales Service.
PREPARING THE CABINET FOR FITTING
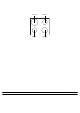
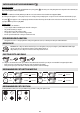
Connection to the terminal block
For the electrical connection of the power cord is present in the supply. Follow the instructions below.
Connect the ground cable yellow / green to terminal symbol .
1. Remove the terminal cover (A) by unscrewing the screw and insert the cover into the hinge (B) of the terminal.
2. Plug the power cord into the clamp and connect the wires to the terminal block as shown in the wiring diagram located near the terminal.
3. Secure the power cable with the cable clamp.
4. Close the cover (C) and screw on the terminal with the screw removed.
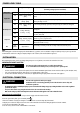
POWER LEVEL TABLE
Power level Type of cooking Level use
(indicating cooking experience and habits)
Max. power 8-9 Frying - boiling
Ideal for browning, starting to cook, frying deep frozen products, fast boiling
High power
7-8
Browning - sautéing - boiling -
grilling
Ideal for sautéing, maintaining a lively boil, cooking and grilling (for a short period of time, 5-10
minutes)
6-7
Browning - cooking - stewing -
sautéing - grilling
Ideal for sautéing, maintaining a light boil, cooking and grilling (for a medium period of time, 10-20
minutes), preheating accessories
Medium power
4-5
Cooking - stewing - sautéing -
grilling
Ideal for stewing, maintaining a gentle boil, cooking (for a long period of time). Creaming pasta
3-4
Cooking - simmering -
thickening - creaming
Ideal for long-cooking recipes (rice, sauces, roasts, fish) with liquids (e.g. water, wines, broth, milk),
creaming pasta
2-3
Ideal for long-cooking recipes (less than a litre in volume: rice, sauces, roasts, fish) with liquids (e.g.
water, wines, broth, milk)
Low power
1-2
Melting - defrosting - keeping
food warm - creaming
Ideal for softening butter, gently melting chocolate, thawing small products and keeping just-cooked
food warm (e.g. sauces, soups, minestrone)
1
Ideal for keeping just-cooked food warm, for creaming risottos and for keeping serving dishes warm
(with induction-suitable accessory)
OFF
Zero
power
Support surface
Hob in stand-by or off mode (possible end-of-cooking residual heat, indicated by an “H”)
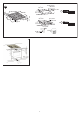
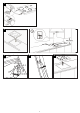
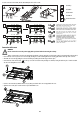
INSTALLATION
WARNING
- The lower part of the product must not be accessible after installation.
- In case of installation of an undertop oven, do not interpose the separator panel.
• In order to ensure the correct operation of the product, do not obstruct the minimum required clearance between the hob and the top of the unit (min. 5 mm).
• If an oven is installed beneath the hob, make sure the oven is equipped with a cooling system.
• To remove the hob from the worktop use a screw driver (not supplied) unlocking the springs from the bottom side of the appliance.
ELECTRICAL CONNECTION
WARNING
- Disconnect the appliance from the power supply.
- Installation must be carried out by qualified personnel who know the current safety and
installation regulations.
- The manufacturer declines all liability for injury to persons or animals and for damage to property resulting from failure to observe the regulations
provided in this chapter.
- The power cable must be long enough to allow the hob to be removed from the worktop.
- Make sure the voltage specified on the dataplate located on the bottom of the appliance is the same as that of the home.