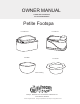
OWNER MANUAL PLEASE SAVE THIS MANUAL FOR FUTURE REFERENCE Petite Footspa La Petite Fleur La Petite Chi Pedi Bowl Sun Flower Patent Pending ® ® Cleanjet , Gulfstream Inc are trademarks of Gulfstream Inc. Patent #D610697, #D600950 © 2011 All rights reserved.
Table of Contents Owner Manual Safety and Precautions 1-2 Identifying Parts 3 INSTALLATIONS Jet Assembly Plumbing Connections 4-5 Operations and Use Cleaning & Maintenance 7 8-9 Warranty & Service 10 6
1 SAFETY & PRECAUTION Thank you for purchasing the Portable spa from Gulfstream Inc. Please carefully read the instructions before installing the spa. Carefully follow the instructions, your spa will give you years of beauty and service. This product is to be connected to a branch circuit outlet protected by a Class A GROUND FAULT CIRCUIT INTERRUPTER (GFCI), and the GFCI shall be tested regularly for continued protection and correct operation.
2 SAFETY & PRECAUTION GROUNDING METHODS Because this unit must be connected to a circuit with a ground-fault circuit interrupter (GFCI), DO NOT use a grounding adapter. The use of a grounding adapter is prohibited in Canada by Part I of the Canadian Electrical Code. GROUNDING INSTRUCTIONS This appliance must be plugged into an outlet equipped with a ground-fault circuit interrupter. The ground-fault interrupter can be in the out-let shown in illustration A or in the circuit breaker (fuse) box.
3 IDENTIFY YOUR FOOT-SPA La Petite Fleur La Petite Chi Glass Bowl Footrest Aluminum Handle Hand Spray Tub Jet Control Water Control Wood Grain Base Jet Control Drain Control Length: 27.5’’ - Width: 22’’ - Height: 18’’ Base Length: 27.5’’ - Width: 22’’ - Height: 18’’ Pedi Bowl Sun Flower Wide: 18.25’’ - Height: 8.5’’ Length: 23.5’’ - Width: 23.
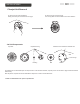
4 INSTALLATIONS Cleanjet Unit Removal To remove the jet unit components. Turn the top plate counter-clockwise in the arrow direction To remove the jet unit from tub/bowl. Gently pull out the jet unit from the anchor pegs Jet Unit Components Top Plate Plate & Anchors located on tub/bowl wall Impeller Housing Wall Anchor Pegs Bushing Ball Screws To install the jet unit.
5 INSTALLATIONS Poly Liner Installation Plastic Liner Heavy plastic liner Hole in the heavy plastic liner Thin Plastic Liner Piece of thin plastic sealed to the heavy plastic liner Fig.2 Impeller Unit Anchor Pegs Base Plate fixed to motor behind Glass Bowl Plastic Liner deformed by the pegs Fig.1 Place the plastic liner firmly inside the glass bowl as shown in the Fig.1 Align the impeller unit onto the anchor pegs and push it onto the base plate as shown in Fig.
6 INSTALLATIONS Plumbing Connections La Petite Fleur La Petite Chi 3/4’’ Fitting 3/4’’ Fitting 1. Discharge pump may be connected to an existing sink drain or floor drain. It can also pump up to 7 ft high, but this will increase the length of the drain time. The drain connection is at the rear of the unit by a 3/4” fitting. 2. Gravity drain uses a standard gravity drain. A floor drain is recommended. P-Trap is not installed nor supplied.
7 OPERATIONS & USE Control Panel (La Petite Fleur and Chi spa only) Hand Spray Water Control Jet On/Off Drain Control 13 Jet On/Off Use the following steps according to the spa model you purchase 1. To fill water: The foot-spa is provided with a single hot and cold mixing valve located on the front of your spa (La Petite Fleur only). This is a pressure balance valve that requires you to lift the handle to start the water flow and to adjust to the temperature that is desired.
CLEANING & MAINTENANCE 8 Please refer the diagrams to remove jet covers for cleaning Gulfstream Inc. highly recommends the following cleaning regimen. You should always contact your local governing agency for their specific cleaning and disinfecting requirements and regulations for pedicure spas. For your clients safety, always use the regulations as a minimum standard for cleaning and disinfecting.
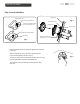
9 CLEANING & MAINTENANCE Cleaning The Magnet Jet (Step by Step) ® ! - Do not run Cleanjet MAX without water. This will void your warranty - Do not place two wet ends in the same bowl when cleaning Warning the jet’s strong magnets could cause injury (pins your fingers) - Do not attach two wet ends to each other. Doing so will cause breakage to wet ends and will void the warranty Three Magnet Jet Components Top Plate Magnet Back Plate Top Back Plate Bottom 1.
WARRANTY & SERVICE 10 Gulfstream warrants to the original purchaser that the new pedicure spa will be free from defect during the Standard Warranty Period (listed below). The shipping date and the uniquely-coded Serial Number on the back of each spa chair will justify the start of the warranty period for the product. The warranty is null and void if the pedicure spa is taken from its initial place of installation, or it is not installed in accordance with federal, state or local codes and ordinances.
Manufacturer of Acrylic Bath Whirlpool & Pedicure Foot Spas Gulfstream Inc. Cambridge, Ontario, Canada N1R 5X5 Tel.: 519-622-0950 Fax: 519-622-6926 www.gulfstreaminc.com © 2011 All rights reserved.