
Specifications


CLEANING & MAINTENANCE
9
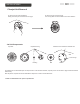
Cleaning The Magnet Jet (Step by Step)
1. Pull Magnet Jet off from the pedicure bowl
2. Turn the Top Plate of the Magnet Jet counter-clockwise
3. Separate the three components of the Magnet Jet: Top Plate, Magnet, Back Plate
4. Wash each component of the Magnet Jet in a recommended or high quality solution or cleaning agent
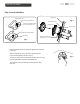
5. Reassemble the Magnet Jet using the following directions:
- Notice that on the Back Plate there is a small hole (1/16’’ of an inch), this small hole indicates the bottom of the
Back Plate
- Put the Magnet, with the three circles facing upwards, in the center of the plate on top of the Magnet and the
Back Plate
so that the tab is slightly left from the “top”
- Turn the Top Plate clockwise until you hear a “click-sound”
** Note: there are 3 pegs on the back of the Back Plate, the pegs which has small holes (1/18’’ of an inch) should
be aligned with the Top Plates tab after the “click-sound”
6. Remount the Magnet Jet onto the pedicure bowl by aligning the pegs so that the tab is at the top of the Magnet Jet
Top Plate Magnet Back Plate Top Back Plate Bottom
Three Magnet Jet Components
Warning
!
- Do not run MAX without water. This will void your warranty
- Do not place two wet ends in the same bowl when cleaning
the jet’s strong magnets could cause injury (pins your fingers)
- Do not attach two wet ends to each other. Doing so will cause
breakage to wet ends and will void the warranty
®
Cleanjet