User Manual
USER MANUAL THANK YOU FOR BUYING OUR PRODUCT. INDEX HEALTH & SAFETY GUIDE. . . . . . . . . . . . . . . . . . . . . . . . . . . . . . . . . . . . . . . . . . . . . . . . . . . . . . . . . . . . . . . . . . 3 Safety Instructions. . . . . . . . . . . . . . . . . . . . . . . . . . . . . . . . . . . . . . . . . . . . . . . . . . . . . . . . . . . . . . . . . . . . . . . . . .
EN Health & Safety guide SAFETY INSTRUCTIONS IMPORTANT TO BE READ AND OBSERVED Before using the appliance, read these safety instructions. Keep them nearby for future reference. These instructions and the appliance itself provide important safety warnings, to be observed at all times. The manufacturer declines any liability for failure to observe these safety instructions, for inappropriate use of the appliance or incorrect setting of controls.
Health & Safety guide Use only new hoses to connect the appliance to DISPOSAL OF PACKAGING MATERIALS packaging material is 100% recyclable and is marked with the recycle the water supply. The old hose-sets should not be The symbol . The various parts of the packaging must therefore be disposed of reused. and in full compliance with local authority regulations The supply water pressure must be in the responsibly governing waste disposal. 01-1 Mpa range.
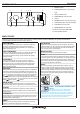
EN User manual PRODUCT DESCRIPTION 1. 2. 3. 1. Worktop 2. Detergent dispenser 3. Control panel 4. 5. 6. 7. 8. 4. Door handle 5. Door 6. Water filter - behind plinth 7. Plinth (removable) 8. Adjustable feet (2) DETERGENT DISPENSER DRAWER Successful washing results also depend on the correct dose of detergent: adding too much detergent will not necessarily result in a more efficient wash, and may in fact cause build up on the inside of your appliance and contribute to environmental pollution.
User manual CONTROL PANEL 1 11 2 10 3 4 9 5 6 8 1 ON/OFF button 2 START/PAUSE button and indicator light 7 3 DELAY START button 4 DOOR LOCKED indicator light 5 Display 6 OPTION buttons and indicator lights 7 CHILD LOCK button and indicator light 8 SPIN SPEED selector knob 9 TEMPERATURE selector knob 10 WASH CYCLE SELECTOR KNOB 11 PUSH & WASH button WASH CYCLES Follow the instructions on the symbols of the garment’s wash care label.
EN User manual ANTI ODOUR Use this cycle (for synthetic fabrics) to wash garments with bad odours (e.g. smoke, sweat, fried food). The cycle is designed to remove bad odours while preserving the fabric fibres. RINSE + SPIN Designed for rinsing and spinning. SPIN + DRAIN Designed to spin and drain the water. OPTIONS ! If the selected option is not compatible with the set wash cycle, the indicator light will flash and the option will not be activated.
User manual PUSH & WASH This function allows for starting a wash cycle even when the machine is switched off without having to press the ON/OFF button in advance or, after switching the machine on, without having activated any other button and/or selector knob (otherwise the Push & Wash cycle will be deactivated). To start the Push & Wash cycle press and hold the relative button for 2 seconds. The lit indicator light indicates that the cycle has started.
EN User manual FUNCTIONS ON/OFF DISPLAY Button: switches the washing machine on and off. WASH CYCLE SELECTOR KNOB: Used to set the desired wash cycle (see “Table of wash cycles”). START/PAUSE Button with indicator light: starts or temporarily interrupts the wash cycles. N.B. To pause the wash cycle in progress, press this button; the corresponding indicator light will flash orange, while the indicator light for the current wash cycle phase will remain lit in a fixed manner.
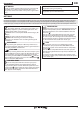
User manual WASH CYCLE TABLE Energy consumption kWh Total water l Detergents and Recommended Additives detergent Main Fabric wash softener Powder Liquid Residual dampness % Maximum load 7 kg Power input in off mode 0.5 W / in left-on mode 8 W 1 Daily cotton 30°C – 30°C 1200 3.5 ** – – – – 2 Daily synthetics 30°C – 30°C 1000 3.5 ** – – – – 3 Coloureds 30°C – 30°C 1000 3.5 ** – – – – 4 Delicates 30°C – 30°C 0 1.
EN User manual HOW TO USE THE APPLIANCE FIRST TIME USE Once the appliance has been installed, and before it is used for the first time, run a wash cycle with detergent and no laundry, by setting the “Auto-Clean” cycle. DAILY USE PREPARING THE LAUNDRY Empty the pockets • Objects such as coins or lighters can damage the washing machine and the drum. Check all buttons. Divide the laundry according to • Type of fabric (cotton, mixed fibres, synthetics, wool, garments to be hand-washed).
User manual END OF THE CYCLE This will be indicated by the word “END” on the display; when the symbol switches off, the door may be opened. Open the door, unload the laundry and switch off the machine. If you do not press “ON/OFF” button, the washing machine will switch off automatically after about a half of an hour. Close the water tap, open the door and unload the washing machine. Leave the door ajar to allow the drum to dry.
EN User manual CLEANING & MAINTENANCE Before performing cleaning and maintenance, switch the washing machine off and disconnect it from the mains power. Do not use flammable liquids to clean the washing machine. DISCONNECT THE WATER AND POWER SUPPLIES Close the water tap after every wash. This will limit wear on the hydraulic system inside the washing machine and help to prevent leaks. Unplug the washing machine when cleaning it and during all maintenance work.
User manual TROUBLESHOOTING The washing machine may occasionally fail to work. Before contacting the Technical Assistance Service, make sure that the problem cannot be easily solved using the following list. Anomalies Possible causes / Solution The washing machine does not start. The appliance is not plugged into the socket, or not sufficiently to make contact. There is no power in the house. The washing machine door is not closed properly. The ON/OFF button has not been pressed.
EN User manual TRANSPORT AND HANDLING Do not lift the washing machine by gripping it from the upper section. 1. Unplug the appliance and close the water tap. 2. Check that the door and detergent dispenser drawer are tightly closed. 3. Detach the filling hose from the water tap then detach the drain hose. 4. Empty all the water remaining in the hoses and secure the latter so that they do not get damaged during transport. 5. Apply the transport bolts back on.
User manual SERVICE BEFORE CONTACTING THE TECHNICAL ASSISTANCE SERVICE • • Check whether you can solve the problem alone (see “Troubleshooting”). Restart the wash cycle to check whether the problem has been solved. • If this is not the case, contact an authorised Technical Assistance Centre. ! Always request the assistance of authorised technicians.
Installation guide x1 17 mm - 0.67 inch x1 12 mm - 0.
Installation guide max 2,0 cm max 0,8 inch max 100cm / 39 inch min 60cm / 24 inch B 8,2 f e et A ma x 2 , 5 m / max 100cm / 39 inch min 60cm / 24 inch ext x4 n n 859991546790EN 18