® ELECTRIC RANGE Use & Care Guide For questions about features, operation, performance, parts, accessories or service, call: 1-800-253-1301 or visit our website at... www.whirlpool.com Table of Contents ............................................
TABLE OF CONTENTS RANGE SAFETY .............................................................................3 The Anti-Tip Bracket ....................................................................3 PARTS AND FEATURES................................................................6 COOKTOP USE ..............................................................................7 Cooktop Controls.........................................................................7 ACCUSIMMER™ Feature ........................
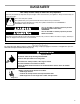
RANGE SAFETY Your safety and the safety of others are very important. We have provided many important safety messages in this manual and on your appliance. Always read and obey all safety messages. This is the safety alert symbol. This symbol alerts you to potential hazards that can kill or hurt you and others. All safety messages will follow the safety alert symbol and either the word “DANGER” or “WARNING.
IMPORTANT SAFETY INSTRUCTIONS WARNING: To reduce the risk of fire, electrical shock, injury to persons, or damage when using the range, follow basic precautions, including the following: ■ WARNING: TO REDUCE THE RISK OF TIPPING OF THE RANGE, THE RANGE MUST BE SECURED BY PROPERLY INSTALLED ANTI-TIP DEVICES. TO CHECK IF THE DEVICES ARE INSTALLED PROPERLY, SLIDE RANGE FORWARD, LOOK FOR ANTI-TIP BRACKET SECURELY ATTACHED TO FLOOR, AND SLIDE RANGE BACK SO REAR RANGE FOOT IS UNDER ANTI-TIP BRACKET.
IMPORTANT SAFETY INSTRUCTIONS ■ ■ ■ Keep Oven Vent Ducts Unobstructed. Placement of Oven Racks – Always place oven racks in desired location while oven is cool. If rack must be moved while oven is hot, do not let potholder contact hot heating element in oven. DO NOT TOUCH HEATING ELEMENTS OR INTERIOR SURFACES OF OVEN – Heating elements may be hot even though they are dark in color. Interior surfaces of an oven become hot enough to cause burns.
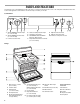
PARTS AND FEATURES This manual covers several different models. The range you have purchased may have some or all of the parts and features listed. The location and appearance of the features shown here may not match your model. Control Panel OFF LO OFF HI LO HI ACCUSIMMER LO 2 DUAL SINGLE NORMAL BURNER OFF 8 2 LO OFF 8 7 3 7 3 4 4 ON 6 5 4 6 5 6 HI 7 3 8 8 8 2 4 6 HI LO 2 2 4 HI 6 5 1. ACCUSIMMER™ Indicator Light (on some models) 2.
COOKTOP USE Cooktop Controls WARNING ACCUSIMMER™ Feature (on some models) The ACCUSIMMER™ feature setting is an adjustable heat setting for more precise simmering. It is the right front surface cooking area or element. The indicator light will glow when the ACCUSIMMER™ feature setting is on. When the setting is not on, the right front surface cooking area or element will function as a single or dual element (on some models). To use: 1.
To Use DUAL : 1. Push in and turn the left front control knob clockwise from the OFF position to the DUAL zone anywhere between HI and LO. 2. Push in and turn knob to OFF when finished. Keep Warm Element WARNING Food Poisoning Hazard Do not let food sit for more than one hour before or after cooking. Ceramic Glass (on some models) The surface cooking area will glow red when an element is on. It will cycle on and off, at all settings, to maintain the selected heat level.
■ ■ Make sure the bottoms of pots and pans are clean and dry before using them. Residue and water can leave deposits when heated. To Replace: 1. Line up openings in the burner bowl with the coil element receptacle. Do not cook foods directly on the cooktop. Hot Surface Indicator Light (under ceramic glass) The hot surface indicator light will glow as long as any surface cooking area is too hot to touch, even after the surface cooking area(s) is turned off. HOT SURFACE 2.
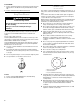
Home Canning When canning for long periods, alternate the use of surface cooking areas, elements or surface burners between batches. This allows time for the most recently used areas to cool. ■ Center the canner on the grate or largest surface cooking area or element. Canners should not extend more than 1 in. (2.5 cm) outside the cooking area. ■ Do not place canner on two surface cooking areas, elements or surface burners at the same time. ■ On ceramic glass models, only use flat-bottomed canners.
ELECTRONIC OVEN CONTROL B C E S A 1. Display 2. Timer 3. Clock 4. Auto Clean 5. Oven Light Pad 6. Sequence Programming (on some models) Display When power is first supplied to the appliance, “PF” will appear on the display. Press OFF/CANCEL to clear. Any other time “PF” appears, a power failure has occurred. Press OFF/CANCEL and reset the Clock if needed. When the oven is not in use, the display shows the time of day.
To Adjust Oven Temperature Calibration: Timer The Timer can be set in hours or minutes up to 12 hours and 59 minutes, and counts down the set time. The Timer does not start or stop the oven. To Set: 1. Press TIMER SET. If no action is taken after 5 minutes, the display will return to the time of day mode. 2. Press the HR or MIN “up” or “down” arrow pads to set the length of time to cook. 3. Press START. If not pressed within 5 seconds, “START?” will appear on the display.
BAKEWARE To cook food evenly, hot air must be able to circulate. Allow 2 in. (5 cm) of space around bakeware and oven walls. Use the following chart as a guide. NUMBER OF PAN(S) POSITION ON RACK 1 Center of rack. 2 Side by side or slightly staggered. 3 or 4 Opposite corners on each rack. Make sure that no bakeware piece is directly over another. Bakeware The bakeware material affects cooking results. Follow manufacturer’s recommendations and use the bakeware size recommended in the recipe.
3. Press OFF/CANCEL when finished. Oven Vent Preheating After START is pressed, the oven will enter a timed preheat conditioning. “PrE” and the countdown time will appear on the display. When the preheat conditioning time ends, a tone will sound and the selected temperature will appear on the display. Preheat temperatures are affected by varying factors such as room temperature and peak energy usage times.
■ After broiling, remove the pan from the oven when removing the food. Drippings will bake on the pan if left in the heated oven, making cleaning more difficult. Before broiling, position rack according to Broiling Chart. It is not necessary to preheat the oven before putting food in unless recommended in the recipe. Position food on grid in the broiler pan, then place it in the center of the oven rack. Close the door to the broil stop position to ensure proper broiling temperature.
Timed Cooking WARNING Food Poisoning Hazard Do not let food sit in oven more than one hour before or after cooking. Doing so can result in food poisoning or sickness. Timed Cooking allows the oven to be set to turn on at a certain time of day, cook for a set length of time, and/or shut off automatically. Delay start should not be used for food such as breads and cakes because they may not bake properly. To Set a Timed Cook: 1. Press BAKE (optional).
2. If fewer than four steps have been programmed, press REVIEW STEPS repeatedly until the last programmed step is displayed, then press FIRST/NEXT STEP if it is desired to program an additional step. While a step is recalled, a cook function pad can be used to change the function, or the TEMPERATURE “up” or “down” arrow pad can be used to change the set temperature. START TIME, when used with the HR or MIN “up” or “down” arrow pads, can be used to change, add or delete a delayed start.
FOOD SETTING Gravy dr 4 Ham, Boneless dr 3 Hard Rolls dr LO Lasagna dr 4 Pastries Pre-Packaged, baked Pre-Packaged, frozen dr 4 dr LO Pie Single Crust Double Crust dr LO dr LO Pizza dr 4 Potatoes, Baked dr 4 Quiche dr 3 Roast, Boneless dr 4 Roasted Chicken dr 4 Soft Rolls dr LO RANGE CARE Self-Cleaning Cycle (on some models) WARNING Keep the kitchen well-ventilated during the Self-Cleaning cycle to help get rid of heat, odors, and smoke.
To Delay Start Self-Clean: Before delay starting Self-Clean, make sure the clock is set to the correct time of day. See “Clock” section. Also, make sure the door is closed completely or it will not lock and the cycle will not begin. 1. Press AUTO CLEAN. Press the HR “up” or “down” arrow pad to set a clean time other than 3 hour 30 minutes. The clean time can be set between 2 hours 30 minutes and 4 hours 30 minutes. 2. Press DELAY START TIME. 3.
CONTROL PANEL Do not use abrasive cleaners, steel-wool pads, gritty wash cloths or some paper towels. Damage may occur. ■ Glass cleaner and soft cloth or sponge: Apply glass cleaner to soft cloth or sponge, not directly on panel. BROILER PAN AND GRID Do not clean in the Self-Cleaning cycle. ■ Mildly abrasive cleanser: Scrub with wet scouring pad. ■ Soak for 20 minutes, then scrub with scouring or steel wool pad. COIL ELEMENTS (on some models) Do not clean or immerse in water. Soil will burn off when hot.
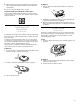
Oven Door 3. Tilt top of door toward range. Slide hinge hangers down onto front frame support pins. Make sure the hinge hangers are fully seated and engaged on the support pins. For normal range use, it is not suggested to remove the oven door. However, if necessary, follow these instructions. The oven door is heavy. Before Removing: 1. Use a putty knife or screwdriver and insert it at the bottom corner of the door stop clip. 4.
TROUBLESHOOTING Oven indicator lights flash ■ Try the solutions suggested here first in order to avoid the cost of an unnecessary service call. Nothing will operate ■ Is the power supply cord unplugged? Plug into a grounded outlet. ■ Has a household fuse been blown or has the circuit breaker been tripped? Replace the fuse or reset the circuit. Display shows messages ■ Is the display showing “PF”? There has been a power failure. Clear the display. See “Display(s)” section.
Accessories U.S.A. ASSISTANCE OR SERVICE Before calling for assistance or service, please check “Troubleshooting.” It may save you the cost of a service call. If you still need help, follow the instructions below. When calling, please know the purchase date and the complete model and serial number of your appliance. This information will help us to better respond to your request. If you need replacement parts If you need to order replacement parts, we recommend that you only use FSP® replacement parts.
WHIRLPOOL® COOKTOP, BUILT-IN OVEN AND RANGE WARRANTY FULL ONE-YEAR WARRANTY For one year from the date of purchase, when this appliance is operated and maintained according to instructions attached to or furnished with the product, Whirlpool Corporation will pay for FSP® replacement parts and repair labor to correct defects in materials or workmanship. Service must be provided by a Whirlpool Corporation designated service company.