UseAndCare A Note to You 2 Important Safety Instructions 3 &Kin61 6 Using Your Range 7 Using the SelfCleaning Cycle 21 Carin for Your w ange 24 If You Need Assistance or Service 29 Warranty 32 1-800-253-I Call us with questions SELF-CLEANING 30 1 or comments.
A Note to You Thank you for buying a Whirlpool@ appliance. Because your life is getting busier and more complicated, Whirlpool ranges are easy to use, save time, and help you manage your home better. To ensure that you will enjoy years of trouble-free operation, we developed this Use and Care Guide. It is full of valuable information on how to operate and maintain your appliance properly and safely. Please read it carefully.
Important Safety Instructions To reduce the risk of fire, electrical shock, injury to persons, or damage when using the range, follow basic precautions, including the following: General oRead all instructions before using the range. 4nstall or locate the range only in accordance with the provided Installation Instructions. The range must be installed by a qualified installer. The ran e must be roperly connecte 2 to electrica Psupply and grounded.
@Useonly d potholders. Moist or damp por holders on hot surfaces could result in burns from steam. Do not let potholder touch hot heating elements. Do not use a towel or bulk cloth for a potholder. It coul J catch on fire. .Keep range vents unobstructed. *Do not heat unopened containers. They could explode. The hot contents could cause burns and container particles could cause injury. .Do not store flammable materials on or near the range. The fumes could create an explosion and/or fire hazard.
Grease *Grease is flammable. Do not allow grease to collect around cooktop or in vents. Wipe spillovers immediately. *Do not use water on grease fires. Never pick up a flaming pan. Smother flamin pan on range by coverin WI9h a wellfitted lid, cookie s!l eet or flat tray. Flaming grease outside of an can be extin uished with Ii aking soda or, i3available, a multipurpose dry chemical or foam-type extinguisher. Care and cleaning @Cleancooktop with care.
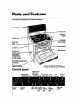
Parts and Features This section contains captioned illustrations the location Control and appearance of your range. Use them to become familiar with of all parts and features.
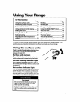
Using Your Range In This Section Page Using the surface units ..................... 7 Positioning racks and pans ............. .9 For best air circulation .................... IO Using aluminum foil for baking ...... IO Setting the clock .............................. 11 Using the Minute Timer ................... 11 Baking/roasting ................................ 12 ;t$;Jing the oven temperature ..... ....... ......... .......................... 13 Page Broiling ........................................
Until you get used to the settings, use the following as a guide. For best results, start NOTE: For best results and greater energy efficiency, use only flat-bottomed l cooking at the high setting; then turn the control knob down to continue cooking. SETTING HI Medium-high Medium hvsfie OFF) Medium-low LO RECOMMENDED USE @To start foods cooking. l To bring liquids to a boil. *To hold a rapid boil. *To fry chickenor pancakes l For gravy, pudding and icing. .To cook large amounts of vegetables.
Home canning information Use the largest surface unit for best l results. l l Start with hot water. This reduces the time the control is set on high. Reduce heat setting to lowest position needed to keep water boiling. Refer to your canner manual for specific instructions. Positioning racks and pans For baking/roasting with one rack, place the rack so the top of the food will be centered in the oven.
For best air circulation Hot air must circulate around the pans in the oven for even heat to reach all parts of the oven. This results in better baking. l Place the pans so that one is not directly over the other. l For best results, allow 1 l/2 to 2 inches (4-5 cm) of space around each pan and between pans and oven walls. There must be a minimum space of 1 inch (2.5 cm). l Use only one cookie sheet in the oven at one time.
Setting the clock Push in and turn the Minute Timer Knob to set the clock. 1. Push in Minute Timer Knob and turn clockwise until clock shows the correct time of day. 2. Let the Minute Timer Knob pop out. Turn clockwise until Minute Timer hand points to OFF. The clock setting will change if you push In the knob when turning. Using the Minute Timer The Minute Timer does not start or stop the oven. It works like a kitchen timer. Set it in minutes up to an hour.
Baking/roasting the rack(s) properly before turning on the oven. To change rack position, lift rack at front and pull out. For further information, 888 “Positioning racks and pans” on page 9. 1. Position 2. Set the Oven Selector to BAKE. 3. Set the Oven Temperature Control Knob to the baking/roasting temperature you want. The OVEN HEATING Indicator Light will come on. The oven is preheated when the OVEN HEATING Indicator Light first goes off.
Adjusting the oven temperature control Oven temperature controls will gradually shift after years of use. So, even though your new oven is properly adjusted to provide accurate temperatures, it may cook faster or slower than your old oven. If, after using the oven for a period of time, you are not satisfied with the temperature settings, you can change them by following these steps: 1. Make sure the Oven Temperature Control Knob is turned to the off position. Pull knob straight off and flip it over. 2.
Broiling 1. Position the rack before turning the oven on. See “Broiling rack position chart” on page 15. 2. Put the broiler pan and food on the rack. 3. Close the door to the Broil Stop position (open about 4 inches [lo cm]). The door will stay open by itself. 4. Set the Oven Selector and Oven Temperature Control Knob to BROIL. The OVEN HEATING Indicator Light will come on. NOTE: Do not preheat oven when broiling. 5.
Broiling rack l chart IRACK POSlTlON IFROM BOTTOM TYPE OF FOOD/ DONENESS 4 Hamburger patties and thin steaks, YY thick or less 3 Quickly searing food, rare and medium steaks, medium patties, ham slices, fish steaksfrankfurters 2 Well-done steaks and patties, lamb chops, split chicken, pork steaks and chops, whole fish 1 Not used for broiling Broiling l position tips Use the broiler pan and grid for broiling.
Energy saving tips Although the energy used for cooking is usually a very small percentage of the total energy used in the home, cooking energy can be used efficiently. Here are some tips to help you save energy when using your cooking product: l Use pans with flat bottoms, straight sides and tight-fifing lids. l Match the pan to the surface unit size. l Cook with a minimum of liquid or fat to help shorten cooking time. l Preheat pans only when recommended and for the shortest time possible.
Using the MEALTIMER” clock The MEALTIMER clock is designed to turn the oven on and off at times you set, even when you are not around. Delayed time baking/roasting is ideal for foods which do not require a preheated oven, such as meats and casseroles. Do not use delayed time cooking for cakes, cookies, etc. - undercooking will result. Before using the MEALTIMER clock, make sure the clock Is set to the correct time of day. (See “Setting the clock” on page 11.) To delay start automatically: and stop 1.
To start baking/roasting and stop automatically: now 1. Position the oven rack(s) properly and place the food in the oven. 2. Push in and turn the Stop Time Knob clockwise to the time you want the oven to shut off. Make sure the Start Time Knob is not pushed in. 3. Set the Oven Selector to TIME BAKE. 4. Set the Oven Temperature Control Knob to the baking/roasting temperature you want. 5.
The storage (Models RF354PXY drawer and RF354BXB) You can remove the storage drawer to make it easier to clean under the range and to check for installation of the anti-tip floor bracket (if you have one). Use care when handling the drawer. Removing the storage drawer: 1. Empty drawer of any pots and pans before removing drawer. Pull drawer straight out to the first stop. Lift front and pull out to the second stop. 2. Lift back slightly and slide drawer all the way out. Replacing the storage drawer: 1.
The anti-tip bracket The range will not tip during normal use. However, tipping can occur if you apply too much force or weight to the open door without the anti-tip bracket properly secured. Personal Injury Hazard .To reduce risk of range tipping over, secure range with a properly installed anti-tip bracket supplied with range or an optional wallmounted anti-tip bracket kit. l If range is moved for cleaning or service, check that anti-tip bracket is engaged before using range.
Using the Self-Cleaning In This I Section Page How the cycle works . ....... .............. .. 21 Before you start ............................... 21 Page Setting the controls ........................ . 22 Special tips ............. ............ .............. 23 The Self-Cleaning cycle saves you from the toil and mess that often come with hand-cleaning the oven interior. Like with the other functions of your range, you operate the Self-Cleaning cycle with the easy-to-use controls.
l l l l Remove the broiler pan grid and any pots and pans being stored in the oven. NOTE: You can clean the broiler pan l l l Remove the oven racks from the oven if you want them to remain shiny. You can clean the oven racks in the Self-Cleaning cycle, but they will become harder to slide. (See page 27.) If you clean racks in the Seff-Cleaning cycle, place them on the 2nd and 4th rack guides. (Guides are counted from bottom to top.) Heat and odors are normal during the Self Cleaning cycle.
4. Move the Lock Lever to the right-the Clean position. The OVEN HEATING Indicator Light will come on. 5. When the oven temperature goes above normal baking/roasting temperatures, the door cannot be opened and the Lock Lever must not be moved. 6. After the Self-Cleanlng cycle is completed and the oven has cooled sufficiently, the Lock Lever can be moved back to the left. DO NOT FORCE IT. Wait until it moves easily. Turn the Oven Selector and Oven Temperature Knob to OFF. Control 7.
Caring for Your Range In This Section Page Cleaning the cooktop ...................... 24 Cleaning other range parts ............. 27 Your range is designed for easy care. You can do most cleaning with items found around your home. Cleaning your range whenever spills or soiling occurs will help to keep it looking and operating like new. Cleaning the cooktop This cooktop is designed for easy care. However, ceramic cook-tops need to be maintained differently than standard electric open-coil elements.
Cleaning Personal Injury Hazard When removing heavy or sugary spills from the hot cooktop, wear oven mitts to prevent burns. l Do not use cooktop cleaner on a hot cooktop. The cleaner could produce hazardous fumes or damage the cooktop. l Do not use the range if the cook-top is cracked or broken. Failure to follow these instructions could result in personal injury. l To avoid damaging the cooktop, follow these instructions: Remove sugary spills before cooktop cools to prevent pitting.
Additional tips: l Sugar spills and soils (such as jellies and candy syrups) can cause pitting on the cooktop if not removed while the ceramfc surface is still warm. Remove as soon as possible after the spill occurs. l Remove dark streaks, specks and discoloration with Cooktop Polishing Creme. l l Remove metal marks (from copper or aluminum pans) with Cooktop Polishing Creme before heating the cooktop again. If heated before cleaning, metal marks may not come off.
Cleaning other range parts Use the following table to help YOU clean all other Ipa rts of your range. PART Control knobs HOW TO CLEAN WHAT TO USE Sponge and warm, soapy water l l Turn knobs to OFF and pull straight away from control panel. Wash, rinse and dry thoroughly. Do not soak. Do not use steel wool or abrasive cleansers. They may damage the finish of the knobs.
The oven light (Models RF364PXY and RF364BXB) Model RF364PXY: The oven light will come on when you open the oven door. Both models: To turn on the light when the oven door is closed, press the Oven Light Switch on the control panel. Elect&al l l Shock Hazard Make sure oven and light bulb are cool and power to the range has been turned off before replacing the light bulb. Failure to do so could result in electrical shock or burns. The bulb cover must be in place when using the oven.
If You Need Assistance or Service This section is designed to help you Save the cost of a service call. Part 1 of this section outlines possible problems, their causes, and actions you can take to solve each problem. Parts 2 and 3 tell you what to do if you still need assistance or service. When calling our Consumer Assistance Center for help or calling for service, please provide a detailed description of the problem, your appliance’s complete model and serial numbers and the purchase date. (See page 2.
PROBLEM SOLUTION Control knob(s) will not turn You are not pushing in before trying to turn. Push control knob(s) in before turning to a setting. Self-Cleaning cycle will not Dperate The Oven Selector and Oven Temperature Control Knob are not set to CLEAN. Set both the Oven Selector and Oven Temperature Control Knob to CLEAN. The range clock does not show the correct time of day. Reset clock to show the correct time of day. (See page 11.
2. If you need assistance ... 4. If you need FSP ment parts . . . Call Whirlpool Consumer Assistance Center telephone number. Dial toll-free from anywhere in the U.S.A.: FSP is a registered trademark of Whirlpool Corporation for quality parts. Look for this symbol of quality whenever you need a replacement part for your Whirlpool@ appliance. FSP replacement parts will fl right and work right, because they are made to the same exacting specifications used to build every new Whirlpool appliance.
WHIRLPOOL@ CleanTop”” Freestanding Range Warranty LENGTH OF WARRANTY FULL ONE-YEAR WARRANTY From Date of Purchase WHIRLPOOL WILL PAY FOR FSP@ replacement parts and repair labor to correct defects in materials or workmanship. Service must be provided by an authorized Whirlpool service company. FSP replacement parts and repair labor for CleanTop ceramic cooktop to the original purchaser of this product.