
Use And Care Guide Self-Cleaning Electric Range


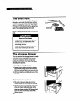


1.
Make
sure
the Oven Temperature
Control Knob is turned to the off position.
Pull
knob straight off and
flip ii over.
2.
Loosen
the locking screws inside the
control
knob. Note the position of the
notches.
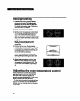
3. To lower the temperature, hold knob
handle firmly and
move
the tooth a notch
counterclockwise.
Each notch equals
about 5°F (2.5%).
4. To raise the temperature, haid la~ob
handle firmly and
move
the tooth a notch
clockwise.
Each notch equals about 5°F
(2.5%).
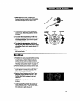
5. Tighten
the locking screws and
replace
the control knob.
Locking
Tooth
screws
\
Notches
/
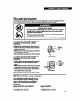
Broiling
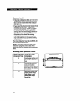
1. Position
the rack properly before turning
on the oven. Position rack so that the
surface of the food is at least 3 inches
(7.4 cm) away from the broil element. See
“Broiling rack position chart” on page 14.
2.
Put
the broiler pan and food on the rack.
3.
Close
the door to the Broil Slop position
(open about 4 inches (10.2 cm]). The
door will stay open by itself.
4.
Set
the Oven Selector and Oven Tern-
perature Control Knob to BROIL. The
OVEN HEATING Indicator Light will
come on.
NOTE: Do not preheat oven when
broiling.
5. When broiling is done, turrl both
the
Oven Selector and Oven Ternperature
Control Knob to OFF. The OVEN HEAT-
ING Indicator Light will go ofl.
13