
Electric Range Use and Care Guide


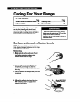

Caring For Your Range
In This Section
Page
Page
Surface units and reflector bowls . ..36
Cleaning chart
. . . . . . . . . . . . . . . . . . . . . . . . . . . . . . . . . . .
38
Lift-up cooktop . . . . . . . . . . . . . . . . . . . . . . . . . . . . . . . . .
38
The oven light
. . . . . . . . . . . . . . . . . . . . . . . . . . . . . . . . . . .
40
Your range is designed for easy care. You
can do most cleaning with items found
around your home. Cleaning your range
whenever spills or soiling occurs will help to
keep it looking and operating like new.
Burn
and
Electrical Shock Hazard
Make sure all controls are OFF and the
range is cool before cleaning.
I
Failure to do so could result in burns or
electriil shock.
I
Surface units and reflector bowls
NOTE: If your model does not include trim
rings, please disregard reference to trim rings
in the following instructions.
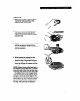
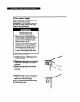
Removing
1. Make sure all surface units are off and
cool before removing surface units,
reflector bowls and trim rings.
2. Lift the edge of the unit, opposite the
receptacle, just enough to clear the
element hold-down clip, reflector bowl and
trim ring.
3. Pull the surface unit straight away from the
receptacle.
4. Lift out the reflector bowl and trim ring.
Sea “Cleaning chart” on page 39 for
cleaning instructions.
36