
Manual


Venting system must terminate to the
outside,
Do not terminate the vent in an attic or
other enclosed space,
Do not use four-inch laundry-type wall caps,
Do not use plastic vent,
Vent system needed for installation is not
included, Backdraft damper supplied with
product must be used. If roof or wall cap
has a damper, do not use damper supplied
with hood, Use metam vent onmy. Rigid metam
vent is recommended.
This range hood can be vented to the
outside ONLY.
Determine which outside venting method
needs to be used,
The length of the vent system and number
of elbows should be kept to a minimum to
provide efficient performance, The size of
the vent system should be uniform, Do Not
install two elbows together, Use duct tape
to seal all joints in vent system, Vent system
can terminate either through the roof or
wall, Use caulking to seal exterior wall or
roof opening around exhaust hood, For the
most efficient and quiet operation, it is
recommended that the range be vented
vertically through the roof through 7" round
vent system,
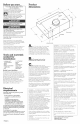
Figures 1-2 show common venting methods
and what types of materials are needed,
Vertical Roof Venting
7" round
through the _ _
roof
damper located
as for from hood
as possible
66 '_
Figure ]
roof cap
roof
7" rain.
round vent
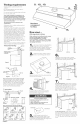
Recommended vent system length
Maximum length of vent system is 26 feet,
For best performance, use no more than
three 90° elbows, To calculate the length of
system you need, add the equivalent feet
for each vent system piece used in the
system, See the following example,
7" vent s' rstem
90 ° eJbows _6 ft,
2ft.
_L Maximum length = 26 feet
1 -- transition = 4,5 ft,
2-- 90° elbows = 10 ft,
8 feet straight = 8 ft,
3-1/4" x 10"
tO7" 1 -- wall cap = 0 ft,
transition Length of 7" system = 22,5 ft,
Recommended standard fittings
3=114" x 16" to 3-114" x 16" to 7" 7" to 3=1t4" x 16"
7" = 4.6 ft. 90 ° elbow = 6 ft. 96 ° e_bow = 9 ft.
90 ° elbow= 7" to 3ot14" 46 ° elbow= 7" wall cap
6 ft, x 16" = 1 ft. 2.6 ft, = 6 ft.
Panel B
12, t3,
correspond
fo sfeps.
Now starL..
With range hood in kitchen.
Slide cardboard or hardboard under range
before moving range across floor to
prevent damaging floor covering,
Cover countertop, cooktop or setqn range
with a thick, protective covering to prevent
damaging countertop.
Disconnect and move freestanding
m range from cabinet opening to
provide easier access to upper cabinet and
rear wall, Put a thick, protective covering
over cooktop, set-in range or countertop to
protect from damage or dirt,
Determine which venting method
m (roof or wall venting) you need to
use,
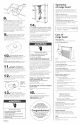
.,wiring
knockouts
m
Remove knockout from the wiring opening
(top or rear) to be used,
terminal
box
cover
If your model does NOT have a factory
installed power cord, remove terminal
box cover from range hood,
Excessive Weight Hazard
Use two or more people to move and
install range hood.
Failure to follow this instruction can
result in back or other injury,.
keyhole slot _ front of hood
Lift the range hood into final
position and center, Mark on the
underside of cabinet the location of the
four keyhole mounting slots, Set range hood
aside on a protected surface,
I
L
centerline
m
Determine and clearly mark a vertical
centerline on the wall and cabinet in the
area the vent opening will be made,
To wire through top, mark a line 7-1/2" from
the right of the centerline on the underside
of the cabinet, Mark the point on this line
that is 2" from back wall, Drill a 1-1/4"
diameter hole through the cabinet at this
point, Note: If a cord-connection kit is used,
drill a 1-5/8" diameter hole,
/'1
I
f
'll
I
L
65- l/4"
do floor)
cenferline
To wire through rear, mark a line 7-1/2" from
the right of the centerline on the wall, Mark
the point on this line that is 65-1/4" from the
floor (or 3/4" from underside of cabinet), Drill
a 1-1/4" diameter hole through wall at this
point,