
Manual

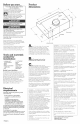


cabinet
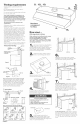
To vent through the roof or wall, mark 5-3/4"
and 6-1/4" in from back wall along the
centerline on underside of cabinet, Use
these points as centers to draw 7-1/8"
circles on underside of cabinet,
Use a saber saw to cut the openings for the
vent system, Repeat for the underside of
the top of the cabinet, This will create
slotted openings which makes it easier to
install the vent system,,
Install vent system through the vent
m opening in upper cabinet or wall,
Complete venting system according to
method needed, See "Venting
requirements," Use caulking to seal exterior
wall or roof opening,
If roof or wall cap does not
have a damper, install damper
(supplied with hood) in vent system to
prevent air from flowing back into vent
system,
If roof or wall cap has a damper, Do Not use
damper blade supplied with range hood,
Do Not turn on power until
m installation is complete. Run
wiring through wall or cabinets according
to the National Elecfrbal Code and local
codes and ordinances, Use caulking to seal
ceiling or outside wall opening,
four keyhole mounting screw slots marked
on the cabinet bottom,
keyhole slot
Check that
screw is in
narraw neck
of slot.
front of hood
screw
Lift range hood into final
m position, feeding electrical wire
through wiring opening, Tighten mounting
screws to cabinet, making sure mounting
screws are in narrow neck of slot,
Electrical Shock Hazard
Disconnect power before making
electrical connections.
Connect ground wire to green ground
screw in terminal box.
Failure to do so can result in death or
electrical shock.
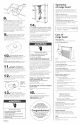
Panel C
write
For models requRing dRect wiring:
Connect the white and black wires of the
power supply cable to the white and black
leads in the range hood with twist-on
connectors,
Connect the power supply grounding wire
to the green, grounding screw inside the
range hood terminal box,
Use caulking to seal wire opening,
Replace terminal box cover,
For cord connected models:
Electrical Shock Hazard
Plug into a grounded 3-prong outlet.
Do not remove ground prong.
Do not use an adapter.
Failure to follow these instructions can
result in death, fire, or electricam shock.
For your personal safety, this range hood
must be grounded, To minimize possible
shock hazard, the cord must be plugged
into a mating, 3-prong, ground-type outlet,
grounded in accordance with National
Electrical Code, ANS!/NFPA 70 - latest
edition* and all local codes and
ordinances,
If mating outlet is not available, if is the
responsibility and obligation of the customer
to have a properly grounded, 3-prong
outlet installed by a qualified electrician,
Do not use an extension cord,
Using a U.L.-listed power supply
cord-connection kit:
Follow Power Cord Kit instructions for
connecting wiring.
Replace terminal box cover,
For models with a factory installed
power cord:
Plug power cord into grounded 3-prong
outlet,
_m Turn power supply on,
Copies of standards listedmay be obtained from:
" National Fire Protection Association
Bafterymorch Park
Quincy, Massachusetts 02269
make reinstalling your
range hood inanother home
as easy as the first
installation.
of tan e
For best results, turn range hood fan ON at
beginning of cooking and allow it to run
until all smoke and odors are removed from
room,
To turn fan ON and OFF:
Press fan control to turn fan on and off and
adjust fan speed, Speed may be increased
or decreased anytime during range hood
operation,
To turn range hood light ON and OFF:
Press light control to turn light on or off, Light
may be turned off or on anytime during
range hood operation,
L LG¢_ t _AN
Care of
¢
Fitter/light lens:
For best results, remove and dean often,
To remove filter/light lens:
/
/
filter tab
Pull firmly on filter tab to remove filter/light
lens from range hood,,
To clean filter/light lens:
Place filter/light lens in dishwasher or hot
sudsy wafer to dean,
To reinstall filter/light lens:
Place edge of filter/light lens in opening so
that right side is above flange and tab
faces downward, Press filter/light lens into
position,
When it's time to replace your
aluminum filter/light lens:
1, Model series RH2000X:,
Order Filter/Light Lens no, 883149
2, Call Whirlpool's Telesales line at
1-800-442-9991
3, Give the Telesales Representative the
part number needed,
4, The Representative will give you the
current price,
5, Place your order using your Master
Card ®J,Visa ®_or Discover ®)credit card,
6, If you wish: mail a check or money order
to:
Whirlpool Corporation
1900 Whirlpool Drive
LaPorfe, IN 46350-9980
Attn: Accessory Accounting
Be sure to ask the Telesales
Representative about the wide variety of
other Whirlpool Product Accessories,
To clean fan motor:
Every three years lubricate each motor
bearing with a few drops of oil to help
prolong motor life,
Clean exterior of motor with a damp cloth
and grease-cutting detergent,
Exteriorsurfaces
Clean the range hood with a mild
detergent and soft cloth, Do Not use
abrasive cleansers or steel wool pads,
Light
Do Not use bulb larger than 60 watts in light
socket,
Light bulb is not included,