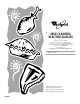
® SELF-CLEANING ELECTRIC RANGES Use & Care Guide For questions about features, operation/performance, parts, accessories or service, call: 1-800-253-1301. In Canada, call for assistance 1-800-461-5681, for installation and service, call: 1-800-807-6777 or visit our website at... www.whirlpool.com or www.whirlpoolappliances.ca Table of Contents ................................................. 2 To the installer: Please leave this instruction book with the unit.
TABLE OF CONTENTS RANGE SAFETY .............................................................................3 The Anti-Tip Bracket ....................................................................3 PARTS AND FEATURES................................................................5 COOKTOP USE ..............................................................................6 Cooktop Controls.........................................................................6 Ceramic Glass Use ..........................
RANGE SAFETY Your safety and the safety of others are very important. We have provided many important safety messages in this manual and on your appliance. Always read and obey all safety messages. This is the safety alert symbol. This symbol alerts you to potential hazards that can kill or hurt you and others. All safety messages will follow the safety alert symbol and either the word “DANGER” or “WARNING.
IMPORTANT SAFETY INSTRUCTIONS WARNING: To reduce the risk of fire, electrical shock, injury to persons, or damage when using the range, follow basic precautions, including the following: ■ WARNING: TO REDUCE THE RISK OF TIPPING OF THE RANGE, THE RANGE MUST BE SECURED BY PROPERLY INSTALLED ANTI-TIP DEVICES. TO CHECK IF THE DEVICES ARE INSTALLED PROPERLY, SLIDE RANGE FORWARD, LOOK FOR ANTI-TIP BRACKET SECURELY ATTACHED TO FLOOR, AND SLIDE RANGE BACK SO REAR RANGE FOOT IS UNDER ANTI-TIP BRACKET.
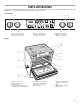
PARTS AND FEATURES This manual covers several different models. The range you have purchased may have some or all of the items listed. The locations and appearances of the features shown here may not match those of your model. Control Panel A B C D E ACCUBAKE SYSTEM OFF OFF HI LO MEDIUM OFF HI LO MEDIUM F OFF HI LO MEDIUM G A. Surface locator indicator B. Power on indicator light C. Electronic oven control H D. Power on indicator light E. Surface locator indicator F.
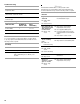
COOKTOP USE Cooktop Controls WARNING Fire Hazard Turn off all controls when done cooking. Failure to do so can result in death or fire. Control knobs must be pushed in before turning them to a setting. The controls can be set anywhere between HI and LO. Use the following chart as a guide when setting heat levels. Ceramic Glass Use The surface cooking area will glow red when an element is on. It will cycle on and off, at all settings, to maintain the selected heat level.
■ Determine flatness by placing the straight edge of a ruler across the bottom of the cookware. While you rotate the ruler, no space or light should be visible between it and the cookware. ■ Cookware designed with slightly indented bottoms or small expansion channels can be used. ■ Make sure the bottoms of pots and pans are clean and dry before using them. Residue and water can leave deposits when heated. ■ Do not cook foods directly on the cooktop.
ELECTRONIC OVEN CONTROL A E A. Oven display B. Timer functions C. Clock D. Oven light F B G H E. Oven settings F. Temperature adjustment G. Auto clean H. Timed cooking I C D J K I. Hour and minute J. Start and control lock K. Off/cancel Display Clock When power is first supplied to the appliance, everything on the display will light up for 1 to 2 seconds, then the time of day and “PF” will appear. Press OFF/CANCEL to clear “PF” from the display.
3. Press START. If not pressed within 5 seconds, the display will return to the time of day mode and the programmed function will be canceled. A minus sign means the oven will be cooler by the displayed amount. No sign means the oven will be warmer by the displayed amount. Use the following chart as a guide. ADJUSTMENT °F (ADJUSTMENT °C) COOKS FOOD 4. Press TIMER OFF anytime to cancel the Timer. Remember, do not press the OFF or OFF/CANCEL pad (button) because the oven will turn off.
Traditional Cooking FOOD Frozen pies, large roasts, turkeys, angel food cakes 1 or 2 Bundt cakes, most quick breads, yeast breads, casseroles, meats 2 Cookies, biscuits, muffins, cakes, nonfrozen pies 2 or 3 The bakeware material affects cooking results. Follow manufacturer’s recommendations and use the bakeware size recommended in the recipe. Use the following chart as a guide.
Oven Vent Custom Broil The broil element operates at full power when heating. Use this setting for normal broiling and top browning. ■ Use only the broiler pan and grid provided with the appliance. It is designed to drain juices and help prevent spatter and smoke. ■ For proper draining, do not cover the grid with foil. The bottom of the pan may be lined with aluminum foil for easier cleaning. ■ Trim excess fat to reduce spattering. Slit the remaining fat on the edges to prevent curling.
BROILING CHART For best results, place food 3" (7 cm) or more from the broil element. Times are guidelines only and may need to be adjusted for individual foods and tastes. It is recommended that food be turned approximately two-thirds of the way through the total cooking time. Use a meat thermometer to determine the doneness of meats and poultry. Check the temperature in 2 or 3 places. Recommended rack positions are numbered from the bottom (1) to the top (4). Do not use position 5.
1. Press CONVECT BAKE. Press the TEMP “up” or “down” arrow pads to enter a temperature other than 350°F (177°C). The convection bake range can be set between 170°F and 500°F (77°C and 260°C). 2. Press START. A preheating time will count down on the display, and “PrE” will appear. The oven control automatically sets preheating time based on the oven temperature selected. As the preheating time ends, the set temperature replaces “PrE” on the display.
Timed Cooking RANGE CARE WARNING Self-Cleaning Cycle Food Poisoning Hazard (on some models) Do not let food sit in oven more than one hour before or after cooking. WARNING Doing so can result in food poisoning or sickness. Timed Cooking allows the oven to be set to turn on at a certain time of day, cook for a set length of time, and/or shut off automatically. Delay start should not be used for foods such as breads and cakes because they may not bake properly. Burn Hazard To Set a Cook Time: 1.
How the Cycle Works IMPORTANT: The heating and cooling of porcelain on steel in the oven may result in discoloring, loss of gloss, hairline cracks and popping sounds. The Self-Cleaning cycle uses very high temperatures, burning soil to a powdery ash. The oven is preset for a 3 hour 30 minute clean cycle, however the time can be changed. Suggested clean times are 2 hours 30 minutes for light soil and between 3 hours 30 minutes to 4 hours 30 minutes for average to heavy soil.
Heavy soil, dark streaks, specks and discoloration ■ Cooktop Polishing Creme or nonabrasive cleanser: Rub product into soil with a damp paper towel or soft cloth. Continue rubbing until white film disappears. OVEN DOOR EXTERIOR ■ Burned-on soil ■ Cooktop Polishing Creme and Cooktop Scraper: Apply glass cleaner to soft cloth or sponge, not directly on panel. Rub creme into soil with damp paper towel. Hold scraper as flat as possible on surface and scrape. Repeat for stubborn spots.
To Replace: Oven Light(s) 1. Insert both hanger arms into the door. The oven light is a standard 15-watt appliance bulb. It will come on when the oven door is opened. The light will not work during the Self-Cleaning cycle (on some models). On some models, when the oven door is closed, press OVEN LIGHT to turn the light on or off. To Replace: Before replacing, make sure the oven and cooktop are cool and the control knobs are off. 1. Unplug range or disconnect power. 2.
TROUBLESHOOTING Try the solutions suggested here first in order to avoid the cost of an unnecessary service call. Nothing will operate ■ Is the power supply cord unplugged? Plug into a grounded outlet. ■ Has a household fuse blown, or has a circuit breaker tripped? Replace the fuse or reset the circuit. Display shows messages ■ Is the display showing “PF”? There has been a power failure. Clear the display. See “Display(s)” section. On some models, reset the clock, if needed. See “Clock” section.
ASSISTANCE OR SERVICE Before calling for assistance or service, please check “Troubleshooting.” It may save you the cost of a service call. If you still need help, follow the instructions below. When calling, please know the purchase date and the complete model and serial number of your appliance. This information will help us to better respond to your request. If you need replacement parts If you need to order replacement parts, we recommend that you use only FSP® replacement parts.
WHIRLPOOL CORPORATION MAJOR APPLIANCE WARRANTY ONE YEAR LIMITED WARRANTY For one year from the date of purchase, when this major appliance is operated and maintained according to instructions attached to or furnished with the product, Whirlpool Corporation or Whirlpool Canada LP (hereafter “Whirlpool”) will pay for FSP® replacement parts and repair labor to correct defects in materials or workmanship. Service must be provided by a Whirlpool designated service company. ITEMS WHIRLPOOL WILL NOT PAY FOR 1.