
Manual

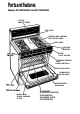


Using your range
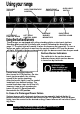
TOP LIGHT
SWITCH
OVEH TEMPERATURE
CONTROL
RIGHT FRONT
CONTROL KNOB
OVEN LIGHT
SWITCH
LEFT FRONT
CONTROL KNOB
LEFT REAR
CONTROL KNOB
SURFACE
BURNER
INDICATORS
RIGHT REAR
CONTROL KNOB
Using the Surface Burners
These ranges are equipped with either standing pilots or electronic ignitors.
Standing pilots must be lit initially with a match following the directions on
page 11. The pilot light will remain lit when the burners are turned off. To turn a
burner on again, just push in and turn the control knob to LITE and the burner
will light. Electronic ignitors automatically light the burners each time theyare used.
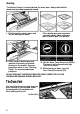
Surface Burner Indicators
The solid dot in the surface burner
indicator shows which surface burner
is turned on by that knob.
O
WARNING: If the
flame should go out
while cooking, or if
there is a strong gas odor, turn the
burners OFF. Wait five minutes for
the gas odor to disappear before
relighting burner. IF GAS ODOR IS
STILL PRESENT, SEE SAFETY NOTE ON
PAGE 2.
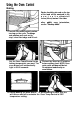
Control knobs must be pushed in,
then turned to LITE position. On elec
tronic ignitor models, the clicking
sound is the ignitor sparking.
After the burner lights, turn the control
knob back to a desired setting. The
control knob has stops for HI and LO,
however it can be set anywhere be
tween HI and LO. Do not cook with
the control in the LITE position.
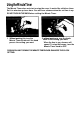
In Case of a Prolonged Power Failure
Surface burners with electronic ignitors can be manually lighted. Hold a lit
match nearthe burner and turn the control to the LITE position. After the burner
lights, turn the control to the desired setting. Power failures will not affect Stand
ing Pilots.
WARNING: Do not attempt to light the oven burner during a
power failure. Personal injury could result.