Self-Cleaning Gas Range A Note to You ............2 Range Safety .............3 Parts and Features ....5 Using Your Range......6 Using the SelfCleaning Cycle.........18 Caring for Your Range.......................21 Troubleshooting.......27 Requesting Assistance or Service .....................29 Index ........................31 Warranty...................32 1-800-253-1301 Call our Consumer Assistance Center with questions or comments. TO THE INSTALLER: PLEASE LEAVE THIS INSTRUCTION BOOK WITH THE UNIT.
A NOTE TO YOU Thank you for buying a WHIRLPOOL® appliance. The Whirlpool Brand is committed to designing quality products that consistently perform for you to make your life easier. To ensure that you enjoy years of trouble-free operation, we developed this Use and Care Guide. It is full of valuable information about how to operate and maintain your appliance properly and safely. Please read it carefully. Also, please complete and mail the Product Registration Card provided with your appliance.
RANGE SAFETY Your safety and the safety of others is very important. We have provided many important safety messages in this manual and on your appliance. Always read and obey all safety messages. This is the safety alert symbol. This symbol alerts you to hazards that can kill or hurt you and others. All safety messages will be preceded by the safety alert symbol and the word “DANGER” or “WARNING.” These words mean: wDANGER You will be killed or seriously injured if you don’t follow instructions.
RANGE SAFETY IMPORTANT SAFETY INSTRUCTIONS WARNING: To reduce the risk of fire, electrical shock, injury to persons, or damage when using the range, follow basic precautions, including the following: • WARNING – TO REDUCE THE RISK OF TIPPING OF THE RANGE, THE RANGE MUST BE SECURED BY PROPERLY INSTALLED ANTI-TIP DEVICES. TO CHECK IF THE DEVICES ARE INSTALLED PROPERLY, SLIDE RANGE FORWARD, LOOK FOR ANTI-TIP BRACKET SECURELY ATTACHED TO FLOOR, AND SLIDE RANGE BACK SO REAR RANGE FOOT IS UNDER ANTI-TIP BRACKET.
PARTS AND FEATURES (SF365PEG shown) (SF367LEH not shown) Manual oven light switch (p. 26) Oven temperature control knob (pp. 6, 12, 13, 15, 19, 20) Oven vent (p. 17) Surface burners and grates (pp. 21, 23-24) Electronic clock/timer (pp. 10-12) Control panel (pp. 5, 21) Automatic oven light switch (p. 26) Anti-tip bracket (p. 3) Gasket (p. 18) Door stop clip (pp. 24-26) Model and serial number plate (behind left side of storage drawer) Storage drawer (p.
USING YOUR RANGE USING THE SURFACE BURNERS wWARNING Burner heat settings Use the following chart as a guide. SETTING LIGHT Fire Hazard Do not let the burner flame extend beyond the edge of the pan. Turn off all controls when not cooking. Failure to follow these instructions can result in death or fire. RECOMMENDED USE • To light the burner. POWER™Burner (left front burner) • To provide highest heat HIGH • To start food cooking. • To bring liquid to a boil. • To hold a boil.
USING YOUR RANGE USING THE SURFACE BURNERS (CONT.) In case of a prolonged power failure • Refer to your canner manual for specific You can manually light surface burners. Hold a lit match near a burner and turn the control knob to the LIGHT position. After the burner lights, turn the control knob to the setting you want. Home canning information The large diameter of most water-bath or pressure canners combined with high heat settings for long periods of time can cause damage to the cooktop.
USING YOUR RANGE USING THE OVEN Positioning racks and pans Place the oven racks where you need them before Where to place pans: turning on the oven. WHEN YOU HAVE PLACE • To move a rack, pull it out to the stop position, 1 pan In center of the oven rack. raise the front edge and lift it out. 2 pans Side by side or slightly • Be sure the rack(s) is level. staggered. • Use pot holders or oven mitts to protect your hands if rack(s) must be moved while the oven is 3 or 4 pans In opposite corners on hot.
USING YOUR RANGE USING ALUMINUM FOIL • Do not line the oven bottom with any type of foil, liners, or cookware. Permanent damage will occur to the oven bottom finish. • Do not block the oven bottom vents. • Do not cover the entire rack with aluminum foil. Doing so will reduce air circulation and overall oven performance. • To catch spillovers from pies or casseroles place foil on the oven rack below. Foil should be turned up at edges and be at least 1 inch larger than dish.
USING YOUR RANGE THE ELECTRONIC TIME-OF-DAY (TOD) CLOCK/TIMER Electronic display Clock pad (pp. 10, 14) Increase pad (p. 10, 11, 14, 19) CLOCK Oven timer pad (p. 11, 12) Decrease pad (pp. 10, 11, 14, 19) TIMER TIMER Display/clock • When you first plug in the range, “PF” will appear on the display. If “PF” appears again on the display, your electricity was off for a while. • When you are not using the oven, the display shows the time of day.
USING YOUR RANGE USING THE ELECTRONIC TIMER The timer does not start or stop the oven. It works like a kitchen timer. It can be set in hours and minutes up to 12 hours, 59 minutes. The timer will display minutes for settings under 1 hour and hours and minutes for settings over 1 hour. You will hear four 1-second tones when the set time is up. NOTE: To display the time of day while the timer is counting down, press CLOCK. Time of day will be displayed for 5 seconds before returning to the timer countdown.
USING YOUR RANGE USING THE ELECTRONIC TIMER (CONT.) 3. When there is 1 minute of time remaining, the YOU SEE display will begin counting down in seconds. (display counts in seconds) When the timer countdown reaches zero, the display will show “End” and you will hear four 1-second tones. YOU SEE ON To cancel the timer: PRESS YOU SEE Press TIMER twice while in the timer mode. (time of day) BAKING/ROASTING 1. Place the racks where you need them.
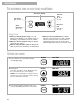
USING YOUR RANGE BAKING/ROASTING (CONT.) 3. Put your food in the oven. During baking/roasting, the burner will turn on and off to keep the oven temperature at the setting. 4. After baking/roasting, push and turn the oven control knob to OFF. PUSH AND TURN WARM BROIL 200 CLEAN YOU SEE OVEN ON and HEATING lights go out. 250 300 350 500 450 400 Saving energy Roasting meats and poultry • To avoid loss of heat, open the oven door as little as possible. • Use a timer to keep track of cooking time.
USING YOUR RANGE ADJUSTING THE OVEN TEMPERATURE CONTROL Although your new oven is properly adjusted to provide accurate temperatures, it may cook faster or slower than your old oven. If you are not satisfied with the baking/roasting results, you can change the offset temperature by following the steps below. NOTE: DO NOT measure oven temperature with a thermometer. Opening the oven door will lower the oven temperature and give you an incorrect reading.
USING YOUR RANGE BROILING NOTES: • Do not preheat when broiling unless your recipe recommends it. 1. Place the rack where you need it in the oven. Front See “Broiling guide lines” later in this section. Rear 2. Put your food on the broiler pan and place the pan in the center of the oven rack. Close the door. 3. Set the oven control knob to BROIL. PUSH AND TURN WARM BROIL 200 CLEAN YOU SEE OVEN ON and HEATING lights go on. 250 300 350 500 450 4.
USING YOUR RANGE BROILING (CONT.) Broiling guidelines • Use only the broiler pan and grid provided. They • Pull out oven rack to stop position before turning are designed to drain extra juices from the cooking surface. This drainage helps prevent spatter and smoke. • To make sure the juices drain well, do not cover the grid with foil. • Trim excess fat to reduce spattering. Slit the fat on the edges to prevent curling. • Use tongs to turn meat to avoid losing juices. or removing food.
USING YOUR RANGE THE OVEN VENT Hot air and moisture escape from the oven through a vent that is near the middle of the backguard. The vent lets air circulate properly. Be careful not to block the vent, or you will get poor baking/roasting results. NOTE: Never store plastics, paper, or other items that could melt or burn near the oven vent, or any of the surface burners. THE STORAGE DRAWER Use the storage drawer to store cookware. You can remove the drawer to make it easier to clean under the range.
USING THE SELF-CLEANING CYCLE wWARNING Burn Hazard Do not touch the oven during the Self-Cleaning cycle. Keep children away from oven during Self-Cleaning cycle. Do not use commercial oven cleaners in your oven. Failure to follow these instructions can result in burns, or illness from inhaling dangerous fumes. BEFORE YOU START Before you start the Self-Cleaning cycle, make sure you: NOTE: DO NOT clean, move, or bend the gasket. You may get poor cleaning, baking, and roasting. • Hand-clean the areas shown.
USING THE SELF-CLEANING CYCLE SETTING THE CONTROLS 1. Set the oven control knob to CLEAN. The door will lock itself within 6 seconds. If the door has a problem locking, it will try to lock itself for 1 minute. If the door fails to lock, the Self-Cleaning cycle will cancel. An error code will be displayed. PUSH AND TURN WARM BROIL 200 CLEAN 250 300 350 500 450 NOTE: Do not attempt to open the door while in the locking mode. 2. Set the cleaning time (optional). 400 YOU SEE OVEN ON light goes on.
USING THE SELF-CLEANING CYCLE SETTING THE CONTROLS (CONT.) To stop the self-cleaning cycle at any time: TURN Turn the oven control knob to OFF. YOU SEE DOOR LOCKED/ CLEANING light stays on. COOL appears in display until oven goes below locking temperature. WARM BROIL 200 CLEAN 250 300 350 500 450 400 HOW THE CYCLE WORKS 875°F ( 468°C ) CLEANING CYCLE Temperature The Self-Cleaning cycle uses very high heat to burn away soil and grease.
CARING FOR YOUR RANGE CLEANING CHART Before cleaning, always make sure all controls are off and the range is cool. Refer to instructions on all cleaning products before using them to clean your range. PART CLEANING METHOD SPECIAL INSTRUCTIONS Control Knobs • Soap and water • Dishwasher • DO NOT use steel wool or abrasive cleaners. • Pull knobs straight away from control panel. • Wash, rinse and dry with soft cloth. Control Panel • Soap and water • Wash, rinse and dry with soft cloth.
CARING FOR YOUR RANGE CLEANING CHART (CONT.) PART CLEANING METHOD Surface burners SPECIAL INSTRUCTIONS • See the “Sealed surface burner” section in the “Caring for your range” section. Oven door glass Oven cavity • Food spills containing sugar and/or milk • All other spills Oven racks • Soap and water • Non-abrasive plastic scrubbing pad • Spray glass cleaner • Wash, rinse and dry with soft • Soap and water • When oven cools, wash, rinse cloth. • Wipe with paper towel.
CARING FOR YOUR RANGE SEALED SURFACE BURNERS AND COOKTOP Cleaning the surface burners • You should routinely remove and clean the burner cap. Always clean the burner cap after a spillover. Keeping the burner cap clean prevents improper ignition and an uneven flame. • For the proper flow of gas and ignition of the burner, do not allow spills, food, cleaning agents, or any other material to enter the gas tube opening. • Gas must flow freely through the gas tube opening for the burner to light properly.
CARING FOR YOUR RANGE SEALED SURFACE BURNERS AND COOKTOP (CONT.) To clean the burners: 1. Pull the burner cap straight up from the 2. 3. 4. burner base. Clean the burner cap with warm, soapy water and a sponge. You can also clean it with a mildly abrasive scrubbing pad or cleanser. Do not clean the burner cap in a dishwasher or self-cleaning oven. If the gas tube opening has become soiled or clogged, use a cotton swab or a soft cloth to clean the area.
CARING FOR YOUR RANGE REMOVING THE OVEN DOOR (CONT.) To remove: 1. Open the oven door. Insert door removal pins, included with your range, into both hinge hangers. Do not remove the pins while the door is removed from the range. 2. Carefully close the door until it rests against the door removal pins. 3. Grasp the door on the sides with your fingers on the front of the door and your thumbs on the inside surface. 4. Pull door straight up, then toward you.
CARING FOR YOUR RANGE REMOVING THE OVEN DOOR (CONT.) 2. Hold oven door so that the top edge of each hinge hanger is horizontal. Insert hinge hangers into the front frame hinge slots. 3. Tilt top of door toward range. Slide hinge hangers down onto front frame support pins. Door stop clip Range Hinge hanger Door removal pin hole NOTE: Make sure the hinge hangers are fully seated and engaged on the support pins. Support pins 4.
TROUBLESHOOTING Most cooking problems often are caused by little things you can find and fix without tools of any kind. Check the lists below and on the next page before calling for assistance or service. If you still need help, see “Requesting Assistance or Service” on page 29. RANGE DOES NOT WORK PROBLEM CAUSE Nothing works • The range is not plugged into a properly grounded outlet (120v polarized). • The range is not properly connected to the gas supply.
TROUBLESHOOTING WHEN SELF-CLEANING YOUR OVEN PROBLEM CAUSE The Self-Cleaning cycle will not work • The door is not closed all the way. COOKING RESULTS PROBLEM SOLUTION Cookware not level on cooktop (Check to see if liquids are level in cookware) • Level the range. (See the Installation Instructions.) • Use cookware with a flat bottom. Excessive heat on cooktop in areas around cookware • Choose cookware the same size or slightly larger than the burner flame.
REQUESTING ASSISTANCE OR SERVICE To avoid unnecessary service calls, please check the “Troubleshooting” section. It may save you the cost of a service call. If you still need help, follow the instructions below. IF YOU NEED ASSISTANCE OR SERVICE Call the Whirlpool Consumer Assistance Center toll free at 1-800-253-1301. Our consultants are available to assist you. When calling: Please know the purchase date, and the complete model and serial number of your appliance (see the “A Note to You” section).
INDEX TOPIC PAGE TOPIC PAGE ANTI-TIP BRACKET......................................................3 FEATURES ....................................................................5 ASSISTANCE ..............................................................29 MODEL AND SERIAL NUMBER ..................................2 BAKING Aluminum foil ............................................................9 Bakeware ..................................................................9 Pans ........................
WARRANTY WHIRLPOOL GAS RANGE ® LENGTH OF WARRANTY WHIRLPOOL CORPORATION WILL PAY FOR FULL ONE-YEAR WARRANTY FROM DATE OF PURCHASE FSP replacement parts and repair labor to correct defects in materials or workmanship. Service must be provided by a Whirlpool designated service company. ® WHIRLPOOL CORPORATION WILL NOT PAY FOR A. Service calls to: 1. Correct the installation of your range. 2. Instruct you how to use your range. 3. Replace house fuses or correct house wiring or plumbing. 4.