Operating Instructions HOB GB GB English,1 Contents Installation, 2-7 Positioning Electrical connection Gas connection Data plate Burner and nozzle specifications Description of the appliance, 8 Overall view Start-up and use, 9-10 Practical advice on using the burners Precautions and tips, 11 SH09PGWAX General safety Disposal Maintenance and care, 12 Switching the appliance off Cleaning the appliance Gas tap maintenance Troubleshooting, 13 After sales support, 14
Installation ! Please keep these operating instructions for future reference. Pass them on to possible new owners of the appliance. ! Intensive and prolonged use may require additional ventilation, for example, opening a window or ventilation more efficient by increasing the suction power The appliance has the following technical specifications: Category: II 2H3+ Positioning ! Keep packaging material out of the reach of children. It can become a choking or suffocation hazard (see Precautions and tips).
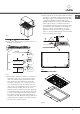
m Min. M in.700mm 700m m 50 m mm 50 2- Built-in hobs (Class 3) with edges lower than 58 mm (see figure 2, detail H2). To install this type of hob, a hole large enough to accommodate the whole lower casing of the appliance must be made on the worktop intended to be under the hob. Remember to leave a gap of at least 1 cm between the lower casing and the worktop around the whole perimeter of the appliance (the underside of the casing can, however, touch the surface below it).
GB 3- Sit-on hobs (Class 1) with edges higher than 58 mm (see figure 2, detail H3). In this case, the lower casing of the hob does not protrude further than the edge of the appliance. Even when the hob is resting on the worktop, it will suffice to leave space for the gas supply tube and electricity supply cable. To fit this type of hob, follow the instructions below (fig.
Electrical connection Gas connection Hobs equipped with a three-pole power supply cable are designed to operate with alternating current at the voltage and frequency indicated on the data plate (this is located on the lower part of the appliance). The earth wire in the cable has a green and yellow cover.
GB Adapting to different types of gas To adapt the hob to a different type of gas other than default type (indicated on the rating plate at the base of the hob or on the packaging), the burner nozzles should be replaced as follows: 1. Remove the hob grids and slide the burners off their seats. 2. Unscrew the nozzles using a 7 mm socket spanner, and replace them with nozzles for the new type of gas (see table 1 “Burner and nozzle characteristics”). 3.
Burner and nozzle specifications Table 1 Liquid Gas Burner Diameter Thermal power (mm) kW (p.c.s.*) By-Pass 1/100 Nozzle 1/100 Flow* g/h Nozzle 1/100 Nomin. Ridot. (mm) (mm) *** ** (mm) Flow* l/h B. Semi fast 75 1,65 0,40 30 64 138 136 96 181 A. Auxiliary 55 1,00 0,40 30 50 73 71 71 95 C. Oval burner — 1,50 0,40 30 60 109 107 88 143 D. Double crown wok (inner DCDR) 30 0,90 0,40 30 44 65 64 70 86 D.
Description of the appliance GB Overall view Gas burners Pan supports Control knobs Flame supervision device • Gas burners differ in size and power as described in the previous page. Use the diameter of the cookware to choose the most appropriate burner to cook with. • Control knobs allow to adjust the power or the size of the flame. • The ignition enables a specific burner to be lit automatically when a knob is pushed down ad turned.
Start-up and use ! The position of the corresponding gas burner is shown on every knob. Gas burners Each burner can be adjusted to one of the following settings using the corresponding control knob: z Off Maximum Minimum To light each of the burners, press down the corresponding knob and turn it anti-clockwise to the maximum setting.
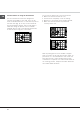
GB Practical advice on using the Oval burners The two Oval burners have been designed to increase the flexibility of your hob. They can be used as individual burners, to cook with two pans at the same time (Fig. A), or they can be turned 90° and used together (Fig. B). This second option is ideal when using the special cast iron Griddle supplied with the hob or the optional Teppan Yaki, as well as with a long pan, or fish kettle.
Precautions and tips ! This appliance has been designed and manufactured in compliance with international safety standards. The following warnings are provided for safety reasons and must be read carefully. General safety • This is a appliance. -Class 1: all models with edges that are higher than 58 mm (see overleaf, fig. 4, detail H3). -Class 3: all models with edges that are lower than 58 mm (see overleaf, fig. 4, details H1 and H2).
Maintenance and care GB Switching the appliance off Disconnect your appliance from the electricity supply before carrying out any work on it. Cleaning the appliance ! Do not use abrasive or corrosive detergents such as stain removers, anti-rust products, powder detergents or sponges with abrasive surfaces: these may scratch the surface beyond repair. ! Never use steam cleaners or pressure cleaners on the appliance.
Troubleshooting It may happen that the appliance does not function properly or at all. Before calling the service centre for assistance, check if anything can be done. First, check to see that there are no interruptions in the gas and electrical supplies, and, in particular, that the gas valves for the mains are open. GB Problem Possible causes/Solution The burner does not light or the flame is not even around the burner. • The gas holes on the burner are clogged.
After sales support Scholtès UK | Morley Way, Peterborough, PE2 9JB t. 0800 158 55 00 e. info@scholtes.co.uk w. scholtes.co.uk GB Commitment to after sales support Thank you for investing in Scholtès Scholtès products are designed to perform consistently and reliably throughout their life. To give you further reassurance Scholtès ensures your appliance benefits from a five year guarantee.
GB 15
03/2010 - 195082269.