EN Operating Instructions
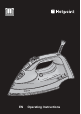
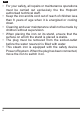
LCD SI E40 BA1 UK 5 4a 3 2 6 1 7 14 8 13 9 12 10 11 SI DC30 BA1 UK 4c 3 5 4b 2 6 1 7 13 8 9 12 10 11
A LCD B1 B2 LCD COT TON C1 C2 LCD D1 D2 LCD E1 LCD E2
G F LCD LCD H1 H2 LCD I J LCD LCD K1 LCD L I NE N K2
en GENERAL SAFETY RULES • Do not operate the iron in case of damaged plug, power cord or appliance, or in the presence of visible damage or water leaks from the appliance. In such a case the appliance must be inspected by the Hotpoint authorized technical staff in order to avoid dangerous situations. • If the appliance was dropped, do not operate it.
en • For your safety, all repairs or maintenance operations must be carried out exclusively the the Hotpoint authorised technical staff. • Keep the iron and its cord out of reach of children less than 8 years of age when it is energized or cooling down. • Cleaning and user maintenance shall not be made by children without supervision. • When placing the iron on its stand, ensure that the surface on which the stand is placed is stable.
en DESCRIPTION OF YOUR IRON • 1. 2. 3. 4a. 4b. 4c. 5. 6. 7. 8. 9. 10. 11. 12. 13. 14. • Shot of steam button Spray button Steam regulator Temperature buttons +/Temperature control Temperature indicator light Power cable holder Cable winder Stand Auto-Clean button Water reservoir Maximum water level Soleplate Spray nozzle Filler hole Lid LCD Not shown: water measurer INTRODUCTION Thank you for purchasing our Quick Perfection steam iron.
en Replacing the fuse When replacing a faulty fuse, a 13 amp ASTA approved fuse to BS 1362 should always be used, and the fuse cover re-fitted. If the fuse cover is lost, the plug must not be used until a replacement is obtained. If a 13 amp plug (BS 1363) is used it must be fitted with a 13 amp fuse, either in the plug or adaptor or at the distribution board. If you are in any doubt regarding the electrical supply to your machine, consult a qualified electrician before use.
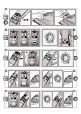
en Before filling the iron with water, make sure that the iron is switched-off and disconnected from the electrical socket. 1. 2. 3. 4. shiny marks. Start ironing the garments that require a lower temperature, such as synthetic fabrics. Fabrics with this symbol on the label must not be ironed. Set the steam regulator (3) to Off. Tilt the iron in such a position to make water entrance easier. Open the lid of the filler hole (13) and fill the water reservoir using the water measurer supplied with the iron.
en Fabrics with this symbol on the label must not be ironed. GARMENT LABEL FABRIC TYPE TEMPERATURE INDICATION synthetic MIN STEAM INDICATION no-steam and steam ironing mode. 1. 2. 3. silk mixed cotton wool mixed wool cotton linen jeans 5. If the water in the reservoir is finished, it may be necessary to press the shot of steam button several times to (re)activate the pump, after filling the water reservoir again.
en 3. and chapter “Using the iron”, section “Selecting the temperature and adjusting the steam”). Press the shot of steam button (1) to obtain an extra steam flow when ironing. If the shot of steam function has not been used for some time, it may be necessary to press the button repeatedly to activate the pump. If the water in the reservoir is finished, it may be necessary to press the shot of steam button several times to (re)activate the pump, after filling the water reservoir again.
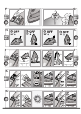
en Cleaning (J) Never use aggressive and/or abrasive substances to clean the plastic parts and the iron soleplate. 1. 2. 3. 4. Set the steam regulator (3) to Off, disconnect the appliance plug from the electrical socket and let the iron cool down. Use a dry or slightly dampened soft cloth to clean the upper part of the iron. For the ordinary cleaning and/or removal of stains or other residues deposited on the plate, clean with a dampened soft cloth and dry.
en impurities. Never use plastic containers for collection. 7. Switch off the iron and disconnect it from the electrical socket. 8. Set the steam select to the maximum position. 9. Allow water to come out of the holes for at least 30 minutes. 10. Slide the iron gently on a cloth to eliminate any stains from the soleplate. 11. Before using the iron again, press the shot of steam button (1) repeatedly to eliminate any scale residues.
en Consumables and Accessories We supply a full range of consumables and accessories to keep your product functioning efficiently throughout its life. UK: 03448 225 225 Republic of Ireland: 0818 313 413 parts.hotpoint.co.uk/shop Recycling and Disposal Information As part of Hotpoint’s continued commitment to helping the environment, Hotpoint reserves the right to use quality, recycled components to keep down customer costs and minimise material wastage.
en Water is dripping out of the soleplate • • • • • • The soleplate is dirty or dark and may stain the fabrics. The spray function does not work. • The soleplate temperature may be too low due to the excessively frequent activation of the shot of steam button. Slightly increase the interval between steam shots. The soleplate temperature is set to a too-low temperature. You have replaced the iron horizontally without emptying it and/or without setting the steam regulator to Off.
www.indesitcompany.com Quick Perfection 2015/03 ver. 2.1.