SMAKRIK PT ES GR NL EM
PORTUGUÊS ESPAÑOL ΕΛΛΗΝΙΚΑ NEDERLANDS 4 21 38 55
PORTUGUÊS Índice Informações de segurança Descrição do produto Painel de controlo Primeira utilização Utilização diária 4 4 6 6 7 8 Limpeza e manutenção O que fazer se... Especificações técnicas Questões ambientais GARANTIA IKEA 12 14 16 17 18 Informações de segurança Antes da primeira utilização Este aparelho foi concebido apenas para utilização doméstica! • Utilize pegas de cozinha ou luvas para o forno para prevenir queimaduras ao tocar em partes quentes.
PORTUGUÊS Segurança • Depois de remover a embalagem, certifique-se de que o aparelho está completo e não se encontra danificado. Em caso de dúvida, não utilize o aparelho e contacte um profissional qualificado. • A instalação e ligação eléctricas devem ser efectuadas por um técnico qualificado, em conformidade com as instruções do fabricante e com as normas de segurança locais. • Os materiais da embalagem (sacos de plástico, poliestireno, etc) constituem um perigo e não devem ficam ao alcance das crianças.
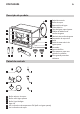
PORTUGUÊS 6 Descrição do produto 4 2 1 5 10 11 3 6 7 8 9 12 13 14 1 2 3 4 5 6 7 8 9 10 11 12 13 14 Painel de controlo C D B E A F A B C D E F Botão selector de vapor Botão café/água quente Botão ligar/desligar Ligar luz Luz indicadora de temperatura OK (café ou água quente) Luz indicadora de vapor Painel de controlo Botão de vapor Reservatório de água Cabo eléctrico Tubo de água vapor/quente Grelha do tabuleiro de recolha de gotas Tabuleiro de recolha de gotas Preparador de capuccino Bo
PORTUGUÊS 7 Primeira utilização Encher o reservatório de água Puxe o reservatório para o remover. adicionar café moído (verifique se o botão de vapor está fechado). Para encaixar o suporte do filtro, coloque-o sob a saída do reservatório de água quente com o punho virado para a esquerda, levante-o e ao mesmo tempo rode-o firmemente para a direita. Encha o reservatório com água fresca tendo o cuidado de não ultrapassar a marca MAX. Volte a colocar o reservatório.
PORTUGUÊS 8 Utilização diária Como preparar café expresso utilizando o suporte do filtro para café moído. Depois de pré-aquecer o aparelho como descrito acima, coloque o filtro de café moído no suporte do filtro, certificando-se de que a saliência é correctamente introduzida na ranhura. Utilize o filtro mais pequeno para preparar um café ou o filtro maior para preparar dois cafés. Distribua o café moído uniformemente e prima ligeiramente com o prensador.
PORTUGUÊS Quando a luz OK estiver acesa (se estiver desligada, aguarde), prima o botão café. Quando a quantidade de café necessária tiver sido distribuída, prima novamente o mesmo botão. Não deverá deixar distribuir mais do que 45 segundos de cada vez. Para retirar o suporte do filtro rode o manípulo da direita para a esquerda. IMPORTANTE: para evitar salpicos, nunca retire o suporte do filtro durante a distribuição de café.
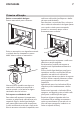
PORTUGUÊS Rode o botão de vapor meia volta para a esquerda. O vapor é libertado pelo preparador de capuccino, conferindo ao leite um aspecto cremoso e espumoso. Para obter espuma cremosa, mergulhe o preparador de capuccino no leite e rode o recipiente em movimentos lentos de baixo para cima. Quando a temperatura necessária for alcançada (60ºC é o ideal), interrompa a distribuição do vapor, rodando o botão de vapor para a esquerda enquanto prime simultaneamente no botão de vapor.
PORTUGUÊS Volte a colocar o bocal de vapor inserindo-o no tubo de vapor e rodando-o firmemente até ao cimo do tubo. Volte a colocar o preparador de capuccino inserindo-o e rodando-o para a esquerda. 11 Preparação de água quente Prima o botão ligar/desligar para ligar o aparelho. Aguarde até a luz indicadora OK acender. Coloque um recipiente por baixo do preparador de capuccino. Prima o botão café e em simultâneo rode o botão de vapor para a esquerda. Sai água do preparador de capuccino.
PORTUGUÊS 12 Limpeza e manutenção Antes de realizar quaisquer operações de limpeza, deixe o aparelho arrefecer. Não utilize produtos de limpeza solventes ou abrasivos para limpar o produto. É suficiente utilizar um pano suave e húmido. Esvazie e limpe o tabuleiro de recolha de gotas e a grelha do tabuleiro de recolha de gotas com frequência. Limpe o reservatório de água regularmente. IMPORTANTE: Nunca submerja o aparelho em água, uma vez que se trata de um aparelho eléctrico.
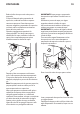
PORTUGUÊS Limpeza da saída do reservatório de água quente A saída do reservatório de água quente deve ser limpo a cada 300 cafés, como se segue: Certifique-se de que o aparelho não está quente e está desligado da corrente eléctrica. Com uma chave de fendas, desaperte o parafusos que fixa o filtro da saída do reservatório de água quente. Limpe o reservatório de água quente com um pano húmido. Limpe cuidadosamente a saída com uma escova e água quente. Certifique-se de que os orifícios não estão bloqueados.
PORTUGUÊS 14 O que fazer se... Problema Possível causa Solução A máquina não prepara café expresso. Sem água no reservatório da água. Coloque água no reservatório. Os orifícios do suporte do filtro estão bloqueados. Limpe os orifícios do suporte. A saída do reservatório de água quente está bloqueada. Limpe como descrito no capítulo "Limpeza da saída do reservatório de água quente". O filtro está bloqueado. Limpe como descrito no capítulo "Limpeza do suporte do filtro".
PORTUGUÊS 15 O que fazer se... Problema Possível causa Solução A espuma do café está demasiado clara (o café foi distribuído muito depressa). O café moído não foi premido o suficiente. Exerça mais pressão no café moído. Não foi colocado café moído suficiente. Aumente a quantidade de café moído. O café moído está demasiado espesso. Utilize apenas café moído para máquinas de café expresso. Tipo de café moído incorrecto. Altere o tipo de café moído. O café moído foi demasiado premido.
PORTUGUÊS 16 Especificações técnicas Dimensões (mm) Largura 595 Altura 348 Comprimento 305 Pressão da bomba (bar) 15 Potência (W) 1100 Capacidade do reservatório de água (L) 1,5 As especificações técnicas estão situadas na chapa de características, localizada na secção interna do aparelho, e na etiqueta de energia.
PORTUGUÊS 17 Questões ambientais Este aparelho está classificado de acordo com a Directiva Europeia 2002/96/CE, sobre Resíduos de equipamento eléctrico e electrónico (REEE). Ao garantir uma eliminação correcta do produto, evitará possíveis consequências negativas para o meio ambiente e para a saúde pública, que poderiam resultar de um tratamento inadequado dos resíduos deste produto.
PORTUGUÊS 18 GARANTIA IKEA Durante quanto tempo é válida a garantia IKEA? Esta garantia é válida durante cinco (5) anos, contados a partir da data de compra do seu aparelho na IKEA, excluindo os aparelhos denominados LAGAN, os quais têm apenas dois (2) anos de garantia. A factura ou talão de compra original é necessária como prova de compra. Se a assistência for efectuada ao abrigo da garantia, isso não irá aumentar o período de garantia do aparelho.
PORTUGUÊS provocados por defeitos de fabrico. • Casos em que não é detectada qualquer avaria durante a visita do técnico. • Reparações não efectuadas pelos nossos prestadores de serviço e/ou por um agente autorizado ou quando não tenham sido usadas peças originais. • Reparações provocadas por uma instalação incorrecta ou que não cumpra as especificações de instalação. • Utilização do aparelho num ambiente não doméstico, isto é, profissional. • Danos de transporte.
PORTUGUÊS no manual do aparelho específico para o qual necessita de assistência. Também solicitamos que nos indique sempre o número de artigo IKEA (código de 8 dígitos) e o número de serviço de 12 dígitos situados na chapa de características. GUARDE A FACTURA OU TALÃO DE COMPRA! É a sua prova de compra e será necessária para aplicar e validar a garantia. A factura ou talão de compra indica igualmente o nome e o número de artigo (código de 8 dígitos) IKEA de cada aparelho que adquiriu.
ESPAÑOL Contenido Información de seguridad Descripción del producto Panel de mandos Primer uso Uso diario 21 21 23 23 24 25 Mantenimiento y limpieza Qué hacer si... Datos técnicos Cuestiones medioambientales GARANTÍA DE IKEA 29 31 33 34 35 Información de seguridad Antes del primer uso Este aparato ha sido diseñado para uso doméstico exclusivamente! • Use salvamanteles o incluso guantes para horno para no quemarse al tocar las partes calientes.
ESPAÑOL Seguridad • Tras quitar el embalaje, asegúrese de que el aparato esté completo y sin daños. Si tiene dudas, no use este aparato y póngase en contacto con un profesional cualificado. • Asegúrese de que la instalación y la conexión eléctrica sean efectuadas por un técnico cualificado según las instrucciones del fabricante y la normativa local. • Los elementos de embalaje (bolsas de plástico, poliestireno etc) no deberán ser dejadas al alcance de los niños puesto que pueden ser peligrosas.
ESPAÑOL 23 Descripción del producto 4 2 1 5 10 11 3 6 7 1 2 3 4 5 6 7 8 9 10 11 12 13 14 8 9 12 13 14 Panel de mandos C D B E A F A B C D E F Botón selector del vapor Botón para el café/ agua caliente Botón On /Off Luz de encendido Luz de temperatura OK (café o agua caliente) Luz indicadora del vapor Panel de mandos Mando del vapor Depósito de agua Cable de alimentación Tubo de agua caliente / vapor Rejilla de goteo Bandeja de goteo Máquina de cappuccino Inyector Salida de café Prensado
ESPAÑOL 24 Primer uso Llenado del depósito de agua Saque el depósito de agua tirando de él hacia fuera colocada en el aparato sin añadir café molido (asegúrese de que el control del vapor esté cerrado). Para colocar la sujeción del filtro, póngalo bajo la salida del café, con el asa hacia la izquierda. Empújela hacia arriba y, al mismo tiempo, gire el asa con firmeza hacia la derecha. Llene el depósito con agua limpia y fresca sin pasarse de la indicación MAX. Vuelva a colocar el depósito.
ESPAÑOL 25 Uso diario Cómo preparar un café espresso usando la sujeción del filtro para café molido Tras precalentar el aparato tal y como se describe arriba, coloque el filtro de café molido en la sujeción del filtro, asegurándose de que la proyección está bien colocada en la ranura. Use el filtro más pequeño para hacer un café y el más grande para hacer dos. Para hacer un solo café, coloque en el filtro una medida de un nivel (unos 7 g) de café molido.
ESPAÑOL Asegúrese de que el piloto OK esté encendido (si no, espere a que se encienda), y pulse el botón del café. Una vez que haya salido la cantidad de café necesaria, pulse de nuevo el mismo botón. No debería dejar salir café por más de 45 segundos cada vez. Para quitar la sujeción del filtro, gire el asa de la derecha a la izquierda. IMPORTANTE: Para evitar salpicaduras, no quite nunca la sujeción del filtro mientras sale café del aparato.
ESPAÑOL Gire el mando de vapor al menos media vuelta hacia la izquierda. El aparato para hacer cappuccino emite vapor, dando a la leche una apariencia cremosa y espumosa. Para obtener una espuma más cremosa, sumerja el aparato para hacer cappuccino en la leche y gire el contenedor con movimientos lentos de bajo arriba. Cuando se alcance la temperatura necesaria (60°C is lo ideal), interrumpa la emisión de vapor girando el mando de vapor en sentido horario y, al mismo tiempo, pulsando el botón del vapor.
ESPAÑOL Limpie a fondo el inyector de vapor del aparato para hacer cappuccino con agua tibia. Asegúrese de que los dos orificios mostrados no estén bloqueados. Si es necesario, límpielos con un alfiler. Cambie el inyector de vapor introduciéndolo en el tubo de vapor y girándolo con firmeza hacia la parte superior del tubo. Cambie el aparato para hacer cappuccino insertándolo y girándolo hacia la izquierda. 28 Producción de agua caliente Encienda el aparato pulsando el botón ON/ OFF.
ESPAÑOL 29 Mantenimiento y limpieza Antes de cualquier operación de limpieza, deje que el aparato se enfríe. No utilice disolventes o productos de limpieza abrasivos para limpiar el aparato. Bastará con un trapo húmedo y suave. Vacíe y limpie frecuentemente la bandeja de goteo y la rejilla de goteo. Limpie el depósito de agua con regularidad. IMPORTANTE: No sumerja nunca el aparato en el agua. Es un aparato eléctrico. Limpieza de la sujeción del filtro.
ESPAÑOL Limpieza de la salida de café Cada 300 cafés, la salida de café puede limpiarse de la siguiente manera: Asegúrese de que el aparato no esté caliente y de que esté desenchufado de la red eléctrica. Con un destornillador, desenrosque el tornillo que fija el filtro de la salida de café Limpie el calentador con un paño húmedo. Limpie bien la salida con agua caliente y un cepillo. Asegúrese de que los orificios no estén bloqueados. Si es necesario, límpielos con un alfiler.
ESPAÑOL 31 Qué hacer si... Problema Posible causa Solución No sale café espresso No hay agua en el depósito Llene el depósito de agua Los orificios de las salidas de la sujeción del filtro están bloqueados. Limpie los orificios de las salidas. La salida de café está bloqueada Límpiela tal y como se describe en el capítulo "Limpieza de la salida de café" El filtro está bloqueado Límpielo tal y como se describe en la sección "Limpieza de la sujeción del filtro".
ESPAÑOL 32 Qué hacer si... Problema Posible causa Solución La espuma del café es demasiado ligera (sale demasiado rápido) El café molido no ha sido prensado con suficiente firmeza Prense el café molido con más firmeza. No hay suficiente café molido Aumente la cantidad de café molido El café molido es demasiado grueso Use sólo café molido para máquinas de café espresso Tipo incorrecto de café molido. Cambie el tipo de café molido.
ESPAÑOL 33 Datos técnicos Dimensiones (mm) Ancho 595 Alto 348 Largo 305 Presión de la bomba (bar) 15 Potencia (W) 1100 Capacidad del depósito de agua (L) 1,5 La información técnica se encuentra en la placa de características, en la parte interna del aparato, y en la etiqueta de energía.
ESPAÑOL 34 Cuestiones medioambientales Este aparato tiene la marca de conformidad con la directiva europea 2002/96/CE sobre Residuos de aparatos eléctricos y electrónicos (RAEE). La correcta eliminación de este producto evita las consecuencias negativas para el medio ambiente y la salud de las personas que podrían derivar de su incorrecta manipulación. en el producto o en El símbolo los documentos que se incluyen con el producto, indica que no se puede tratar como un residuo doméstico.
ESPAÑOL 35 GARANTÍA IKEA ¿Qué plazo de validez tiene la garantía de IKEA? Esta garantía es válida por cinco (5) años a partir de la fecha original de compra del electrodoméstico en IKEA, excluyendo los aparatos denominados LAGAN, los cuales tienen solo dos (2) años de garantía. Como justificante de la compra, necesitará la factura o recibo de compra original. Si se realizan reparaciones en el periodo de garantía, no se ampliará el periodo de garantía del electrodoméstico.
ESPAÑOL proveedores de servicios y/o un servicio autorizado por IKEA, o cuando se utilicen piezas no originales. • Reparaciones provocadas por una instalación defectuosa o que no cumpla las especificaciones de instalación. • Uso del electrodoméstico en un entorno no-doméstico, es decir, uso profesional. • Daños de transporte. Si un cliente transporta el producto a su casa o a otra dirección, IKEA no se responsabiliza de los daños que pueda sufrir en el trayecto.
ESPAÑOL en la placa de datos técnicos del aparato. ¡GUARDE LA FACTURA O RECIBO DE COMPRA! Es la prueba de la compra y lo necesitará para hacer uso de la garantía. El recibo también incluye el nombre y el número del producto (8 dígitos) de IKEA, para cada uno de los electrodomésticos que compre. ¿Necesita ayuda adicional? Para quaisquer esclarecimentos adicionais Para todas las cuestiones adicionales no relacionadas con Post-Venta sobre sus aparatos, por favor, diríjase al call center de la tienda IKEA.
ΕΛΛΗΝΙΚΑ Περιεχόμενα Πληροφορίες ασφαλείας Περιγραφή προϊόντος Πίνακας ελέγχου Πρώτη χρήση Καθημερινή χρήση 38 38 40 40 41 42 Καθαρισμός και συντήρηση Τι να κάνετε εάν… Τεχνικά στοιχεία Περιβαλλοντικά θέματα ΕΓΓΥΗΣΗ IKEA 46 48 50 51 52 Πληροφορίες ασφαλείας Πριν από την πρώτη χρήση Η συσκευή αυτή προορίζεται μόνο για οικιακή χρήση! • Χρησιμοποιήστε ειδικά πανιά ή γάντια φούρνου για προστασία από εγκαύματα κατά την επαφή με ζεστά εξαρτήματα.
ΕΛΛΗΝΙΚΑ Ασφάλεια • Μετά την αφαίρεση της συσκευασίας, βεβαιωθείτε ότι η συσκευή είναι πλήρης και ότι δεν έχει υποστεί ζημιά. Σε περίπτωση αμφιβολιών, μη χρησιμοποιείτε τη συσκευή. Επικοινωνήστε με εξειδικευμένο τεχνικό. • Η ηλεκτρική εγκατάσταση και η ηλεκτρική σύνδεση πρέπει να πραγματοποιούνται από εξειδικευμένο τεχνικό σύμφωνα με τις οδηγίες του κατασκευαστή και τους τοπικούς κανονισμούς ασφαλείας. • Τα υλικά της συσκευασίας (πλαστικές σακούλες, φελιζόλ, κ.λπ.
ΕΛΛΗΝΙΚΑ 40 Περιγραφή προϊόντος 4 2 1 5 10 11 3 6 7 1 2 3 4 5 6 7 8 9 10 11 12 13 14 8 9 12 13 14 Πίνακας ελέγχου C D B E A F A B C D E F Κουμπί επιλογής ατμού Κουμπί καφέ/ζεστού νερού Κουμπί ενεργοποίησης/απενεργοποίησης Λυχνία ενεργοποίησης Λυχνία θερμοκρασίας ok (καφές ή ζεστό νερό) Ενδεικτική λυχνία ατμού Πίνακας ελέγχου Κουμπί ατμού Δοχείο νερού Καλώδιο τροφοδοσίας Σωλήνας ατμού/ζεστού νερού Πλέγμα συλλογής σταγόνων Δίσκος συλλογής σταγόνων Εξάρτημα προετοιμασίας καπουτσίνο Ακροφύσ
ΕΛΛΗΝΙΚΑ 41 Πρώτη χρήση Πλήρωση του δοχείου νερού Αφαιρέστε το δοχείο νερού τραβώντας το προς τα έξω (προς τα εμπρός). φίλτρου είναι συνδεδεμένη στη συσκευή χωρίς να προσθέσετε αλεσμένο καφέ (βεβαιωθείτε ότι το κουμπί ατμού είναι κλειστό). Για να συνδέσετε τη λαβή φίλτρου, τοποθετήστε την κάτω από το στόμιο εξόδου του βραστήρα με το άκρο της λαβής προς τα αριστερά, πιέστε τη λαβή προς τα πάνω και περιστρέψτε την ταυτόχρονα σταθερά προς τα δεξιά.
ΕΛΛΗΝΙΚΑ 42 Καθημερινή χρήση Προετοιμασία καφέ espresso με τη χρήση της λαβής φίλτρου για αλεσμένο καφέ Μετά την προθέρμανση της συσκευής, όπως περιγράφεται παραπάνω, τοποθετήστε το φίλτρο αλεσμένου καφέ στη λαβή φίλτρου και βεβαιωθείτε ότι η προεξοχή έχει εισαχθεί σωστά στην υποδοχή. Χρησιμοποιήστε το μικρότερο φίλτρο για την προετοιμασία ενός καφέ ή το μεγαλύτερο φίλτρο για δύο καφέδες. Για να προετοιμάσετε μόνο έναν καφέ, προσθέστε μία κοφτή μεζούρα (περίπου 7 g) αλεσμένου καφέ στο φίλτρο.
ΕΛΛΗΝΙΚΑ το φλιτζάνι ή τα φλιτζάνια κάτω από τα στόμια της λαβής φίλτρου. Συνιστάται να ζεσταίνετε τα φλιτζάνια πριν από την προετοιμασία του καφέ ξεπλένοντάς τα με λίγο ζεστό νερό. Βεβαιωθείτε ότι η λυχνία ok είναι αναμμένη (εάν είναι σβηστή, περιμένετε μέχρι να ανάψει) και, στη συνέχεια, πατήστε το κουμπί καφέ. Όταν τρέξει η απαιτούμενη ποσότητα καφέ, πατήστε ξανά το ίδιο κουμπί. Μην αφήνετε να τρέξει καφές για περισσότερο από 45 δευτερόλεπτα κάθε φορά.
ΕΛΛΗΝΙΚΑ περίπου 100 γραμμάρια γάλακτος για κάθε cappuccino που θα προετοιμαστεί. Το γάλα πρέπει να έχει θερμοκρασία ψυγείου (δεν πρέπει να είναι ζεστό!). Κατά την επιλογή του μεγέθους του δοχείου, λάβετε υπόψη ότι ο όγκος του γάλακτος διπλασιάζεται ή τριπλασιάζεται. ΣΗΜ.: συνιστάται να χρησιμοποιείτε ημιαποβουτυρωμένο γάλα σε θερμοκρασία ψυγείου. Τοποθετήστε το δοχείο που περιέχει το γάλα κάτω από το εξάρτημα προετοιμασίας cappuccino.
ΕΛΛΗΝΙΚΑ Αφήστε να βγει λίγος ατμός για μερικά δευτερόλεπτα περιστρέφοντας το κουμπί ατμού. Με τον τρόπο αυτό, απομακρύνεται τυχόν ποσότητα γάλακτος που έχει παραμείνει στο στόμιο ατμού. ΣΗΜΑΝΤΙΚΟ: Για καλύτερη υγιεινή, συνιστάται να ακολουθείτε τη διαδικασία αυτή κάθε φορά που προετοιμάζετε καφέ cappuccino, ώστε να μην παραμείνει γάλα στο κύκλωμα.
ΕΛΛΗΝΙΚΑ 46 Καθαρισμός και συντήρηση Πριν από την εκτέλεση εργασιών καθαρισμού, αφήστε τη συσκευή να κρυώσει. Μη χρησιμοποιείτε διαλύτες ή λειαντικά καθαριστικά προϊόντα για τον καθαρισμό της συσκευής. Μπορείτε να χρησιμοποιήσετε ένα μαλακό, υγρό πανί. Αδειάζετε και πλένετε συχνά το δίσκο και το πλέγμα συλλογής σταγόνων. Καθαρίζετε τακτικά το δοχείο νερού. ΣΗΜΑΝΤΙΚΟ: Μην εμβαπτίζετε ποτέ τη συσκευή σε νερό. Η συσκευή είναι ηλεκτρική.
ΕΛΛΗΝΙΚΑ Καθαρισμός του στομίου εξόδου του βραστήρα Ο καθαρισμός του στομίου εξόδου του βραστήρα espresso πρέπει να εκτελείται κάθε 300 καφέδες περίπου ως εξής: Βεβαιωθείτε ότι η συσκευή δεν είναι ζεστή και ότι είναι αποσυνδεδεμένη από το κεντρικό δίκτυο. Χρησιμοποιώντας ένα κατσαβίδι, ξεβιδώστε τη βίδα στερέωσης του φίλτρου στο στόμιο εξόδου του βραστήρα espresso. Καθαρίστε το βραστήρα με ένα υγρό πανί. Καθαρίστε καλά το στόμιο εξόδου με ζεστό νερό χρησιμοποιώντας μια βούρτσα.
ΕΛΛΗΝΙΚΑ 48 Τι να κάνετε εάν… Πρόβλημα Πιθανή αιτία Δεν παρέχεται καφές espresso Δεν υπάρχει νερό στο δοχείο Γεμίστε το δοχείο με νερό Ο καφές espresso στάζει από τα άκρα της λαβής φίλτρου και όχι από τις οπές. Ο καφές espresso είναι κρύος Η αντλία κάνει υπερβολικό θόρυβο Λύση Οι οπές στα στόμια της λαβής φίλτρου είναι φραγμένες. Καθαρίστε τις οπές των στομίων.
ΕΛΛΗΝΙΚΑ 49 Τι να κάνετε εάν… Πρόβλημα Πιθανή αιτία Λύση Ο αφρός του καφέ είναι πολύ λίγος (παρέχεται πολύ γρήγορα από το στόμιο) Ο αλεσμένος καφές δεν έχει συμπιεστεί αρκετά Συμπιέστε περισσότερο τον αλεσμένο καφέ. Η ποσότητα αλεσμένου καφέ δεν είναι επαρκής Αυξήστε την ποσότητα αλεσμένου καφέ Ο αλεσμένος καφές είναι πολύ χοντροκομμένος Χρησιμοποιείτε αλεσμένο καφέ μόνο για μηχανές espresso Εσφαλμένος τύπος αλεσμένου καφέ. Χρησιμοποιήστε διαφορετικό τύπο αλεσμένου καφέ.
ΕΛΛΗΝΙΚΑ 50 Τεχνικά στοιχεία Διαστάσεις (mm) Πλάτος 595 Ύψος 348 Μήκος 305 Πίεση αντλίας (bar) 15 Ισχύς (W) 1100 Χωρητικότητα δοχείου νερού (L) 1,5 Οι τεχνικές πληροφορίες αναγράφονται στην πινακίδα τεχνικών στοιχείων στην εσωτερική πλευρά της συσκευής, καθώς και στην ετικέτα ενεργειακής απόδοσης.
ΕΛΛΗΝΙΚΑ Περιβαλλοντικά θέματα Η συσκευή αυτή φέρει σήμανση σύμφωνα με την ευρωπαϊκή οδηγία 2002/96/ΕΚ σχετικά με τα απόβλητα ειδών ηλεκτρικού και ηλεκτρονικού εξοπλισμού (ΑΗΗΕ). Η σωστή απόρριψη αυτού του προϊόντος συμβάλλει στην αποτροπή πιθανών επιβλαβών επιπτώσεων για το περιβάλλον και την ανθρώπινη υγεία λόγω ακατάλληλου χειρισμού των αποβλήτων του προϊόντος αυτού.
ΕΛΛΑΣ 52 ΕΓΓΥΗΣΗ IKEA Ποια είναι η διάρκεια της εγγύησης της IKEA; Αυτή η εγγύηση ισχύει για πέντε (5) έτη από την αρχική ημερομηνία αγοράς της συσκευής σας στην IKEA, με εξαίρεση τις συσκευές που ονομάζονται LAGAN όπου ισχύει εγγύηση δύο (2) ετών. Απαιτείται η πρωτότυπη απόδειξη αγοράς ως αποδεικτικό στοιχείο. Εάν εκτελεστούν εργασίες σέρβις εντός εγγύησης, δε θα επεκταθεί το χρονικό διάστημα της εγγύησης για τη συσκευή.
ΕΛΛΑΣ εντοπιστεί κάποια βλάβη κατά την επίσκεψη του τεχνικού. • Επισκευές που δεν εκτελούνται από τους επιλεγμένους μας παροχείς υπηρεσιών επισκευής ή/και από εξουσιοδοτημένο συνεργάτη υπηρεσιών επισκευής ή περιπτώσεις στις οποίες δεν έχουν χρησιμοποιηθεί γνήσια ανταλλακτικά. • Επισκευές λόγω εσφαλμένης εγκατάστασης ή εγκατάστασης που δεν πληρεί τις προδιαγραφές. • Χρήση της συσκευής σε μη οικιακό περιβάλλον, π.χ. επαγγελματική χρήση. • Ζημιές κατά τη μεταφορά.
ΕΛΛΑΣ Για ταχύτερη εξυπηρέτηση, συνιστάται η χρήση των ειδικών τηλεφωνικών αριθμών που αναφέρονται σε αυτό το εγχειρίδιο. Ανατρέχετε πάντα στους τηλεφωνικούς αριθμούς που παρέχονται στο εγχειρίδιο της συσκευής για την οποία χρειάζεστε βοήθεια. Επίσης, ανατρέχετε πάντα στον αριθμό προϊόντος της IKEA (8ψήφιος κωδικός) και το 12ψήφιο αριθμό επισκευής που αναγράφονται στην πινακίδα τεχνικών χαρακτηριστικών της συσκευής σας.
NEDERLANDS Inhoud Veiligheidsinformatie Productbeschrijving Bedieningspaneel Eerste gebruik Dagelijks gebruik 55 55 57 57 58 59 Reiniging en onderhoud Wat moet u doen als... Technische gegevens Bescherming van het milieu IKEA GARANTIE 63 65 67 68 69 Veiligheidsinformatie Voor het eerste gebruik Dit apparaat is alleen bedoeld voor huishoudelijk gebruik! • Gebruik pannenlappen of ovenhandschoenen wanneer u hete onderdelen aanraakt, om brandwonden te voorkomen.
NEDERLANDS Veiligheid • Controleer nadat u de verpakking heeft verwijderd of het apparaat compleet en onbeschadigd is. Gebruik het apparaat bij twijfel niet en neem contact op met een gekwalificeerde monteur. • De elektrische installatie en de elektrische aansluiting moeten worden uitgevoerd door een gekwalificeerde monteur, volgens de instructies van de fabrikant en in overeenstemming met de plaatselijke veiligheidsvoorschriften. • Verpakkingselementen (plastic zakken, piepschuim etc.
NEDERLANDS 57 Productbeschrijving 4 2 1 5 10 11 3 6 7 8 9 12 13 14 Bedieningspaneel C D B E A F A B C D E F Selectieknop stoom Selectieknop koffie / heet water Aan/Uit-knop Lampje apparaat aan Lampje temperatuur OK (koffie of heet water) Indicatielampje stoom 1 2 3 4 5 6 7 8 9 10 11 12 13 Bedieningspaneel Stoomknop Watertank Netsnoer Stoom-/heetwaterpijpje Opvangrooster Opvangbak Cappuccinomaker Tuit Boileruitgang Aandrukker Filterhouder Klein filter voor één kopje of voor koffiepads 14
NEDERLANDS 58 Eerste gebruik De watertank vullen Verwijder de watertank door deze eruit te trekken (naar voren). gemalen koffie toe te voegen (controleer of de stoomknop gesloten is). Om de filterhouder te bevestigen plaatst u deze onder de boileruitgang met de handgreep naar links gericht; duw de houder omhoog en draai de handgreep tegelijkertijd stevig naar rechts. Vul de tank met vers schoon water. Zorg ervoor dat het water niet boven het teken MAX komt. Plaats de tank terug.
NEDERLANDS 59 Dagelijks gebruik Espressokoffie bereiden met de filterhouder voor gemalen koffie Nadat u het apparaat heeft voorverwarmd zoals hierboven beschreven, plaatst u het filter voor gemalen koffie in de filterhouder; zorg ervoor dat het uitstekende deel op de juiste manier in de opening wordt gestoken. Gebruik het kleine filter voor één kopje koffie of het grote filter voor twee kopjes koffie. Om één kopje koffie te zetten doet u één maatschepje (ongeveer 7 g) gemalen koffie in het filter.
NEDERLANDS Controleer of het OK-lampje brandt (als het uit is, wacht dan tot het gaat branden) en druk op de koffieknop. Wanneer de gewenste hoeveelheid koffie is uitgestroomd, drukt u nogmaals op dezelfde knop. Laat de koffie niet langer dan 45 seconden per keer naar buiten stromen. Om de filterhouder te verwijderen draait u de handgreep van rechts naar links. BELANGRIJK: om spatten te voorkomen mag de filterhouder nooit verwijderd worden terwijl er koffie uit het apparaat stroomt.
NEDERLANDS Draai de stoomknop minimaal een halve slag naar links. Er komt stoom uit de cappuccinomaker, waardoor de melk een romig en schuimig uiterlijk krijgt. Om een nog romiger schuim te krijgen dompelt u de cappuccinomaker in de melk en draait u het kannetje langzaam van onder naar boven. Als de gewenste temperatuur is bereikt (60°C is ideaal), stopt u de stoomafgifte door de stoomknop naar rechts te draaien en tegelijkertijd op de stoomknop te drukken.
NEDERLANDS Was de cappuccinomaker en het stoomtuitje grondig met warm water. Controleer of de twee weergegeven gaatjes niet verstopt zijn. Maak ze indien nodig vrij met een pin. Plaats het stoomtuitje terug door het op het stoompijpje te drukken en het stevig naar de bovenkant van het pijpje te draaien. Plaats de cappuccinomaker terug door deze erin te plaatsen en naar links te draaien. 62 Productie van heet water Zet het apparaat aan door op de AAN/UITknop te drukken.
NEDERLANDS 63 Reiniging en onderhoud Laat het apparaat afkoelen voordat u reinigingswerkzaamheden uitvoert. Gebruik geen oplosmiddelen of agressieve reinigingsproducten om het apparaat te reinigen. Een zachte, vochtige doek is voldoende. Giet de opvangbak en het opvangrooster regelmatig leeg en was ze af. Reinig de watertank regelmatig. BELANGRIJK: Dompel het apparaat nooit onder in water. Het is een elektrische apparaat.
NEDERLANDS De boileruitgang reinigen Na ongeveer 300 kopjes koffie moet de boileruitgang voor espressokoffie als volgt worden gereinigd: Zorg ervoor dat het apparaat niet heet is en dat het netsnoer uit het stopcontact is gehaald. Draai de schroef waardoor het filter van de espressoboileruitgang op zijn plaats wordt gehouden los met een schroevendraaier. Reinig de boiler met een vochtige doek Maak de uitgang met een borstel grondig schoon in warm water. Controleer of de gaatjes niet verstopt zijn.
NEDERLANDS 65 Wat moet u doen als... Probleem Mogelijke oorzaak Oplossing Er komt geen espresso uit het apparaat Geen water in de tank Vul de tank met water De espresso druppelt uit de randen van de filterhouder in plaats van door de gaatjes. De gaatjes in de tuitjes van Reinig de gaatjes in de tuitjes. de filterhouder zijn verstopt. De boileruitgang voor espresso is verstopt.
NEDERLANDS 66 Wat moet u doen als... Probleem Mogelijke oorzaak Oplossing Het koffieschuim is te licht (stroomt te snel uit het tuitje) De gemalen koffie is niet voldoende aangedrukt Druk de gemalen koffie harder aan. Er is niet genoeg gemalen koffie Verhoog de hoeveelheid gemalen koffie De gemalen koffie is te grof Gebruik alleen gemalen koffie voor espressomachines Onjuist type gemalen koffie. Gebruik een ander type gemalen koffie.
NEDERLANDS 67 Technische gegevens Afmetingen (mm) Breedte 595 Hoogte 348 Lengte 305 Pompdruk (bar) 15 Vermogen (W) 1100 Capaciteit watertank (l) 1,5 De technische informatie staat op het typeplaatje op de binnenkant van het apparaat en op het energielabel.
NEDERLANDS Bescherming van het milieu Dit apparaat is voorzien van het merkteken volgens de Europese richtlijn 2002/96/EG inzake Afgedankte Elektrische en Elektronische Apparatuur (AEEA). Door ervoor te zorgen dat dit product op de juiste manier als afval wordt verwerkt, helpt u mogelijk schadelijke gevolgen voor het milieu en de gezondheid te voorkomen, die veroorzaakt zouden kunnen worden door onjuiste verwerking van dit product als afval.
NEDERLANDS 69 IKEA GARANTIE Hoe lang is de IKEA garantie geldig? Deze garantie is vijf (5) jaar geldig vanaf de oorspronkelijke datum van aankoop van uw apparaat bij IKEA, uitgezonderd indien uw apparaat het merk LAGAN draagt, daar is de garantieperiode van twee (2) jaar van toepassing. Uw origineel kassaticket is vereist. Als er tijdens de garantieperiode service tussenkomsten worden uitgevoerd, wordt de garantieperiode van het apparaat niet verlengd.
NEDERLANDS geconstateerd kon worden tijdens het bezoek van een technicus. • Reparaties die niet zijn uitgevoerd door onze aangestelde servicediensten en/of een erkende contractuele servicepartner of wanneer er niet-originele onderdelen gebruikt zijn. • Reparaties die veroorzaakt zijn door installatie die verkeerd of niet in overeenstemming met de installatieinstructies zijn uitgevoerd. • Het gebruik van het apparaat in niet huishoudelijke omgeving d.w.z. professioneel gebruik. • Transportschade.
NEDERLANDS Om u sneller van dienst te kunnen zijn, adviseren wij u de specifieke telefoonnummers in de handleiding te gebruiken. Vermeld altijd de nummers die vermeld zijn in het boekje van het specifieke apparaat waarvoor u assistentie wilt. Vermeld ook het IKEA artikelnummer (bestaande uit 8 cijfers) en het servicenummer bestaande uit 12 cijfers dat op het typeplaatje van uw apparaat staat. BEWAAR DE KASSABON! Het is uw bewijs van aankoop en is ook nodig om de geldigheid van de garantie aan te tonen.
BELGIË - BELGIQUE - BELGIEN Telefoon/Numéro de téléphone/Telefon-Nummer: 026200311 Tarief/Tarif/Tarif: Lokaal tarief/Prix d’un appel local/Ortstarif Openingstijd: Maandag - Vrijdag 8.00 - 20.00 Heures d’ouverture: Lundi - Vendredi 8.00 - 20.00 Öffnungszeiten: Montag - Freitag 8.00 - 20.00 ČESKÁ REPUBLIKA Telefonní číslo: Sazba: Pracovní doba: DANMARK Telefonnummer: Takst: Åbningstid: 225376400 Místní sazba Pondělí - Pátek 8.00 - 20.00 70150909 Lokal takst Mandag - fredag 9.00 - 21.00 Lørdag 9.
5019 4000 104 18879 © Inter IKEA Systems B.V.