4’ Top-Mount Refrigerator Table of Contents..................2 Réfrigérateur superposé de 14 po Table des matières..............
TABLE OF CONTENTS Page A Note to You ..................................................................2 Refrigerator Safety .........................................................3 Proper Disposal of Your Old Refrigerator .....................4 Parts and Features .........................................................5 Installing Your Refrigerator.............................................6 Unpacking your refrigerator ..........................................6 Space requirements ..................
REFRIGERATOR SAFETY YOUR SAFETY AND THE SAFETY OF OTHERS IS VERY IMPORTANT. We have provided many important safety messages in this manual and on your appliance. Always read and obey all safety messages. This is the safety alert symbol. This symbol alerts you to hazards that can kill or hurt you and others. All safety messages will be preceded by the safety alert symbol and the word “DANGER” or “WARNING.” These words mean: You will be killed or seriously injured if you don’t follow instructions.
PROPER DISPOSAL OF YOUR OLD REFRIGERATOR wWARNING Suffocation Hazard Remove doors from your old refrigerator. Failure to do so can result in death or brain damage. IMPORTANT: Child entrapment and suffocation are not problems of the past. Junked or abandoned refrigerators are still dangerous... even if they will sit for “just a few days.” If you are getting rid of your old refrigerator, please follow the instructions below to help prevent accidents.
PARTS AND FEATURES NOTE: This manual covers several different models. The refrigerator you have purchased may have some or all of the parts and features listed below.
INSTALLING YOUR REFRIGERATOR SPACE REQUIREMENTS wWARNING It is important to prepare your refrigerator for use. This section tells you how to clean it, install it, connect it to a power source, and level it. UNPACKING YOUR REFRIGERATOR wWARNING Excessive Weight Hazard Use two or more people to move and install refrigerator. Failure to do so can result in back or other injury.
ELECTRICAL REQUIREMENTS wWARNING Electrical Shock Hazard Plug into a 3 prong grounded outlet. Do not remove ground prong. Do not use an adapter. Do not use an extension cord. Failure to follow these instructions can result in death, fire, or electrical shock. Before you move your refrigerator into its final location, it is important to make sure you have the proper electrical connection.
DOOR CLOSING AND ALIGNMENT Door Closing Your refrigerator has 2 front adjustable rollers - one on the right and one on the left. If your refrigerator seems unsteady or you want the doors to close easier, adjust the refrigerator’s tilt using the instructions below: 1. Plug refrigerator power cord into a 3-prong grounded outlet. Move the refrigerator into its final position. 2. The two leveling screws are part of the front roller assemblies which are at the base of the refrigerator on either side. 3.
USING YOUR REFRIGERATOR SETTING THE CONTROL The control for the refrigerator and freezer is located in the top of the refrigerator section. It controls the temperature in both the refrigerator and freezer compartments. When you first install your refrigerator, set the Temperature Control to 3 (normal). Temperature Control adjustments range from 1 (warmest) to 5 (coldest).
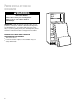
ENSURING PROPER AIR CIRCULATION In order to ensure proper temperatures, you need to permit air flow between the two sections. As shown in the illustration, cool air enters through the bottom of the freezer section (1) and moves up. Most of the air then flows through the freezer section vents (2) and recirculates under the freezer floor (3). The rest of the air enters the fresh section through the top vent (4). Do not block any of these vents (1, 2, 3, or 4) with food packages.
ADJUSTING THE REFRIGERATOR SHELVES To remove the shelves: 1. Remove items from the shelf. 2. Slide shelf straight out to the stop. 3. Depending on your model, lift the back or front of the shelf over the stop. 4. Slide shelf out the rest of the way. To replace the shelves: 1. Slide back of shelf into shelf track in wall of cabinet. 2. Guide front of shelf into shelf track. 3. Slide shelf in all the way. REMOVING THE CRISPER(S) AND COVER To remove the crisper(s): 1.
REMOVING THE MEAT DRAWER AND COVER (on some models) To remove the meat drawer: 1. Slide meat drawer out to the stop. 2. Lift front of meat drawer. 3. Slide meat drawer out the rest of the way. 4. Replace in reverse order. To remove the cover: 1. Remove the meat drawer. 2. Push cover back to release rear clips from shelf. 3. Tilt cover up at front. 4. Pull cover forward and out. To replace the cover: 1. Fit notches and clips on underside of cover over rear and center cross bars on shelf. 2.
CHANGING THE LIGHT BULB To change the refrigerator light: 1. Unplug refrigerator or disconnect power. 2. Reach behind the Control Panel and remove the bulb. 3. Replace the bulb with a 40-watt appliance bulb. 4. Plug in refrigerator or reconnect power. NOTE: Not all appliance bulbs will fit your refrigerator. Be sure to replace the bulb with one of the same size and shape. REVERSING THE DOOR SWING TOOL NEEDED: 5⁄16-inch hex-head socket wrench, No.
Reversing the door swing (cont.
UNDERSTANDING THE SOUNDS YOU MAY HEAR Your new refrigerator may make sounds that your old one didn’t. Because the sounds are new to you, you might be concerned about them. Don’t be. Most of the new sounds are normal. Hard surfaces like the floor, walls, and cabinets can make the sounds seem louder. The following describes the kinds of sounds that might be new to you, and what may be making them.
CARING FOR YOUR REFRIGERATOR Your refrigerator is built to give you many years of dependable service. However, there are a few things you can do to help extend its product life. This section tells you how to clean your refrigerator and what to do when going on vacation, moving, or during a power outage. CLEANING YOUR REFRIGERATOR Both the refrigerator and freezer sections defrost automatically. However, clean both sections about once a month to prevent odors from building up. Wipe up spills immediately.
Additional cleaning tips are listed below: PART WHAT TO USE HOW TO CLEAN Removable parts (shelves, crisper, etc.) Sponge or cloth with mild detergent and warm water • Hand wash, rinse, and dry thoroughly. Outside Sponge, cloth, or paper towel with mild detergent, warm water, and an appliance wax (or good auto paste wax) • Wash outside of cabinet. Do not use abrasive or harsh cleaners. • Wipe and dry thoroughly. • Wax painted metal surfaces at least twice a year. Apply wax with a clean, soft cloth.
VACATION AND MOVING CARE Vacation Moving If you choose to leave the refrigerator on while you’re away, use these steps to prepare your refrigerator before you leave. 1. Use up any perishables and freeze other items. 2. If your refrigerator has an automatic ice maker: • Raise ice maker arm to OFF (up) position. • Shut off water supply to the ice maker. 3. Empty the ice bin. When you are moving your refrigerator to a new home, follow these steps to prepare it for the move. 1.
FOOD STORAGE GUIDE STORING FRESH FOOD Wrap or store food in the refrigerator in airtight and moisture-proof material unless otherwise noted. This prevents food odor and taste transfer throughout the refrigerator. For dated products, check code date to ensure freshness. Butter or margarine Keep opened butter in covered dish or closed compartment. When storing an extra supply, wrap in freezer packaging and freeze. Cheese Store in the original wrapping until you are ready to use it.
STORING FROZEN FOOD The freezer section is designed for storing commercially frozen food and for freezing food at home. NOTE: For further information about preparing food for freezing or food storage times, check a freezer guide or reliable cookbook. Packaging Successful freezing depends on the correct packaging. When you close and seal the package you must not allow air or moisture in or out. If you do, you could have food odor and taste transfer throughout the refrigerator, and also dry out frozen food.
TROUBLESHOOTING Try the solutions suggested here first in order to avoid the cost of an unnecessary service call. Your refrigerator will not operate • The power supply cord is unplugged. Firmly plug the cord into a live outlet with proper voltage. • A household fuse or circuit breaker has tripped. Replace the fuse or reset the circuit. • The refrigerator control is turned to the “OFF” position. Refer to the “Setting the Control” section. • The refrigerator is defrosting.
• The control is not set correctly. Refer to the “Setting the Control” section. • The water shut-off valve is not turned completely on. Turn valve on fully. Refer to the “Connecting the Refrigerator to a Water Source” section. Off-taste or odor in the ice • The plumbing connections are new, causing discolored or off-flavored ice. Discard the first few batches of ice. • The ice cubes have been stored for too long. Throw old ice away and make a new supply.
REQUESTING ASSISTANCE OR SERVICE Before calling for assistance or service, please check the “Troubleshooting” section. It may save you the cost of a service call. If you still need help, follow the instructions below. FOR ASSISTANCE OR SERVICE: 1. If the problem is not due to one of the items listed in the “Troubleshooting” section… Call the Whirlpool Consumer Assistance Center toll free at 1-800-253-1301. Our consultants are available to assist you.
REFRIGERATOR WARRANTY TM TWO-YEAR FULL WARRANTY ON REFRIGERATOR For two years from the date of purchase, when this refrigerator is operated and maintained according to instructions attached to or furnished with the product, Whirlpool will pay for Factory Specified Parts and repair labor to correct defects in materials or workmanship. Service must be provided by a Whirlpool designated service company.