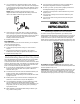
TOP-MOUNT REFRIGERATOR Use & Care Guide Table of Contents..................................................
TABLE OF CONTENTS REFRIGERATOR SAFETY .............................................................3 INSTALLING YOUR REFRIGERATOR ..........................................4 Unpacking Your Refrigerator .......................................................4 Space Requirements....................................................................4 Electrical Requirements ...............................................................5 Connecting the Refrigerator to a Water Source ..........................
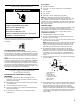
REFRIGERATOR SAFETY Your safety and the safety of others are very important. We have provided many important safety messages in this manual and on your appliance. Always read and obey all safety messages. This is the safety alert symbol. This symbol alerts you to potential hazards that can kill or hurt you and others. All safety messages will follow the safety alert symbol and either the word “DANGER” or “WARNING.
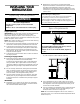
■ INSTALLING YOUR REFRIGERATOR When Moving Your Refrigerator: Unpacking Your Refrigerator Your refrigerator is heavy. When moving the refrigerator for cleaning or service, be sure to protect the floor. Always pull the refrigerator straight out when moving it. Do not wiggle or “walk” the refrigerator when trying to move it, as floor damage could occur. WARNING Excessive Weight Hazard Use two or more people to move and install refrigerator.
Electrical Requirements WARNING Electrical Shock Hazard Plug into a grounded 3 prong outlet. Do not remove ground prong. Do not use an adapter. Do not use an extension cord. Failure to follow these instructions can result in death, fire, or electrical shock. Before you move your refrigerator into its final location, it is important to make sure you have the proper electrical connection: Recommended grounding method A 115 Volt, 60 Hz., AC only 15 or 20 ampere fused, grounded electrical supply is required.
7. Slip compression sleeve and compression nut on copper tubing as shown. Insert end of tubing into outlet end squarely as far as it will go. Screw compression nut onto outlet end with adjustable wrench. Do not overtighten. 8. Place the free end of the tubing into a container or sink, and turn ON main water supply and flush out tubing until water is clear. Turn OFF shut-off valve on the water pipe. Coil copper tubing. Connecting to refrigerator: 1.
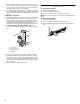
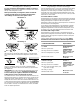
Refrigerator Doors: Removing, Reversing (optional) and Replacing TOOLS NEEDED: ⁵⁄₁₆ in. hex-head socket wrench, No. 2 Phillips screwdriver, flat-head screwdriver, ⁵⁄₁₆ in. open-end wrench, flat 2 in. putty knife. IMPORTANT: Before you begin, turn the refrigerator control OFF, unplug refrigerator or disconnect power. Remove food and any adjustable door or utility bins from doors. Door Removal & Replacement Door Swing Reversal (optional) 1-2 2 Base Grille 1 1 1.
Door and hinge removal ⁵⁄₁₆” Hex Head Hinge Screw 1. Unplug refrigerator or disconnect power. 2. Open refrigerator door and remove base grille from the bottom front of the refrigerator (see Base Grille graphic). 3. Close the refrigerator door and keep both doors closed until you are ready to lift them free from the cabinet. NOTE: Provide additional support for the doors while the hinges are being moved. Do not depend on the door magnets to hold the doors in place while you are working. 4.
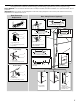
3. Use a screwdriver to adjust the leveling screws. Turn the leveling screw to the right to raise that side of the refrigerator or turn the leveling screw to the left to lower that side. It may take several turns of the leveling screws to adjust the tilt of the refrigerator. NOTE: Having someone push against the top of the refrigerator takes some weight off the leveling screws and rollers. This makes it easier to adjust the screws.
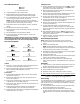
Setting the Control(s) Adjusting Control Settings For your convenience, the refrigerator controls are preset at the factory. Controls for the refrigerator and freezer are located in the top of the refrigerator section. When you first install your refrigerator, make sure that the control(s) are still preset. The control(s) should be at the “mid-settings” as shown for each style of control. Mid-setting “3” Give the refrigerator time to cool down completely before adding food.
CONDITION/REASON: REFRIGERATOR section too cold RECOMMENDED ADJUSTMENT: ■ Controls not set correctly for your conditions Turn REFRIGERATOR Control or TEMPERATURE Control to next lower number, wait 24 hours, then recheck ■ Blocked air stream Move items out of air stream FREEZER section too cold ■ Controls not set correctly for your conditions ■ Blocked air stream 3. Replace the shelf by guiding it back into the slots on the frame and pushing the shelf in past the stop.
To replace the shelf: NOTE: Make sure that both of the rear shelf slides are securely in the track before letting go of the shelf. The lateral shelf may be difficult to install if the track is placed too close to the refrigerator ceiling. Reposition the track on a lower rung until the shelf can be tilted enough to easily slide into the track. 1. Hold the shelf at the front and tip the front at a 45° angle to the track. 2.
■ Crisper and Crisper Cover Leafy vegetables: Wash in cold water, drain and trim or tear off bruised and discolored areas. Place in plastic bag or plastic container and store in crisper. (on some models - Accessory) To remove and replace the crisper(s): 1. Slide crisper(s) straight out to the stop. Lift the front of the crisper(s) and slide out the rest of the way. 2. Replace the crisper(s) by sliding back in fully past the drawer stop.
■ Avoid connecting the ice maker to a softened water supply. Water softener chemicals (such as salt) can damage parts of the ice maker and lead to poor quality ice. If a softened water supply cannot be avoided, make sure the water softener is operating properly and is well maintained. ■ It is normal for the ice cubes to be attached at the corners. They will break apart easily. ■ Do not force the wire shut-off arm up or down. ■ Do not store anything on top of the ice maker or in the ice storage bin.
Adjustable Half-width Freezer Shelf (on some models) To remove and replace the shelf: 1. Remove the shelf by lifting the shelf up and pulling straight out. 2. Replace the shelf over the supports and lower it into place. Drop-in Door Rails To remove and replace the rails: 1. Remove the rails by pulling straight up on each end of the rail. 2. Replace the rails by sliding the shelf rail into the slots on the door and pushing the rail straight down until it stops.
2. Place the front of the utility compartment on top of the shelf rail. Lower the back of the compartment onto the ribs on the refrigerator door. To adjust the utility compartment or tray: 1. Lift the front slightly and slide to desired position. 2. Lower front to lock into place. Flip-up Door Shelf (on some models) The shelf bottom flips up so you can store taller items in the door shelf below. When in the down position, the shelf is strong enough to hold up to 10 pounds (4.5 kg).
4. Plug in refrigerator or reconnect power. Power Interruptions If the electricity in your house goes off, call the power company and ask how long it will be off. 1. If the power will be out for 24 hours or less, keep both refrigerator doors closed to help food stay cold and frozen. 2. If the power will be out for more than 24 hours: a) Remove all frozen food and store it in a frozen food locker. OR b) Place 2 lbs (907 g) of dry ice in the freezer for every cubic foot (28 L) of freezer space.
■ Is an ice cube jammed in the ejector arm? Remove the ice from the ejector arm with a plastic utensil. Refer to the “Ice Maker Operation” section. ■ Does the ice maker mold have water in it or has no ice been produced? Check to see if your refrigerator has been connected to your home water supply and the supply shut-off valve is turned on. Refer to the “Connecting the Refrigerator to a Water Source” section.
■ ■ Has a large amount of food just been added to the refrigerator or freezer? Adding a large amount of food warms the refrigerator. It can take several hours for the refrigerator to return to the normal temperature. Is the control set correctly for the surrounding conditions? Refer to the “Setting the Control(s)” section. There is interior moisture build-up ■ Are the air vents blocked in the refrigerator? Remove any objects from in front of the air vents.
REFRIGERATOR WARRANTY TWO-YEAR FULL WARRANTY ON REFRIGERATOR MANUFACTURED FOR COSTCO WHOLESALE CORPORATION BY WHIRLPOOL CORPORATION For two years from the date of purchase, when this refrigerator (excluding the water filter) is operated and maintained according to instructions attached to or furnished with the product, Whirlpool Corporation will pay for factory specified parts and repair labor costs to correct defects in materials or workmanship.