
Manual


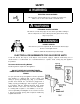
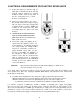
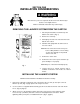

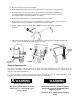
Table Of Contents
- AiVhirlDool
- A WARNING
- Whifl

13. Move the washer to its permanent location.
14. Tilt the washer forward off the floor and set back down to adjust the rear self-leveling legs.
15. Check the washer for level, both side-to-side and front-to-back. Adjust the front legs as
necessary. Tighten the locking nuts to the base of the washer with a wrench. If the nuts
are not tightened, the washer may vibrate excessively.
16. Run water through both faucets to get rid of particles in the water lines.
17. Attach the hoses to the water faucets. The bottom hose should be connected to the hot water
supply and the top hose should be connected to the cold water supply.
18. Cut the shipping strap at the words "CUT HERE" and slide it off the power supply plug.
(Fig. 14)
19. The hook-end of the drain hose can be installed into a stand pipe (Fig. 5, A &B) or laundry tub,
(Fig. 5, C) and secured with the shipping strap as shown.
STRAP
Fig. 5
Exhaust Requirements
The dryer comes with a rear deflector vent to exhaust the dryer straight out the rear. This vent can be
connected to an exhaust system that goes up, down, left or right. All ducting systems should end in an
exhaust hood to prevent back draft.
To convert the dryer to exhaust left, right, up or down, Exhaust Kit, Part No. 279823 MUST be used.
Follow the instructions in the kit to avoid operational and personal hazard.
A WARNING
Electrical Shock Hazard
Disconnect power before servicing.
Failure to do so could result in serious
injury or death.
WARNING
Personal Injury Hazard
Wear gloves and long sleeves to protect
hands and arms from sharp edges that
might be present.
Failure to do so could result in personal
injury.