
Manual


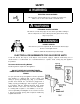
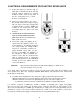
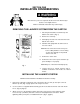

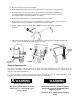
Table Of Contents
- AiVhirlDool
- A WARNING
- Whifl

SECTION ONE
INSTALLATION CONSIDERATIONS
A WARNING
INJURY HAZARD
More than one person is required to lift, tilt or move the washer/dryer
because of its weight and size
Failure to follow this instruction may result in injury
REMOVING THE LAUNDRY SYSTEM FROM THE CARTON
1. Cut along the dotted line around the top and
bottom of the carton. (Fig. 1)
2. Remove the carton top.
3. Carefully lay the unit on its side and remove the
bottom of the carton.
4. Stand the unit upright and cut down each cor
ner of the carton.
NOTE: Do not remove the inside corner posts
before cutting down the corners. Doing
so may cause damage to the painted
surface of the unit.
5. Remove the carton sides.
6. Remove the inner corner posts and foam sup
ports and dispose of properly.
Fig. 1
NOTE: Dispose of all carton material properly.
7. Remove the hoses, clamps, washers and in
stallation instructions from inside the washer
basket.
INSTALLING THE LAUNDRY SYSTEM
NOTE: Read and follow the Installation Instructions carefully.
1. Remove the yellow rip cord from the rear of the washer. Be sure two (2) cotter pins come out
with the rip cord. (Fig. 2, page 2) Save this strap for use later.
2. Use the new hoses supplied with the laundry system. Insert a flat washer into each end of both
hoses. (Fig. 2, page 2)
3. Attach one hose to the bottom (hot water) inlet valve connector first. Then, attach the other
hose to the top (cold water) inlet valve connector. Hand tighten both connections. Finish
tightening with a pair of pliers, an additional 2/3 turn. (Fig. 2, page 2)
1