® COMPACTORS Use & Care Guide For questions about features, operation/performance, parts, accessories or service, call: 1-800-253-1301. In Canada, call for assistance 1-800-461-5681, for installation and service, call: 1-800-807-6777 or visit our website at... www.whirlpool.com or www.whirlpoolappliances.ca Table of Contents .................................................
TABLE OF CONTENTS COMPACTOR SAFETY ..................................................................3 INSTALLATION INSTRUCTIONS ..................................................4 Unpacking ....................................................................................4 Location Requirements ................................................................4 Electrical Requirements ...............................................................5 Freestanding and Undercounter Installation ...............
COMPACTOR SAFETY Your safety and the safety of others are very important. We have provided many important safety messages in this manual and on your appliance. Always read and obey all safety messages. This is the safety alert symbol. This symbol alerts you to potential hazards that can kill or hurt you and others. All safety messages will follow the safety alert symbol and either the word “DANGER” or “WARNING.
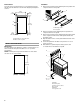
INSTALLATION INSTRUCTIONS Installer: Leave Use and Care Guide with the homeowner. Homeowner: Keep Use & Care Guide for future reference and for local electrical inspector’s use, if required. 4. Place the other 2 corner posts on the floor to the side of the compactor. Grasp the sides of the compactor cabinet and put compactor on its side on top of the corner posts. Remove the shipping base from the bottom of the compactor.
Cutout dimensions Electrical Requirements WARNING 3" (7.6 cm) A 34¹⁄₄" min. (87 cm) 24" min. (61 cm) 18" min. (45.7 cm) Electrical Shock Hazard Plug into a grounded 3 prong outlet. Do not remove ground prong. Do not use an adapter. Do not use an extension cord. Failure to follow these instructions can result in death, fire, or electrical shock. 15¹⁄₄" min. (38.7 cm) A. Grounded electrical outlet must be a minimum of 3" (7.6 cm) away from surrounding cabinets or nearby walls as shown.
Freestanding and Undercounter Installation NOTE: Proper installation is your responsibility. Make sure you have everything necessary for correct installation. It is the personal responsibility and obligation of the customer to contact a qualified installer to assure that electrical installation meets all national and local codes and ordinances. To adjust for other kitchen cabinet opening heights: ■ Loosen self-tapping screw just enough to clear stud from hole in position “1.
■ If the compactor is to be midway between “1” and “3,” place the retaining bracket mounting screws through “2.” A B 9. Grasp sides of compactor drawer and place bottom of drawer into tracks. Lift at the handle so drawer will go over drawer stops. Close drawer. Check to see whether drawer opens freely. If the toe plate rubs against floor, see “Adjusting the Toe Plate” for further instructions. Adjusting the Toe Plate 3 2 1 A. Countertop B. Retaining bracket (provided in conversion kit) 7.
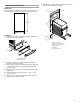
Raised Panel: Installation The outer section of panel must be ⁷⁄₃₂" (5.6 mm) thick to fit into the trim. Use the dimensions shown when designing raised panel sections. 1. Remove the mounting screws attaching the foot pedal to the compactor. Remove foot pedal. ⁷⁄₃₂" (5.6 mm) 14⁵⁄₈" (37.2 mm) A 1¹⁄₄" (32 mm) A A B 23¹³⁄₁₆" (60.5 cm) B A. Mounting screws B. Foot pedal ⁵⁄₁₆" ⁵⁄₁₆" (8 mm) (8 mm) both sides A. Raised panel or decorative trim B.
7. Reinstall the toe guard using the existing screws and ¹⁄₂" washer. Then, reinstall the foot pedal. Trimless Panel without Handle Dimensions Use these dimension drawings to create a custom panel for use without a trim kit. The panel should be ¹⁄₂" (13 mm) min. thick. A B C 25" (63.5 cm) C 15" (38.1 cm) Installation 1. Remove the mounting screws attaching the foot pedal to the compactor. Remove foot pedal. A D E F A. Custom panel B. 15" x ¹⁄₂ " quarter-round C. Panel screw locations D.
COMPACTOR USE How Your Compactor Works The compacting ram is the part of the compactor which compresses the trash. The compacting ram does not go to the bottom of the drawer. You will not see compacting of trash the first few times you load the compactor. NOTE: The compactor drawer should be more than ¹⁄₂ full before the compactor can begin to compress the load. You may hear a noise when glass breaks. Strong glass bottles may not break at all.
4. Lift out bag. Style 2 To start and stop the compactor 1. To start the compactor: ■ Turn the Key-Switch to ON. ■ Press ON. ■ Press START. The compactor will automatically stop at the end of the cycle. Installing a New Bag Do not use any kind of bag other than those designed especially for use in your compactor. Order replacement compactor bags through your local dealer or by calling the toll-free number on the cover or in the “Assistance or Service” section.
COMPACTOR CARE Your new compactor is designed to give you many years of dependable service. However, there are a few things you are expected to do in order to properly maintain your compactor. This section will tell you how to clean and care for your compactor. Cleaning Before cleaning the compactor, turn the Key-Knob (or KeySwitch) to the OFF & LOCK position and remove it. NOTE: Any services other than those outlined in this section should be performed by a designated service representative.
5. Wash the inside of the cabinet with a clean sponge or soft cloth and a mild detergent in warm water. Rinse and dry thoroughly with a soft cloth. 6. To replace the drawer, grasp it by the sides and insert the rollers onto the tracks. 7. Lift the front of the drawer and push it in fully past the stops. Cleaning the Ram NOTE: You may want to wear protective gloves since there may be bits of glass on the ram cover. 1. Wipe glass particles off of the ram cover with a cloth or paper towels. 2.
ASSISTANCE OR SERVICE Before calling for assistance or service, please check “Troubleshooting.” It may save you the cost of a service call. If you still need help, follow the instructions below. When calling, please know the purchase date and the complete model and serial number of your appliance. This information will help us to better respond to your request. If you need replacement parts If you need to order replacement parts, we recommend that you only use FSP® replacement parts.
Notes 15
WHIRLPOOL CORPORATION MAJOR APPLIANCE WARRANTY ONE YEAR LIMITED WARRANTY For one year from the date of purchase, when this major appliance is operated and maintained according to instructions attached to or furnished with the product, Whirlpool Corporation or Whirlpool Canada LP (hereafter “Whirlpool”) will pay for FSP® replacement parts and repair labor to correct defects in materials or workmanship. Service must be provided by a Whirlpool designated service company. ITEMS WHIRLPOOL WILL NOT PAY FOR 1.