TABLE OF CONTENTS GB DESCRIPTION OF THE DRYER PAGE 14 FILTER PAGE 14 WATER CONTAINER PAGE 15 BEFORE USING THE DRYER PAGE 15 PRECAUTIONS PAGE 15 PREPARING THE LAUNDRY PAGE 16 SELECTING DRYING TIME OR PROGRAMME AND OPTIONS PAGE 17 STARTING AND COMPLETING THE PROGRAMME PAGE 18 INSTALLATION PAGE 19 ELECTRICAL CONNECTION PAGE 19 DRAINAGE SYSTEM PAGE 21 DOOR REVERSIBILITY PAGE 21 MAINTENANCE PAGE 22 TROUBLE SHOOTING GUIDE PAGE 23 AFTER-SALES SERVICE PAGE 23 To get fu
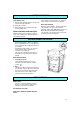
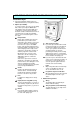
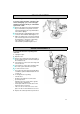
DESCRIPTION OF THE DRYER 1. 2. 3. 4. Work-top Condensation water container Contact pin Door (Door opening can be reversed). See “Door reversibility” section. To open the door: pull the handle out. To close the door: push the door gently until it closes. 5. Lint filter 6. Child safety-lock 6a. For dryers with clear door Using a coin or a screwdriver turn the plastic screw counterclockwise until it snaps in. The door cannot be closed. 6b.
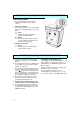
WATER CONTAINER Empty the water container at the end of each drying cycle 1. Open the flap (pulling it gently to the left) and remove the water container. 2. Empty the container. 3. When emptied, push container back into housing until it clicks. Water container indicator light Indicates that the water container is full and needs to be emptied. The drying programme is automatically stopped. Electronic dryer Set programme selector knob to “0”, empty the water container and restart the programme.
PREPARING THE LAUNDRY Laundry preparation Check that all fastenings are closed and that pockets are empty. Turn the articles inside out. Place laundry loosely in the drum to make sure that they don’t get tangled. Max. drying weight • • • • Cottons Cottons with Rapid option Synthetics Delicates 5,0 kg 3,5 kg (electronic dryer) 2,5 kg 1,5 kg (electronic dryer) The given weights correspond to a standard laundry load.
SELECTING DRYING TIME OR PROGRAMME AND OPTIONS Electronic dryer 1. Select the programme and the options as indicated in the table (see Programme Table). 2. Options (If available) To select an option, press the corresponding button before pressing the Start button. The indicator above the button lights up to confirm that a selection has been made. An alarm sounds to indicate that an incorrect selection has been made (incompatible options). Press the button again to cancel the option.
SELECTING DRYING TIME OR PROGRAMME AND OPTIONS Time-steered dryer 1. Select the drying time and the options according to the table (see Programme Table). 2. Options (if available) To select an option, press the corresponding button. Press the button again to cancel the option. Gentle Reduces the drying temperature. Suitable for delicate articles. Buzzer Pressing the button initiates a buzzer sound to signal at regular intervals, at the end of the drying cycle. 3.
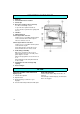
INSTALLATION • • • • • • • Install your dryer in a room which is not subject to extreme conditions. Remove the protective foil from the control panel. Level the dryer adjusting the four feet. Should the room temperature rise above 35°C during the operation of the dryer, please ventilate the room. Before running the first cycle ensure water container and heat exchanger are correctly positioned.
ELECTRICAL CONNECTION 1) ELECTRICAL CONNECTIONS “Warning - this appliance must be earthed” This appliance is normally supplied with a mains lead having a plug fitted in the factory which has been checked for correct earth continuity. If the fitted plug is not suitable for your socket outlet, or if the machine’s mains lead is not fitted with a plug, you should fit a suitable new, good quality plug by following the instructions in (2) below.
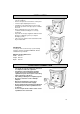
DRAINAGE SYSTEM Direct drainage at the rear of the dryer To avoid to empty the water container at the end of each drying cycle, connect the pipe supplied in the dryer directly to a fixed drain or put it into a sink. 1. Remove the pipe in the lower part behind the dryer and mount it to the plastic connector (shown in driagram), put a rag underneath to collect water spillage. 2. Connect the pipe supplied with the dryer to the connector. The maximum drain height is 1 m. 3.
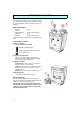
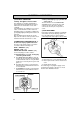
DOOR REVERSIBILITY To change the direction of opening of the non-clear door 1. Unplug the dryer. 2. Open the door. 3. Remove the contact pin at the upper part of the door with a spanner. Turn the contact pin 90° and take it out. 4. Unscrew the 2 screws at the door hinge and remove the door. 5. To remove the door lock: • Unscrew the two screws above and below the door lock system and slide it upwards (1,5 cm) holding it from the bottom. Remove it. 6. To change the door opening: • Turn the door.
TROUBLE SHOOTING GUIDE Should your dryer operate incorrectly, check the following points before calling for a qualified service technician.