Use&Care Side by Side Refrigerator Table of Contents ......... 2 d’utilisation et d’entretien Réfrigérateur côte à côte Table des matières .......
TABLE OF CONTENTS TABLE DES MATIÈRES Page Page A Note to You .................................................................. 3 Note à l’utilisateur ........................................................... 3 Refrigerator Safety ....................................................... 4-5 Sécurité du réfrigérateur ......................................... 4 et 5 Parts and Features .......................................................... 6 Pièces et caractéristiques .............................
A NOTE TO YOU NOTE À L’UTILISATEUR Your ESTATE refrigerator gives you all the functionality of name brand appliances at a value price. To ensure that you enjoy years of trouble-free operation, we developed this Use and Care Guide. It is full of valuable information about how to operate and maintain your appliance properly and safely. Please read it carefully. Also, please complete and mail the Product Registration Card provided with your appliance.
REFRIGERATOR SAFETY Your safety and the safety of others is very important. We have provided many important safety messages in this manual and on your appliance. Always read and obey all safety messages. This is the safety alert symbol. This symbol alerts you to hazards that can kill or hurt you and others. All safety messages will be preceded by the safety alert symbol and the word “DANGER” or “WARNING”. These words mean: wDANGER You will be killed or seriously injured if you don’t follow instructions.
PROPER DISPOSAL OF YOUR OLD REFRIGERATOR MISE AU REBUT PRUDENTE DE VOTRE VIEUX RÉFRIGÉRATEUR wWARNING wAVERTISSEMENT Suffocation Hazard Remove doors from your old refrigerator. Failure to do so can result in death or brain damage. Risque de suffoquer Enlever les portes de votre vieux réfrigérateur. Le non-respect de cette instruction peut causer un décès ou des lésions cérébrales. IMPORTANT: Child entrapment and suffocation are not problems of the past.
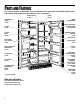
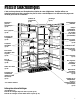
PARTS AND FEATURES This section contains an illustration of your refrigerator. Use it to become more familiar with the parts and features. Page references are included for your convenience. Control panel (p. 19) Automatic ice maker (p. 29) Light (p. 32) Utility compartment Ice bin (p. 30) Model and serial number, label (on side wall) Freezer light (p. 33) Adjustable glass shelves (p. 26) Wine Rack† Removable wire shelves (p. 29) Removable door shelf fronts (p. 25) Freezer bin (p. 28) Base grille (p.
PIÈCES ET CARACTÉRISTIQUES Cette section présente une illustration descriptive de votre réfrigérateur. Veuillez utiliser ces renseignements pour bien connaître les pièces et les caractéristiques. Les références de page sont incluses pour vous accommoder. Machine à glaçons automatique (p. 29) Tableau de commandes (p. 19) Bac à glaçons (p. 30) Éclairage du congélateur (p. 33) Clayettes amovibles (p. 29) Balconnets amovibles dans la porte (p. 25) Bac du congélateur (p. 28) Éclairage (p.
INSTALLING YOUR REFRIGERATOR AVANT L’UTILISATION DU It is important to prepare your refrigerator for use. This section tells you how to clean it, install it, connect it to a power source, and level it. Il est important de préparer votre réfrigérateur avant son utilisation. Cette section vous indique comment le nettoyer, l’installer, le brancher à une source de courant électrique et le mettre d’aplomb.
Unpacking your refrigerator (cont.) Déballage de votre réfrigérateur (suite) Cleaning before use Nettoyage avant l’utilisation After you remove all of the packaging materials, clean the inside of your refrigerator before using it. See the cleaning instructions in the “Caring for Your Refrigerator” section for more information. Après avoir enlevé tous les matériaux d’emballage, nettoyer l’intérieur du réfrigérateur avant l’utilisation.
ELECTRICAL REQUIREMENTS SPÉCIFICATIONS ÉLECTRIQUES wWARNING wAVERTISSEMENT Electrical Shock Hazard Plug into a grounded 3 prong outlet. Do not remove ground prong. Do not use an adapter. Do not use an extension cord. Failure to follow these instructions can result in death, fire, or electrical shock. Before you move your refrigerator into its final location, it is important to make sure you have the proper electrical connection. Recommended Grounding Method A 115 Volt, 60 Hz.
LEVELING AND DOOR NIVELLEMENT ET ALIGNMENT ALIGNEMENT DES PORTES If the refrigerator is not leveled during installation, the doors may not close or seal properly, causing cooling, frost, or moisture problems. It is very important for the refrigerator to be level in order to function properly. Move the refrigerator into its final position. Use a level on top of the refrigerator to check that it is level from side-to-side. Next, open both doors completely and release them.
Leveling and door alignment (cont.) Nivellement et alignement des portes (suite) 3. To level your refrigerator, you may either turn the 3. Pour niveler le réfrigérateur, faire tourner la vis dans le screw clockwise to raise that side of the refrigerator, or turn the screw counterclockwise to lower that side. Place a level on top of the refrigerator to check adjustments. Use a screwdriver to adjust the leveling screw. (See diagram on previous page.
ATTACHING THE ICE MAKER TO A WATER SUPPLY Read all directions carefully before you begin. wWARNING Electrical Shock Hazard Unplug the refrigerator before installing ice maker. Failure to do so can result in death or electrical shock. RACCORDEMENT DE LA MACHINE À GLAÇONS À UNE CANALISATION D’EAU Lire attentivement toutes les instructions avant de commencer. wAVERTISSEMENT Risque de choc électrique Débrancher le réfrigérateur avant l’installation de la machine à glaçons.
Attaching the ice maker to a water supply (cont.) Raccordement de la machine à glaçons à une canalisation d’eau (suite) Valve selection: Sélection de robinet : 14 Your appliance dealer has a kit available with a ⁄ -inch saddle type shut-off valve, a union, and copper tubing. Before purchasing, make sure a saddle type valve complies with your local plumbing codes. Do not use a piercing type or 3⁄ 16-inch saddle valve which reduces water flow and clogs more easily.
Attaching the ice maker to a water supply (cont.) Raccordement de la machine à glaçons à une canalisation d’eau (suite) Connecting to water line Raccordement à une canalisation d’eau 1. Unplug the refrigerator or disconnect power supply. 2. Turn OFF main water supply. Turn ON nearest faucet long enough to clear line of water. 3. Find a 1⁄2-inch to 1 1⁄4-inch vertical COLD water pipe near the refrigerator.
Attaching the optional ice maker to a water supply (cont.) Raccordement de la machine à glaçons à une canalisation d’eau (suite) 5. Using a grounded drill, drill a 1⁄4-inch hole on the cold 5. À l’aide d’une perceuse électrique reliée à la terre, water pipe you have selected. 6. Fasten shut-off valve to cold water pipe with pipe clamp. Be sure outlet end is solidly in the 1⁄4-inch drilled hole in the water pipe and that washer is under the pipe clamp. Tighten packing nut.
Attaching the ice maker to a water supply (cont.) Raccordement de la machine à glaçons à une canalisation d’eau (suite) Connecting to refrigerator 1. Disconnect the tube clamp on the back of the product and insert copper tubing through the clamp as shown at the right. Attach the copper tube to the valve inlet using a compression nut and sleeve as shown. Tighten the compression nut. Do not overtighten. Reattach the tube clamp and tube to the back of the cabinet. 2. Turn shut-off valve ON. CHECK FOR LEAKS.
UTILISATION DU USING YOUR REFRIGERATOR RÉFRIGÉRATEUR To obtain the best possible results from your refrigerator, it is important that you operate it properly. This section tells you how to set the controls, remove and adjust the features in your refrigerator, and how to save energy. Pour obtenir les meilleurs résultats possibles du réfrigérateur, il est important de s’en servir de la bonne façon.
SETTING THE CONTROLS RÉGLAGES DES COMMANDES When you first install your refrigerator, set the Refrigerator and Freezer Controls at the mid-setting(s). Give your refrigerator time to cool down completely before adding food. It is best to wait 24 hours before adding food. Lorsque vous installez le réfrigérateur au début, faire les réglages du réfrigérateur et du congélateur au point central des réglages. Donner au réfrigérateur le temps de se refroidir complètement avant d’y ajouter des aliments.
CHANGING THE CONTROL SETTINGS CHANGEMENT DU RÉGLAGE DES COMMANDES If you need to adjust temperatures in the refrigerator or freezer, use the settings listed in the chart below as a guide. Wait at least 24 hours between adjustments.
USING THE ICE AND WATER UTILISATION DES DISTRIBUTEURS D’EAU ET DE GLAÇONS wWARNING wAVERTISSEMENT DISPENSERS Cut Hazard Use a sturdy glass when dispensing ice or water. Failure to do so can result in cuts. Risque de coupures Utiliser de verre robuste pour prendre des glaçons ou de l’eau. Le non-respect de cette instruction peut causer des coupures. The ice dispenser Le distributeur de glaçons Ice dispenses from the ice maker storage bin in the freezer.
Using the ice and water dispensers (cont.) Utilisation des distributeurs d’eau et de glaçons (suite) To dispense ice: 1. Press button for the desired type of ice. Distribution de glace : 1. Appuyer sur le bouton pour le type de glace désirée. ICE CRUSH 2. Press a sturdy container against the ice dispenser lever. Hold the container close to the dispenser opening so ice does not fall outside of the glass.
Using the ice and water dispensers (cont.) Utilisation des distributeurs d’eau et de glaçons (suite) The water dispenser Le distributeur d’eau Chilled water comes from a tank behind the meat drawer. It holds approximately 11⁄2 quarts (1.5 L). When the refrigerator is first hooked up, press the water dispenser bar with a glass or jar until you draw and discard 2 or 3 quarts (1.9 to 2.8 L). It will take three to four minutes for the water to begin dispensing.
Using the ice and water dispensers (cont.) Utilisation des distributeurs d’eau et de glaçons (suite) The dispenser light Témoin lumineux du distributeur The dispenser area has a light. It can be turned on manually by pressing the “ON” button at the right hand side of the control panel. The red indicator above the button will appear. Le distributeur comporte un indicateur lumineux. Il peut être allumé manuellement en appuyant sur le bouton à ON (allumé) au côté droit du panneau de réglage.
REMOVING THE DROP-IN DOOR TRIM RETRAIT DE LA TRINGLE DÉPOSÉE DANS LA PORTE To remove the trim piece: 1. Remove all items from the shelf. 2. Pull straight up on each end of the trim piece. Pour enlever la tringle : 1. Enlever tous les articles rangés sur la tablette. 2. Soulever verticalement chaque extrémité de la tringle. To replace the trim piece: 1. Locate each end of the trim piece above the trim pocket opening. 2. Push the trim ends straight down until they stop. 3. Replace items on the shelf.
ADJUSTING THE RÉGLAGE DES REFRIGERATOR SHELVES TABLETTES DE RÉFRIGÉRATEUR The shelves in your refrigerator are adjustable to match the way you use them. Your model may have either glass or wire shelves. Les tablettes dans votre réfrigérateur peuvent être ajustées pour correspondre à l’utilisation désirée. Le modèle que vous avez peut présenter des tablettes en verre ou en broche : NOTE: Glass shelves are heavy. Handle them carefully. REMARQUE : Les tablettes en verre sont lourde.
Removing the convertible vegetable/meat drawer and cover (cont.) Retrait du bac convertible à légumes/viandes et du couvercle (suite) To remove the cover: 1. Remove the crisper, the crisper cover, and the meat drawer. 2. Tilt front of cover up. 3. Lift cover at back and pull straight out. 4. Replace in reverse order. Pour retirer le couvercle : 1. Retirer le bac à légumes, le couvercle du bac à légumes et le bac à viande. 2. Soulever l’avant du couvercle. 3.
Removing the crisper and crisper cover (cont.) Retrait du bac à légumes et du couvercle (suite) To remove the cover: 1. Hold the glass insert firmly while pushing up from the bottom. 2. Slide the glass insert out. 3. Lift cover frame up and out. Pour retirer le couvercle : 1. Tenir fermement la plaque en verre en la poussant par en-dessous. 2. Faire glisser la plaque en verre vers l’extérieur. 3. Soulever le cadre du couvercle et le retirer.
REMOVING THE RETRAIT DES CLAYETTES To remove a shelf: 1. Lift right side of shelf off supports. 2. Slide shelf out of shelf support holes. 3. Replace in reverse order. Pour enlever la clayette : 1. Soulever le côté droit hors des supports. 2. Faire glisser la clayette vers l’extérieur au-dessus des orifices des supports. 3. Replacer la clayette en suivant l’ordre inverse.
Using the automatic ice maker (cont.) Utilisation de la machine à glaçons automatique (suite) • Avoid connecting the ice maker to a softened water • Éviter de brancher la machine à glaçons à un REMOVING THE ICE MAKER RETRAIT DU BAC D’ENTREPOSAGE There are several reasons why you may need to remove, empty, and clean the ice maker storage bin. • The ice dispenser has not, or will not, be used for a week or more. • A power failure causes the ice in the bin to melt and freeze together.
To remove the ice bin: 1. Pull the covering panel out from the bottom and then slide it back toward the rear. Pour retirer le bac à glaçons : 1. Retirer le panneau qui recouvre le bac à glace en le sortant de la base et ensuite le faire glisser vers l’arrière. 2. Lift the signal arm so it clicks into 2. Soulever le levier de la machine the OFF (up) position. Ice can still be dispensed, but no more can be made. 3. Lift up the front of the storage bin and pull it out. 4. Empty the ice bin.
REMOVING THE BASE RETRAIT DE LA GRILLE GRILLE You will need to remove the base grille to clean the defrost pan or the condenser coils, or to level the front of the refrigerator. NOTE: Carefully avoid touching the condenser coils while cleaning. Surfaces may be hot. To remove the base grille: 1. Open both doors. 2. Place hands along the ends of the grille, with your thumbs along the top. Push in with your thumbs and pull up on the bottom.
Changing the light bulbs (cont.) Remplacement des ampoules d’éclairage (suite) Refrigerator light: Ampoule du réfrigérateur : 1. Unplug refrigerator or disconnect refrigerator from 1. Débrancher le réfrigérateur de la source de courant power supply. 2. Reach behind the Control Panel and remove the bulb. 3. Replace the bulb with a 40-watt appliance bulb. 4. Plug in refrigerator or reconnect refrigerator to power supply. électrique. 2.
Changing the light bulbs (cont.) Remplacement des ampoules d’éclairage (suite) Dispenser area light: Ampoule dans la section de distribution : 1. Unplug refrigerator or disconnect refrigerator from power supply. 2. Reach through the dispenser area to remove the bulb. 3. Replace the bulb with a heavyduty 10-watt bulb, which can be purchased from your Estate dealer. 4. Plug in refrigerator or reconnect refrigerator to power supply. 1. Débrancher le réfrigérateur de la source de courant électrique. 2.
UNDERSTANDING THE SOUNDS YOU LES BRUITS DE L’APPAREIL QUE MAY HEAR VOUS POUVEZ ENTENDRE Your new refrigerator may make sounds that your old one didn’t make. Because the sounds are new to you, you might be concerned about them. Most of the new sounds are normal. Hard surfaces, like the floor, walls, and cabinets, can make the sounds seem louder than they actually are. Due to new product designs, there may be sounds that you are not familiar with.
CARING FOR YOUR REFRIGERATOR Your refrigerator is built to give you many years of dependable service. However, there are a few things you can do to help extend its product life. This section tells you how to clean your refrigerator and what to do when going on vacation, moving, or during a power outage. CLEANING YOUR REFRIGERATOR Both the refrigerator and freezer sections defrost automatically. However, clean both sections about once a month to prevent odors from building up. Wipe up spills immediately.
ENTRETIEN DU RÉFRIGÉRATEUR Ce réfrigérateur a été conçu et construit pour offrir de nombreuses années de service fiable. L’utilisateur peut cependant faire certaines choses pour en augmenter la longévité. Cette section décrit comment nettoyer le réfrigérateur, et ce qu’il faut faire avant une période de vacances, avant un déménagement, ou à l’occasion d’une interruption de l’alimentation électrique. NETTOYAGE DU RÉFRIGÉRATEUR Les sections du réfrigérateur et du congélateur se dégivrent automatiquement.
Nettoyage du réfrigérateur (suite) PIÈCE COMMENTAIRES Plateau de dégivrage • Retirer la grille de la base. • Retirer le plateau de dégivrage, que l’on peut atteindre par la petite ouverture sur le côté droit. • Laver, rincer et sécher à fond. • Replacer le plateau de dégivrage. Bien l’enfoncer complètement dans l’ouverture. • Replacer la grille de la base. Serpentins du condenseur • Retirer la grille de la base. • Nettoyer à l’aspirateur les serpentins lorsqu’ils sont sales ou poussiéreux.
VACATION AND MOVING CARE ENTRETIEN AVANT LES VACANCES OU LORS D’UN DÉMÉNAGEMENT Short vacations Courtes vacances If you will be away for less than four weeks, use these tips to prepare your refrigerator before you leave. 1. Use up any perishables and freeze other items. 2. If your refrigerator has an automatic ice maker: • Raise signal arm to OFF (up) position. • Shut off water supply to the ice maker. 3. Empty the ice bin.
Vacation and moving care (cont.) 7. Empty water from the defrost pan. 8. Clean, wipe, and dry thoroughly. 9. Take out all removable parts, wrap them well, and Entretien avant les vacances ou lors d’un déménagement (suite) 7. Vider l’eau du plateau de dégivrage. 8. Nettoyer, essuyer et sécher tout l’intérieur. 9. Retirer toutes les pièces amovibles, bien les envelop- tape them together so they don’t shift and rattle during the move. 10. Screw in the leveling rollers. 11.
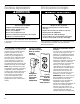
REMOVING ENLÈVEMENT DES THE DOORS PORTES wWARNING wAVERTISSEMENT Step 3 Step 4 Risque de choc électrique Débrancher le réfrigérateur avant d’enlever les portes. Le non-respect de cette instruction peut causer un décès ou un choc électrique. Electrical Shock Hazard Unplug the refrigerator before removing doors. Failure to do so can result in death or electrical shock. NOTE: Before removing doors, open both doors and remove base grille (see the “Removing the base grille” section).
Ènlèvement des portes (suite) Removing the doors (cont.) 3. Left top hinge 3. Charnière supérieure du côté A • Remove hinge cover (A) and screws (B). • Disconnect wiring plug (D) and both ground wires (C). Carefully lift door up off bottom hinge. Make sure you protect water line from damage. DO NOT REMOVE SCREW (E) [not on all models] gauche • Ôter le couvre-charnière (A) et les vis (B). • Déconnecter le câblage (D) et les deux fils de liaison à la terre (C).
FOOD STORAGE GUIDE GUIDE DE CONSERVATION There is a correct way to package and store refrigerated or frozen food. To keep food fresher, longer, take the time to study these recommended steps. Il existe une façon correcte d’emballer et de conserver les aliments au réfrigérateur ou au congélateur. Pour garder les aliments plus frais, plus longtemps, prendre le temps d’étudier ces étapes recommandées.
Storing fresh food (cont.) Vegetables with skins Conservation des aliments frais (suite) Légumes à pelure (carrots, peppers) (carrots, peppers) Place in plastic bags, or plastic container and store in crisper Ranger dans le bac à légumes, un sac en plastique ou un contenant en plastique. Fish Poisson Use fresh fish and shellfish the same day as purchased. Le poisson et les fruits de mer frais doivent être consommés le jour même de l’achat.
STORING FROZEN FOOD CONSERVATION DES ALIMENTS CONGELÉS The freezer section is designed for storing commercially frozen food and for freezing food at home. NOTE: For further information about preparing food for freezing or food storage times, check a freezer guide or reliable cookbook. Le compartiment congélateur est conçu pour conserver les aliments surgelés commerciaux et pour faire congeler les aliments à la maison. Packaging Emballage Successful freezing depends on the correct packaging.
Storing frozen food (cont.) Conservation des aliments congelés (suite) Freezing Congélation Your freezer will not quick-freeze any large quantity of food. Put no more unfrozen food into the freezer than will freeze within 24 hours (about 2 to 3 lbs of food per cubic foot [907-1,350 g per liter] of freezer space). Leave enough space in the freezer for air to circulate around packages. Also leave enough room at the front so the door can close tightly.
TROUBLESHOOTING GUIDE You can solve many common refrigerator problems easily, saving you the cost of a possible service call. Try the suggestions below to see if you can solve your problem without outside help. If the suggestions do not work, please call the Consumer Assistance Center. NOTE: The Index in the back of the book will help you locate the appropriate sections that are referenced throughout this Troubleshooting Guide. Your refrigerator will not operate Check if ... Then ...
The motor seems to run too much Check if ... Then ... The room temperature is hotter than normal. Expect the motor to run longer under warm conditions. At normal room temperatures, expect your motor to run about 40% to 80% of the time. Under warmer conditions, expect it to run even more of the time. A large amount of food has just been added to the refrigerator. Adding a large amount of food warms the refrigerator. It is normal for the motor to run longer in order to cool the refrigerator back down.
The ice maker is not producing ice Check if ... Then ... The freezer temperature is not cold enough to produce ice. See the “Setting the controls” section. The ice maker arm is in the “OFF” (up) position. Lower arm to the “ON” (down) position. See the “Using the automatic ice maker” section. The water line shut-off valve to the refrigerator is not turned on. Turn on the water valve. See the “Attaching the ice maker to a water supply” section. An ice cube is jammed in the ejector arm.
The ice dispenser will not operate properly Check if ... Then ... The freezer door is not closed completely. Push the door firmly shut. If it will not shut all the way, see “The doors will not close completely” later in this section. The ice bin is not installed correctly. Push the ice bin in all the way. If the ice bin does not go in all the way, it may not be put in straight. Pull it out and try again. The wrong ice has been added to the bin. Use only cubes produced by the current ice maker.
Water or ice is leaking from the dispenser Check if ... Then ... The glass is not being held under the ice dispenser long enough, causing the ice to spill. Hold the container under the ice chute for two to three seconds after releasing the dispenser lever. A small amount of ice may dispense after the lever is released. The glass is not being held under the water dispenser long enough, causing water to drip.
There is interior moisture build-up Check if ... Then ... The air vents are blocked in the refrigerator. Remove any objects from in front of the air vents. Refer to “Ensuring proper air circulation” for the location of air vents. The door is opened often. To avoid humidity build-up, try to get everything you need out of the refrigerator at once, keep food organized so it is easy to find, and close the door as soon as the food is removed.
GUIDE DE DÉPANNAGE Vous pouvez résoudre de nombreux problèmes communs des réfrigérateurs, ce qui vous économise le coût possible d’un appel de service. Essayer les suggestions ci-dessous pour voir si vous pouvez résoudre votre problème sans aide de l’extérieur. Si les suggestions ne fonctionnent pas, veuillez appeler le Centre d’assistance aux consommateurs. REMARQUE : L’index à l’arrière de ce manuel vous aidera à localiser les sections appropriées qui sont identifiées dans ce Guide de dépannage.
Le plateau de dégivrage contient de l’eau Vérifier si ... Alors ... Le réfrigérateur se dégivre. L’eau s’évaporera. C’est normal pour l’eau de dégoutter dans le plateau de dégivrage. Le réfrigérateur est plus humide que normalement. Prévoir que l’eau dans le plateau de dégivrage prenne plus de temps à s’évaporer. Ceci est normal parce qu’il fait chaud ou humide. L’eau dans le plateau de dégivrage déborde. Vérifier pour s’assurer que le réfrigérateur est de niveau (voir “Nivellement”).
Le réfrigérateur semble faire trop de bruit Vérifier si ... Alors ... Certains sons et bruits sont communs pour les réfrigérateurs neufs. Voir la section “Les bruits de l’appareil que vous pouvez entendre”. La machine à glaçons ne produit pas de glaçons Vérifier si ... Alors ... La température du congélateur n’est pas assez froide pour produire des glaçons. Voir la section “Réglage des commandes”. Le levier de la machine à glaçons est en position “OFF” (élevée).
Mauvais goût ou odeur des glaçons Vérifier si ... Alors ... Les raccords de plomberie sont neufs et causent une décoloration et une mauvaise saveur des glaçons. Jeter les premières quantités de glaçons. Les glaçons ont été gardés trop longtemps. Jeter les vieux glaçons et en faire une nouvelle provision. Les aliments dans le congélateur n’ont pas été bien emballés. Voir la section “Conservation des aliments congelés”. Le congélateur et le bac à glaçons ont besoin d’être nettoyés.
Le distributeur d’eau ne fonctionne pas bien Vérifier si... Alors... La porte du réfrigérateur n’est pas complètement fermée. Pousser fermement la porte pour la fermer. Si elle ne se ferme pas complètement, voir “Les portes ne se ferment pas complètement” plus loin dans cette section. Le réservoir d’eau ne s’est pas rempli. Le réservoir d’eau a besoin d’être rempli la première fois qu’il est employé.
L’eau du distributeur n’est pas assez froide Vérifier si ... Alors ... Le réfrigérateur vient d’être installé. Accorder 24 heures pour que le réservoir se refroidisse complètement. Une grande quantité d’eau a récemment été retirée. Accorder 24 heures pour que le réservoir se refroidisse complètement. Aucune eau n’a été récemment retirée. Le premier verre d’eau peut ne pas être froid. Jeter l’eau du premier verre. La cloison au centre entre les deux sections est tiède Vérifier si ... Alors ...
Il existe une accumulation d’humidité à l’intérieur Vérifier si ... Alors ... Les ouvertures d’aération dans le réfrigérateur sont bloquées. Enlever tous les objets en avant des ouvertures d’aération. Consulter “Pour une circulation d’air appropriée” pour l’emplacement des ouvertures d’aération. La porte est fréquemment ouverte.
REQUESTING ASSISTANCE OR SERVICE To avoid unnecessary service calls, please check the “Troubleshooting Guide” section. It may save you the cost of a service call. If you still need help, follow the instructions below. IF YOU NEED ASSISTANCE OR SERVICE IN U.S.A. Call the Whirlpool Consumer Assistance Center toll free at 1-800-253-1301. Our consultants are available to assist you.
REQUESTING ASSISTANCE OR SERVICE Before calling for assistance or service, please check the “Troubleshooting Guide” section. It may save you the cost of a service call. If you still need help, follow the instructions below. IF YOU NEED ASSISTANCE OR SERVICE IN CANADA 1. If the problem is not due to one of the items listed in the “Troubleshooting Guide”† ... Contact the dealer from whom you purchased your appliance, or call the Inglis Limited Consumer Assistance Centre toll free, 8:30 a.m. – 6 p.m.
DEMANDE D’ASSISTANCE OU DE SERVICE Avant de faire un appel pour assistance ou service, veuillez vérifier la section “Guide de dépannage”. Cette action peut vous faire économiser le coût d’un appel de service. Si vous avez encore besoin d’assistance, suivre les instructions ci-dessous. SI VOUS AVEZ BESOIN D’ASSISTANCE OU DE SERVICE 1. Si le problème n’est pas attribuable à l’une des causes indiquées dans “Guide de dépannage”† ...
WARRANTY (U.S.A.) ESTATE* REFRIGERATOR LENGTH OF WARRANTY WHIRLPOOL WILL PAY FOR FULL ONE-YEAR WARRANTY FROM DATE OF PURCHASE FSP* replacement parts and repair labor to correct defects in materials or workmanship. Service must be provided by an authorized Whirlpool service company. FULL FIVE-YEAR WARRANTY FROM DATE OF PURCHASE FSP replacement parts and repair labor to correct defects in materials or workmanship in the sealed refrigeration system. These parts are: 1. Compressor 2. Evaporator 3.
GARANTIE (É.-U.) RÉFRIGÉRATEUR ESTATE* DURÉE DE LA GARANTIE WHIRLPOOL PAIERA POUR GARANTIE COMPLÈTE D’UN AN À COMPTER DE LA DATE D’ACHAT Les pièces de remplacement FSP* et la main-d’oeuvre pour réparer les défauts de matériau ou de fabrication. Les réparations doivent être effectuées par un établissement de service autorisé Whirlpool.
INDEX This index is alphabetical. It contains all the topics included in this manual, along with the pages on which you can find each topic. TOPIC PAGE AIR CIRCULATION .......................................................... 18 BASE GRILLE Removing .................................................................... 32 CLEANING How to ......................................................................... 36 Moving .........................................................................
Index (cont.) Index (suite) TOPIC PAGE SUJET PAGE REFRIGERATOR SECTION Convertible vegetable/meat drawer ............................ 26 Crisper ......................................................................... 27 Drop-in door trim ......................................................... 25 Shelves ........................................................................ 26 Snap-on door trim ....................................................... 25 PANNE DE COURANT ÉLECTRIQUE ...............