THANK YOU for purchasing this high-quality product. If you should experience a problem not covered in TROUBLESHOOTING, please visit our website at www.whirlpeel.eom for additional information. If you still need assistance, call us at 1-800-253-1301. In Canada, visit our website at www.whirtpooLca or call us at 1-800-807-6777. You will need your model and serial number located on the inside wall of the refrigerator compartment.
IMPORTANT WARNING:To SAFETY INSTRUCTIONS reducethe riskof fire, electricshock,or injuryto personswhen usingthe refrigerator,follow basic precautions, including the following: • Plug into a grounded 3 prong outlet. • Use nonflammable • Do not remove ground prong. • Do not use an adapter. • Do not use an extension cord. • Keep flammable materials and vapors, such as gasoline, away from refrigerator. cleaner. • Use two or more people to move and install refrigerator.
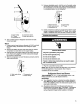
Location Requirements Electrical Requirements Explosion Hazard Electrical Shock Hazard Keep flammable materials and vapors, such as gasoline, away from refrigerator. Fallurs to do so can result In death, explosion, Plug into a grounded 3 prong outlet. Do not remove ground prong. or fire. To ensure proper ventilation for your refrigerator, allow for a 1,_,, (1.25 cm) space at the top and behind the refrigerator.
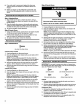
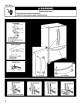
Water Pressure 5. Using a cordless drill, drill a 1/4"hole in the cold water pipe you have selected. A cold water supply with water pressure of between 35 and 120 psi (241 and 827 kPa) is required to operate the water dispenser and ice maker. If you have questions about your water pressure, call a licensed, qualified plumber.
. A m B m C D E Using an adjustable wrench, hold the nut on the plastic water line to keep it from moving. Then, with a second wrench turn the compression nut on the copper tubing counterclockwise to completely tighten. Do not overtighten. • I A. Plastic water line B. Water valve inlet port C. Compression nut 6. A. Copper tubing B. "P" clamp C. Compression nut 3. D. Compression sleeve E. Water valve inlet port D. Copper tubing E. "P" clamp Check connection by pulling on copper tubing.
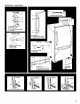
Ifyouonlywantto remove and replace the doors see "Remove Doors and Hinges" and "Replace Doors and Hinges." Style 2-French Doors Before you begin, turn the refrigerator control OFF, and remove food and adjustable door or utility bins from the doors. Install and Remove Refrigerator Door Handles Style 1-Standard Door 1. Place handle on the door or drawer as shown. Using a Phillips screwdriver, attach the handle to the door with the handle screws.
4. Attach refrigerator handle on opposite side of the refrigerator door with the two screws as shown in Graphic 2. Replace handle trim as shown. Remove and Replace Freezer Drawer Tighten all screws. Set aside the door until hinges and freezer compartment drawer are in place. Freezer door IMPORTANT: • Two people may be required to remove freezer drawer. 1. Remove freezer handle assembly as shown in Graphic 5-1. Keep all parts together.
Standard Door- Freezer Door 8
Standard Door - Freezer Drawer
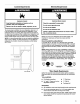
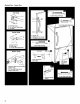
FrenchDoors Top Hinges t A c A. Hinge Cover Screw B. Top Hinge Cover C. S/l_BHex-Head Hinge Screws D. Top Hinge Bottom Hinges \\, \ \, \ A. Shim (on some models) B. Bottom Hinge \ C. Hinge Screws Wiring Plug A A. 3/_. Set Screw 10 A.
Adjustthe Door Depending on your model, your refrigerator may have two front adjustable rollers (Style 1) or four adjustable rollers (Style 2) located at the base of the refrigerator. If your refrigerator seems unsteady or you want the door to close more easily, use the instructions below. 6. 7. Replace the bracket cover. Place the bracket cover into the outer edge, swing the cover toward the cabinet and snap it into place. Replace the base grille. Style 2-Freezer Style1-Freezer Door Models 1.
REFRIGERATOR USE IMPORTANT: Openingand Closing Doors The recommended setting should be correct for normal household refrigerator use. The controls are set correctly when milk or juice is as cold as you like and when ice cream is firm. (French door models) There are two refrigerator compartment doors. The doors can be opened and closed either separately or together. Wait 24 hours for your refrigerator to cool completely before adding food.
CrisperHumidity Control You can control the amount of humidity in the moisture-sealed crisper. Depending on your model, adjust the control to any setting between FRUIT and VEGETABLES or LOW and HIGH. FRUIT/LOW with skins. (open) for best storage of fruits and vegetables WaterDispenser (on some models) IMPORTANT: • VEGETABLES / HIGH (closed) for best storage of fresh, leafy vegetables.
WaterFiltrationSystem Do not use with water that is microbiologically unsafe or of unknown quality without adequate disinfection before or after the system. Systems certified for cyst reduction may be used on disinfected waters that may contain filterable cysts. The water filter is located in the upper right-hand corner of the refrigerator compartment. You should change the water filter at least every 6 months.
NOTE: You may need to remove the upper freezer shelf or basket to access the light assembly. 4. Replace the light shield. Freezer drawer models • Top of the refrigerator compartment - insert the tabs on the shield into the liner holes on each side of light assembly. Slide the shield toward the front until it locks into place. NOTE: To avoid damaging the light shield, do not force the shield beyond the locking point.
• Popping - contraction/expansion of inside walls, especially during initial cool-down • Water running - may be heard when water melts during the defrost cycle and runs into the drain pan • Creaking/Cracking ice maker mold. - occurs as ice is being ejected from the Ice and Water The ice maker is not producing • The doors will not close completely • Door blocked open? Move food packages away from door. • Bin or shelf in the way? Push bin or shelf back in the correct position.
Thewaterdispenser will notoperate properly WATERFILTERCERTIFICATIONS Refrigerator connected to a water supply and the supply shutoff valve turned on? Connect refrigerator to water supply and turn water shutoff valve fully open, _t StVe of_ of HeelthScrvlces Water Treatment Device Cerd_ca_ Number Kink in the water source line? Straighten the water source line, 03-1583 • New installation? Flush and fillthe water system. See "Water Dispenser.
PRODUCTDATASHEETS Interior Water Filtration Model 67003523-750 Capacity System 750 Gallons (2839 Liters) Standard 42 for the reduction of Chlorine Taste and Odor, Particulate SystemI*;tested Class and against and certified NSF/ANSI by NSF Standard International 53 for theagainst reduction NSF/ANSI of Lead, Mercury, Atrazine, Toxaphane, Cysts, Turbidity, Asbestos and (_ L ndane. This system has been tested according to NSF/ANSI Standards 42 and 53 for the reduction of the substances listed below.
WHIRLPOOL CORPORATION MAJORAPPLIANCEWARRANTY LIMITED WARRANTY For one year from the date of purchese, when this major appliance is operated and maintained according to instructions attached to or furnished with the product, Whirlpool Corporation or Whirlpool Canada LP (hereafter "Whirlpool") will pay for Factory Specified Parts and repair labor to correct defects in materials or workmanship. Service must be provided by a Whirlpool designated service company.
Nous vous REMERCIONS d'avoir achet_ ce produit de haute qualit& Si voue rencontrez un probl_me non mentionn_ dane la section DI_PANNAGE, veuinez visiter notre site Web www.whirlpool.com pour des informatione euppl_mentaires. Si voue avez toujours besoin d'assistance, veuillez nous t_lephoner au 1-800-253-1301. Au Canada, vieitez notre site Web www.whirlpool.ca ou t_l_phonez-nous au 1-800-807-6777.
Mise au rebut de votre vieux r6frig rateur Avant de jeter votre vieux rdfrigdrateur a Enlever les pertes. a ou cong61ateur : Laisser les tablsttes en place de sorts que les enfants ne puissent pas y p_n6trer facilement. IMPORTANT : L'emprisonnement st I'etouffement des enfants ne sont pas un probl_me du passe. Les r_frig6rateurs jet6s ou abandonn6s sont encore dangereux, m_me s'ils sont laJss_,s abandonn6s pendant "quelques jours seulement".
REMARQUE : II eat recommand6 de ne pea installer le r6frig6rsteur pros d'un four, d'un radiateur ou de toute autre source de chaleur. Ne pea installer le r6frig6rateur dans un endroit o_Jla temp6rature balssera au-deesous de 55°F (13°C). r_frig@rateurde la source d'alimentation 61ectrique. Lorsque vous avez termin6, reeonnecter le r6fdg6rateur _ la source d'alimentation 61ectrique st mettre de nouveau le r_glage de la temperature au r_=glaged_sir_. Voir "Utilisation des commandes".
Raccordement de la canalisation d'eau Lire toutes les instructions event de commencer. IMPORTANT : Si on doit utiliesr le r_frigersteur event qu'il soit raccordb b la canalisation d'eau, placer la commande de la machine b gla(;ons b,la position OFF (arr_t). Raccordement b une canalisation d'eau 1. Debraccher le refrigerateur ou deconnecter la source de courant electrique. 2. FERMER le rebinet principal d'arriv6e d'eau.
4. Faire glisser 1'6crou de compression sur la bague, serrer pour le fixer sur I'orifice d'arriv6e d'eau. Porte(s) et firoir du r frig rateur OUTILLAGE NECESSAIRE : CI_s _ douille hexagonale de sA6", 3/s"et 1/_,,,tournevis Phillips n° 2, tournevis & lame plate. IMPORTANT : Vctm r_frig6rateur peat comporter une porte r_vereible standard (Style 1) avec soit une porte de cong_lateur ou un tiroir de cong61ation, soit une porte & deux battants (Style 2).
Mod&les de compartiments de cong61ation avec porte 1. D6branoher le r6frig_rateur ou d_connecter la source de courant _lectrique. 2. Fermar la porte du cong_lataur jusqu'au moment o_ on eat pr_t & la s6parer de la caisse de rappareil. REMARQUE : Pr6voir un support additionnel des portes pendant le d6montage des charni_ms. La force d'attraction des aimants des portes ne suffit pes _ lea maintenir en place. 3. 4. 5.
R6installation - Porteet chami_(es Retirer et r6installer le tiroir du cong61ateur Style 1-Porte standard REMARQUE : Si on inverse le sees d'ouverture des portes, consid6rer I'image syre_trique. IMPORTANT : • Deux personnes peuvent _tre n_ceesaires pour d6pceer et r6installer le tiroir de cong61ation. Mod&les avec tiroir de cong61ation • Toutes les illustrations mentionn_es dens les instructions suivantes sont incluses plus loin dens oatte section apr_s "_':tapes finales". 1.
Porte standard - Porte du compartiment de congdlation 27
Porte standard - Porte du compartiment 28 de congdlation
Portesb de_ battants Charni_res supdrieures f A c A. Vis du couvercle de la chamiere B. Couvercle de la chamiere sup_fieure C. Vis de charni_re _ t#te hexagonale de %_" D. Chamiere sup_rieure Charni_res inf_rieures A. Cale (sur certains med_les) B. Chami_re inf_deure C. Vis de chami_re Fiche de branchement A A. Vis de retenue de 31_. A.
Ajustementde la porte Selon votre mod_le, le r_frig_rateur peut comporter deux roulettas avant r6glablas (Style 1) ou quatre roulettes rdglablas (Style 2) situ6as _ la base du r6frigerateur. Si votre r6frig6mteur semble instable ou si vous d6airez que las portas as ferment plus facilernent, faire le r6glage de I'inclinaison du r6frig6rateur en suivant les instructions ci-dassous. Style 1-Mod&les de compartiments de congdlatJon avec porte f, Retirer la grille de la base.
UTILISATION DU REFRIGERATE IMPORTANT Ouvertureet fermeture des portes Les r6glages recommand6s devraient convenir _ un usage domsetique normal. Lee eommandes sent r_gl_es correctement Iorsque le lair ou le jus est ausei froid que vous I'aimez et Iorsque la cr6me glacde set ferme. (lVlod_lesavec portes _.deuxbattants) II y a deux portee pour le compartiment de r_frig6ration. Lee portes peuvent _tm ouvertes et ferm6es s6par6ment ou ensemble.
CONDITION/RAISON : AJUSTEMENT R#FRIGI_RATEUR trop tiede : Tourner le reglage de TEMPf:RATURE du RI_RIGf:RATEUR 1° plus haut CONGI_LATEUR trop tiede/tmp peu de gla(;ons Tourner Is reglage de TEMP(:RATURE du CONGI_LATEUR 1° plus haut RI_FRIGI_RATEUR trop froid Tourner le reglage de TEMP#RATURE du RI_RIGI_RATEUR 1° plus bas Taux de production des glagons • La machine _tgla_ons devrait produire une quantit6 de glagons cempl_te environ touters les 3 heures. • Pour augmenter la production de glaP_.
Distribution d'eau I. Tenir un r6cipient eous le distributeur tout en appuyant cur le bouton. 2. ENTRETIENDU GERATEUR Rel&cher le bouton pour arr_ter la distribution. Nettoyage Risque d'explosion Utlllser un prodult de nettoyage ininflammable.
4. Le condenseur n'a pss besoin d'etre nettoy_ souvent dans des conditions de fonctionnernent norrnales. Si I'environnement est particuli_rnment graisseux, poussi6reux, ou s'il y a des anirnaux domestiques dans la maison, le condenssur devrait 6tre nettoy6 tous Iss deux ou trois mois pour assurer une efficacit6 maxirnale. ModUles de compartiments Si vous avez besoin de nettoyer le condenssur : 5, • Retirer la grille de la base.
DEPANNAGE Essayer d'abord les solutions sugg_r6es ici ou visiter notre site Internet et la FAQ (foire aux questions) pour 0viter le coot d'un appel de service. Aux E.-U., www.whirlpool.com Au Canada, www.whirlpool.ca Fonctionnement du r frig rateur Le r#frig0rateur ne fonctionne pas Le r_ffrig0rateur semble bruyant Le bruit des r6frig6rateurs a 6t6 r6duit au cours des ann6es.
S'agit-il d'une nouvelle installation? Attendre 24 heures apr_s I'inatallation pour le commencement de la production de gla_ons. Attendre 72 heures pour la production complbte de gla_ons. Temperatureet humidit La temperature • est t_op 61ev6e La porte du cong61ateur est-elle complbtement ferm6e? Bien fermer la porte du compartiment de cong61ation. Si la porte du compartiment de cong61ation ne ferme pas compl_tement, voir "Les portes ne ferment pes compl_tement".
MauvaisgoOt,odeuroucouleurgrisedesglagons Les raccords de plomberie sont-ils neufs? Des raccords de plomberie neufs peuvent causer une d6coloration etun mauvais go0t des gla_ons. Les glac_ons ont-ils 6t6 gard6s trop Iongtemps? Jeter Ise gla_ons, Laver le compartiment _ gla_ons, Accorder 24 heurse pour la fabrication de nouveaux gla(;ons, • • Ueau coule du syst_me de dist_ibuUon REMARQUE : II set normal de constater une ou deux gouttse d'eau aprbs la distribution d'eau.
FEUILLESDE DONNEESSURLEPRODUIT Systeme ModUle de filtration 67003523-750 d'eau intdrieur / Capacit6 : 750 gallons (2839 litres) NSF/ANSI 42 (r_duction du goat et de I'odeur du chlore, et particules Syst_meI*)); (clssse test_ et enetvertu certifi_de par la norme NSF International NSF/ANS153 en(r_duction vertu de ]a denorme plomb, (_ mercure, atrazine, toxaph_ne, kystes, turbiditY, amiante, et lindane).
GARANTIE DESGROSAPPAREILSMENAGERS WHIRLPOOL CORPORATION GARANTIE LIMITEE Pendant un an _ compter de la date d'achat, Ioreque ce gros appareil menager est utilis6 et entretenu conformement aux instructions jointes _ ou fournies avec le produit, Whirlpool Corporation ou Whirlpool Canada LP (ci-apr_s d_signees "Whirlpool") paiera pour les pi_ces specifiees par I'usine et la main-d'ceuvre pour corriger les vices de materiaux ou de fabrication.
W10175448A SP PN W10175487A ©2008 WhirlpoolCorporation. All rights reserved. ® RegisteredTrademark/TM Trademark of Whirlpool, U.S.A., Whirlpool Canada LP Licensee in Canada Tous droits r_serv_s. ® Marque d_pos_e/TM Marque de commerce de Whirlpool, U.S.A., emploi souslicence par Whirlpool Canada LPau Canada 1/08 Printed in U.S.A. Imprim_ aux E.-U.