Use & Care Guide Guide d’utilisation et d’entretien ELECTRONIC DRYER SÉCHEUSE ÉLECTRONIQUE Para obtener acceso al Manual de uso y cuidado en español, o para obtener información adicional acerca de su producto, visite: www.whirlpool.com. If you have any problems or questions, visit us at www.whirlpool.com Pour tout problème ou question, consulter www.whirlpoolappliances.
ELECTRONIC DRYER SÉCHEUSE ÉLECTRONIQUE DRYER SAFETY..................................................................................... 2 ACCESSORIES....................................................................................... 4 CHECK YOUR VENT SYSTEM FOR GOOD AIR FLOW............................. 5 CONTROL PANEL AND FEATURES......................................................... 6 CYCLE STATUS INDICATORS.................................................................. 7 CYCLE GUIDE.........
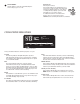
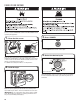
ACCESSORIES Enhance your new washer and dryer with the following genuine Whirlpool® accessories. For more information on options and ordering, call 1-800-901-2042, or visit us at: www.whirlpool.com/accessories. In Canada, call 1-800-807-6777 or visit us at www. whirlpoolparts.ca 15" Pedestal Color-matched pedestals raise the washer and dryer to a more comfortable working height. The large drawer provides convenient storage. Available in matching colors.
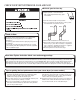
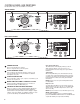
CHECK YOUR VENT SYSTEM FOR GOOD AIR FLOW Maintain good air flow by: n Cleaning your lint screen before each load. n Replace plastic or foil vent material with 4" (102 mm) diameter heavy, rigid vent material. n Use the shortest length of vent possible. n Use no more than four 90° elbows in a vent system; each bend and curve reduces air flow. Good Better Good air flow Along with heat, dryers require good air flow to efficiently dry laundry.
CONTROL PANEL AND FEATURES Not all features and cycles are available on all models. Steam models 1 2 3 4 5 Steam Control Lock Sensing Wet Damp Cool Down Done Wrinkle Shield 6 Non-steam models 1 2 3 4 5 Control Lock Sensing Wet Damp Cool Down Done Wrinkle Shield 6 1 POWER BUTTON 2 CYCLE CONTROL KNOB 3 Press to turn the dryer on and off. Press to stop/cancel a cycle at any time. Use your dryer’s Cycle Control knob to select a cycle for your laundry load.
6 Control Lock If the dryer is running: Press and hold the Cycle Signal button for 3 seconds to lock the controls of the dryer and avoid an accidental change in cycle options or settings during a drying cycle. Press and hold again for 3 seconds to unlock. To enable the Control Lock feature if the dryer is off, it is not necessary to press POWER before activating the Control Lock feature. CYCLE SIGNAL Use this button to turn the signal indicating the end of a drying cycle on or off.
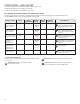
CYCLE GUIDE — AUTO CYCLES Settings and options shown in bold are default settings for that cycle. Not all features and cycles are available on all models. Not all settings and options are available on each cycle. Use Auto Cycles for better fabric care and energy savings The dryer senses moisture in the load or air temperature and shuts off when the load reaches the selected dryness level. Use the NORMAL dryness level to provide optimal energy savings.
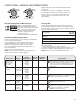
CYCLE GUIDE — MANUAL AND STEAM CYCLES Steam Settings and options shown in bold are default settings for that cycle. Not all features and cycles are available on all models. Not all settings and options are available on each cycle. Steam cycles (on some models) are designed for use with dry loads to loosen wrinkles, reduce odors, and refresh fabrics.
USING YOUR DRYER WARNING: To reduce the risk of fire, electric shock, or injury to persons, read the IMPORTANT SAFETY INSTRUCTIONS before operating this appliance. 1. Clean the lint screen 3. Press POWER Press the POWER button to turn on the dryer. Clean the lint screen before each load. Pull the lint screen straight up. Roll lint off the screen with your fingers. Do not rinse or wash screen to remove lint. Wet lint is hard to remove. Push the lint screen firmly back into place.
5. Adjust cycle settings, if desired 7. Remove garments promptly after cycle is finished Steam Control Lock Steam Control Lock Sensing Wet Damp Cool Down Done Wrinkle Shield Sensing Wet Damp Cool Down Done Wrinkle Shield Steam model shown Steam model shown You may adjust different settings, depending on whether you have selected an Auto Cycle, Manual Cycle, or Steam Cycle (on some models). See the “Cycle Guide” for detailed information.
ADDITIONAL FEATURES USING THE DRYING RACK To obtain a drying rack for your dryer, follow the instructions included in your dryer drum. Remove and discard any packing material before use. Use the Drying Rack for items that you do not want to tumble dry, such as sweaters and tennis shoes. When you use the drying rack, the drum continues to turn, but the rack remains stationary. The drying rack is intended for use with the Timed Dry cycles only. The drying rack cannot be used with Auto Cycles.
CLEANING THE LINT SCREEN Every load cleaning The lint screen is located in the door opening of the dryer. Be sure to clean the lint screen after each load. A screen blocked by lint can increase drying time. NON-USE, STORAGE, AND MOVING CARE Install and store your dryer where it will not freeze. Because some water may stay in the hose, freezing can damage your dryer. If storing or moving your dryer during freezing weather, winterize it. To clean: Non-Use or Storage Care 1.
SPECIAL INSTRUCTIONS FOR STEAM MODELS Water Inlet Hose Replace inlet hose and hose screen after 5 years of use to reduce the risk of hose failure. Periodically inspect and replace inlet hose if bulges, kinks, cuts, wear, or leaks are found. When replacing your inlet hose, record the date of replacement. To Winterize the Dryer 1. Unplug dryer or disconnect power. 2. Shut off water faucet. 3. Disconnect water inlet hose from faucet and drain. To Use the Dryer Again 1. Flush water pipes.
TROUBLESHOOTING First try the solutions suggested here or visit our website at www.whirlpool.com/help for assistance and to possibly avoid a service call. If you experience Solution Possible Causes Dryer Operation Door not closed completely. Make sure the dryer door is closed completely. START/PAUSE button not pressed firmly or held long enough. Press and hold the START/PAUSE button 2-5 seconds. Household fuse is blown or circuit breaker has tripped.
TROUBLESHOOTING First try the solutions suggested here or visit our website at www.whirlpool.com/help for assistance and to possibly avoid a service call. If you experience Possible Causes Solution Dryer Results (cont.) The load is too large and heavy to dry quickly. Separate the load to tumble freely. Dryer sheets are blocking the grille. The air outlet grille is just inside the door, behind the lint screen. Check that it is not blocked by a dryer sheet.
First try the solutions suggested here or visit our website at www.whirlpool.com/help for assistance and to possibly avoid a service call. If you experience Possible Causes Solution Dryer Results (cont.) Odors Load too hot Recent painting, staining, or varnishing in the area where your dryer is located. Ventilate the area. When the odors or fumes are gone from the area, rewash and dry the clothing. For steam cycles, the water is not properly connected with the dryer.
WHIRLPOOL CORPORATION LAUNDRY WARRANTY LIMITED WARRANTY For one year from the date of purchase, when this major appliance is operated and maintained according to instructions attached to or furnished with the product, Whirlpool Corporation or Whirlpool Canada LP (hereafter “Whirlpool”) will pay for Factory Specified Parts and repair labor to correct defects in materials or workmanship that existed when this major appliance was purchased. Service must be provided by a Whirlpool designated service company.
NOTES • REMARQUES 39
AssistAnce or service Before calling for assistance or service, please check “Troubleshooting” or visit www.whirlpool.com/help. It may save you the cost of a service call. If you still need help, follow the instructions below. When calling, please know the purchase date and the complete model and serial number of your appliance. This information will help us to better respond to your request. If you need replacement parts or to order accessories We recommend that you use only FSP® Factory Specified Parts.