
Installation Guide


3
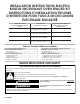
Minimum Installation Clearances
For proper installation, the following minimum clearances
must exist above and below the cabinet opening.
Installation Above Single Built-In Oven
A. Upper cabinet
B. Lower single oven
INSTALLATION INSTRUCTIONS
Assemble Spacer Kit
1. Attach bottom vent to spacer bars using four ³⁄
8
" hex washer
head screws.
NOTE: Spacer bar flanges should be facing out.
A. Bottom vent
B. Spacer bar flange
C. Spacer bars
D. ³⁄
8
" hex washer head screws
Install Spacer Kit
1. Center assembled microwave oven spacer kit against lower,
front edge of the cabinet cutout.
2. Using an ¹⁄
8
" (3.2 mm) drill bit, drill through the mounting
holes in the spacer bars to create pilot holes.
3. Attach the assembled spacer kit to the cabinet using four ¾"
pan head screws provided. Do not overtighten screws.
A. ¾" pan head screws
B. Spacer kit assembly
Install Microwave Oven
Follow the instructions below along with the instructions in the
Electric Built-In Microwave Oven Installation Instructions.
Read the “Electrical Requirements” and “Electrical Connection”
sections along with all other sections of the Installation
Instructions before installing the microwave oven.
1. Using 2 or more people, lift microwave oven partially into
cabinet cutout above spacer kit and place microwave oven
in between spacer bar flanges.
NOTE: Open microwave oven door and push against
seal area of microwave oven front frame when pushing
microwave oven into cabinet. Do not push against
outside edges.
1"
(2.5 cm)
1"
(2.5 cm)
fr
om top
of oven
A
B
A
B
C
D
D
A
B
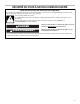
WARNING
Excessive Weight Hazard
Use two or more people to move and install
microwave oven.
Failure to do so can result in back or other injury.