
Installation Guide


10
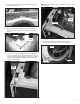
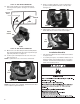
FIGURE 5
PRESSURE
TAP PLUG
GAS
VALVE
BODY
SIDE
VIEW
HOLE
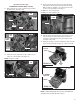
22. If any bubbles are present, turn off gas supply, tighten the
leaking connection and retest for leaks.
23. If dryer was moved during conversion, use the same
method to check for leaks in the exible gas supply line
and ttings between the dryer and the gas supply pipe.
24. If any bubbles are present, tighten the leaking connection
and retest for leaks.
NOTE: Replace exible gas supply line if bubbles are present
on supply line.
25. If no bubbles are present reinstall hole plug to side panel
and unplug dryer.
Leak Check
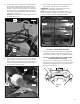
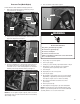
16. With front panel removed, brush or spray an approved
non-corrosive leak detection solution onto pressure
tap plug.
17. Reassemble dryer in reverse order as described in
steps 4-12.
18. Turn on gas supply.
19. Plug in dryer or reconnect power.
20. Set dryer cycle to time dry, high heat and turn on dryer.
21. View through the hole on the right side panel inspecting
for leaks indicated by growing bubbles. See Figure 5.
Completing the Conversion
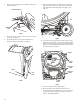
1. Check to assure all components are attached securely in
place and lter has been installed to dryer.
2. Reattach dryer top or top & console assembly (depending
on application). If dryer was moved from its original position,
reposition dryer to its location.
3. Plug in dryer or reconnect power.
4. Check that dryer is working properly by:
• Turn on dryer.
• Run on high heat for 5 minutes.
• Check for heat in drum.