
Installation Guide


5
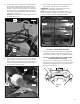
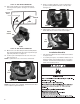
20. To gain further access to the burner assembly the drum
will need to be removed. Before removing drum from
dryer the CCU & bracket assembly must be secured in
position to side panel using the plastic hook attached to
the main harness. This will allow the CCU assembly to
hang in place rather than dropping down when the drum
is removed. See Figure 16.
NOTE: Only on models with the CCU Bracket located on
the right side of the unit.
FIGURE 16
HOOK -
PLASTIC
SIDE PANEL
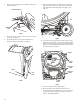
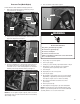
21. Remove drum from dryer by rst reaching into dryer just
under the drum, to back side of drive motor. Grasp idler
pulley and lift up to relieve tension from belt and remove
belt from motor pulley and idler pulley. Refer to Figure 17
for belt removal and reassembly.
FIGURE 17
IDLER
PULLEY
DRYER
DRUM
DRIVE
MOTOR
DRUM
BELT
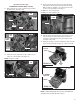
22. Remove drum from dryer by grasping the drum belt and
front of drum and slide drum out of cabinet front.
IMPORTANT: Note position of drum belt, front and rear
orientation for reassembly. See Figure 18.
NOTE: When removing drum from cabinet be sure not to hit
the CCU & bracket assembly knocking it from its hanging
position. Continue to Step 23 “Changing the Orice.”
FIGURE 18
FRONT
REAR
DRUM BELT
CCU
BRACKET
SECTION 2 - DRYERS WITH TOE PANEL
5. Remove toe panel. On some models, a small at-head
screwdriver is required to release the clips at the top of
the toe panel. Continue to Step 23 “Changing the Orice.”
SPRING CLIPS
FIGURE 1
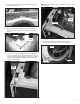
5. Lift dryer top. Use a putty knife to press against the left
and right spring clips to release them from the top. Gently
lean dryer top toward the wall so as not to damage the
dryer top or wall. See Figure 1.
SECTION 3 - DRYERS WITH A FULL-FRONT PANEL
AND REAR MOUNTED CONSOLE