
Installation Guide


6
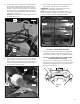
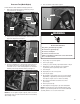
FIGURE 3
HANGER
FRONT
PANEL
7. Disconnect the door switch connector from the harness
connector. See Figure 2.
8. Lift the front panel, unhook it from the bottom two
hangers and remove the panel. See Figure 3.
9. Reach around the back of the drive motor and push the
idler wheel arm to relieve the spring tension on the belt,
then slide the belt off the idler and motor pulleys. See
Figure 4.
FIGURE 4
BELT
TOP TWO (2)
SCREWS
FIGURE 5
10. Loosen the top two (2) hex-head screws and remove the
bottom two (2) hex-head screws from the front bulkhead.
Remove the lower two (2) screws from the blower air duct.
Gently remove the bulkhead and blower air duct from the
front of the dryer. See Figure 5.
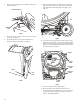
11. Remove the drum from the dryer cabinet.
12. Disconnect ignitor wires from harness then remove
the burner tube by removing the two (2) screws securing
it to the burner base. See Figure 19B, then continue to
Step 23 “Changing the Orice”.
BOTTOM TWO (2)
SCREWS
LOWER TWO (2)
SCREWS
BULKHEAD
BLOWER
AIR DUCT
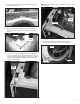
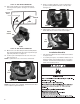
FIGURE 2
DOOR SWITCH CONNECTOR
CABINET FRONT
SCREW
6. Remove two (2) hex head screws from the cabinet front
panel. See Figure 2.